Airgun Workshop filling PCPs part 2
-
385
 Comments
- Last updated: 19/12/2016


Last month we looked at the safety aspects of compressed air cylinders and their testing requirements. The pneumatic air rifle that you use also has a compressed air cylinder fitted to it of course. This holds less air than your filling cylinder, but has to safely contain the same high pressure – usually in excess of 2000psi!
It’s not just the cylinders that are subject to these high pressures. When the actual filling or charging is taking place, the filling line and its fittings are also under the same stresses. It is very important therefore, to ensure that the fittings and connecters are kept in good order and regularly inspected for wear or damage. It is also important to have a ‘filling procedure’, so that you don’t put yourself or anyone near you in danger should an accident occur. These are some of the things we will look at this month, starting with some of the combinations of connector types for rifle and cylinder.
It isn’t always so important to know about the many different types of fillers there are, because when you purchase your first PCP it will probably come complete with a filling connector/adaptor in the price. It’s likely that you will buy a compatible air pressure gauge, hose and cylinder at the same time. So as long as all your connecters fit together you are in business?
The time may come however, when you wish to add another PCP and this one may have different fittings to what you already have. Usually, the purchase of an adapter or two will overcome any fitting problems, which may involve replacing an existing adapter from the main filling cylinder with one of a different type.
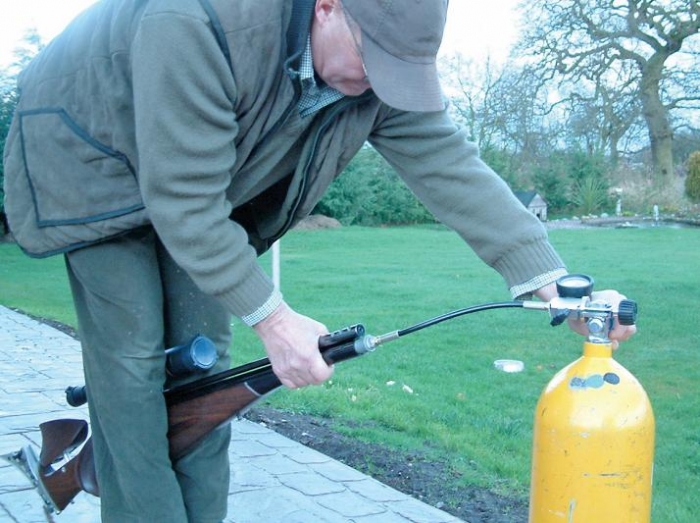
I use a Sportsmatch GC2 rifle which has a snap-on, quick-fill connector in the end of the rifle’s air cylinder. This accommodates the female snap-on connector on my fill line, which incorporates the gauge and a ‘yoke’ type clamp that fits over the main valve on the filling cylinder. This is often referred to as a ‘D-clamp’.
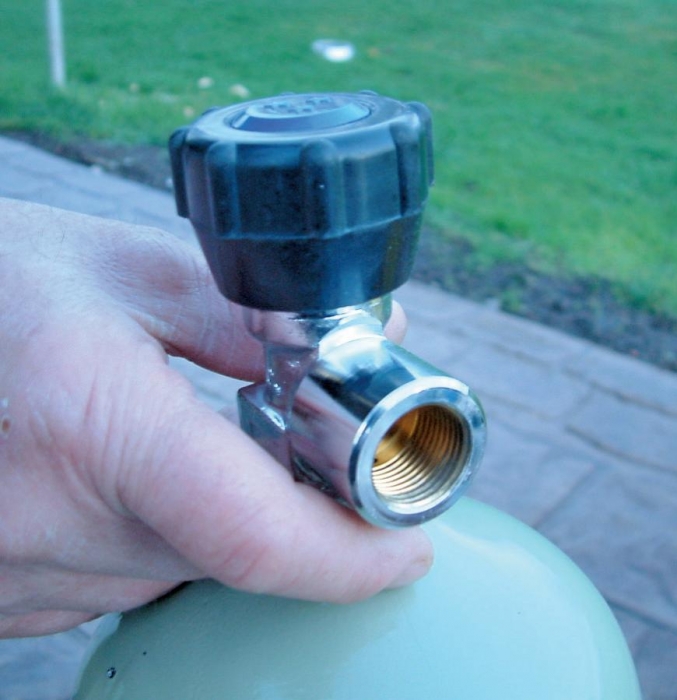
Some filling cylinders will have a pillar valve that can incorporate the gauge as well. The fill line then screws directly into it. In my case, the problem arises when I want to fill my BSA Super-TEN which uses the ‘buddy bottle’ system. In this case, the rifle’s air cylinder is unscrewed and has to be connected to the main filling cylinder to be charged up. An adapter is supplied with the rifle and has to be screwed on to the D-clamp to allow filling.
Fortunately, the Super TEN will give a lot of shots per fill, and as it is used on vermin shoots only, that fill will last a good few trips. A tip here; when having to screw fitting on and off the main cylinder is to have a roll of plumbers tape (P.T.F.E.) handy. You will find that without it a leak-proof seal is hard to obtain. As fast as you try to put air into the cylinder it will leak under the tremendous pressure. Go easy with the tape, making sure that bits don’t tear off and get into the valve inlets.
Quick fill (QF) adapters that snap on at the rifle end can also come in different sizes, so if you are purchasing one separately, make sure that it’s correct. Some older PCPs, such as those from Titan and Falcon, use a basic threaded male valve on the end of the fixed cylinder; these work fine but are a bit more fiddly to connect and require the use of a spanner to make a good seal. Best Fittings sell upgrade adaptors and these, once fitted, make charging much simpler! A male quick fill fitting is screwed onto the valve and sealed with a washer and the rifle can then be filled using a snap on female fitting. A valve cover is included and at only £22.50, it’s a bargain.
Another example of a QF system is the ‘push-fit’ type, utilising a couple of O-rings on the male end of a probe; the Career, BSA, Evanix and FX range of rifles uses this method (they’re not the same though!). The prod pushes directly into a socket on the rifle’s air reservoir and creates a seal. This works very well provided that the O-rings are kept in good order. A smear of grease wiped around the rings will help make a good positive seal and prevent damage; BSA even supply a sachet of suitable grease with their PCPs.
Compressed air needs to be treated with respect, particularly at the pressures we use for filling PCPs. Under no circumstances use oil of any type! This could cause combustion during the charging process with obvious results. An occasional slight smear of silicon grease will keep the O-rings in good order.
Most of the compressed air used at garages (for tyre inflating) has pressures up to maybe 150psi or thereabouts. Even at these relatively low pressures, misuse can result in serious injury.
It takes only 12psi to ‘pop’ an eyeball from its socket! A close blast of air (4”) at around 40psi can rupture an eardrum or cause a brain haemorrhage! Editor’s note: who measured them?
Now think about the pressures that we are regularly dealing with. Over and above 2000psi! A blast of compressed air can enter the body, particularly through the navel, and rupture the intestines. It can do this through a good layer of clothing. It can enter the blood stream directly through the skin and cause air bubbles (embolisms) that can prove deadly. Many of us have heard of divers suffering from ‘the bends’ (nitrogen in the blood). This is exactly the same scenario. You don’t have to be a deep sea diver - just buy a compressed air cylinder and show no respect for what it contains!
Yet used correctly, compressed air is a very safe power source - but please remember: don’t fool around with it! Each time you fill your rifle cylinder from the main filling cylinder, be it a fixed one or a ‘buddy bottle’ type, you are equalizing the pressure between the two cylinders.
Filling an empty rifle cylinder from a cylinder with 3000psi of pressure in it will result in a balanced pressure of approximately 2950psi. Some pressure is usually present in the various valves and connectors. The next time you fill from the main cylinder this pressure will have dropped to maybe 2900psi (because you’ve used some of the air to fire the rifle) resulting in a few less shots for that charge, and so on until it becomes necessary to get the main cylinder re-filled. How often that is depends on a number of factors;
The capacity and pressure of the main cylinder: i.e. 8litres-12litres-15litres etc. at 232bar (3200psi) or 300bar (4100psi) etc
The capacity of the rifle cylinder
The working pressure of the rifle system
The efficiency of the rifle system (especially if a regulator is fitted) All these factors and variances between systems will produce different results.
Another thing to consider when filling the rifle or buddy bottle is the actual filling rate. Compressed air passing from one vessel to another creates heat, which can actually be felt on the rifle cylinder. This is why it is important to only use a silicone-based lubricant on fittings and O-rings. Normal oil-based lubricants could ignite, causing untold damage to your pride and joy and probably to you as well.
This heat can be kept to a minimum by careful filling and it will also increase the life of the various seals in the valving system on the rifle. The advisory fill rate for diving cylinders is between 300-600psi per minute. Considering that our rifle cylinders are much smaller than your average diving cylinder, we should be taking this advice on board.
Just connecting the line to an empty rifle and whacking the valve open could be potentially dangerous, apart from causing stress to the valve system of the rifle and eventual premature metal fatigue of the main cylinder due to expansion/contraction. By filling slowly you will get the maximum shots to charge ratio from your combination, with less pressure being lost through heat transfer.
One thing I haven’t mentioned concerning the filling of a cylinder is the blow off, or ‘bleed’ port. Once the rifle pressure has been equalised with the filling cylinder and the valve closed, there remains a balance of air in the filling hose that connects the two. This is also at the same high pressure as the rest of the system and before attempting to disconnect any fitting it needs to be released, thereby severing the physical pressure between the two cylinders. It is unlikely that you would be able to disconnect a fitting while this pressure is present anyway, but don’t even attempt it!
The bleed valve will be situated on the block of the gauge clamp or on the main pillar of the filling cylinder. It can be either a button type release valve or a screw type. In the case of the former, it’s important to keep fingers away from the exit hole as the button is pressed. In effect it’s a dump valve and it releases the trapped pressure all at once in a sharp blast. There is no way of controlling the release. The screw type, on the other hand, gives the operator a certain amount of control and it can be opened slowly, to my way of thinking it’s much safer!
Buddy bottles are filled slightly differently and are connected directly to the filling cylinder; therefore they require a different technique to release them after filling. After closing the valve on the filling cylinder, the bottle is grasped firmly and unscrewed slightly. This operates a release valve inside the nozzle of the bottle, allowing the trapped air between the two cylinders to bleed off. Once again, this should be done carefully, allowing a slow release of pressure.
All fittings and threads should be regularly inspected for damage or dirt. The threaded joints on our high pressure system are the weakest points in the chain. However, provided the rifle tube is in good condition and is subject to pressure checks once in a while to confirm it; it is only these threaded joints that could ‘let go’ should there be a problem with the fitting. It is because of this possibility that a safe method of filling should be adopted. In the event of a problem arising, you can confine the damage to the equipment and leave your equipment intact!
Use only ‘dry’ compressed air from a specialised source (usually a diving shop or an industrial gasses company that supply fire brigades, mines, etc.) There are now highpressure compressors available for use at home and these have bleed systems that prevent moisture entering the rifle. PCP stirrup pumps also have a similar system.
When filling, make sure that the rifle is pointed away from people, yourself included, in case of thread failure on the rifle or main filling cylinder. It could become a guided missile!
Avoid standing directly over the main cylinder or rifle. In the event of a burst you will be first in the firing line. Do not hold the rifle between your legs when filling… for at least two obvious reasons. Remember that compressed air at these pressures can penetrate clothing and enter the blood stream with fatal results.
Fill slowly to preserve O-rings and prevent excessive heat build up. Release pressure slowly if possible. Keep your fingers away from release valves.
Always rest the butt end of your rifle on something solid. Stand to one side of the rifle allowing it to swing over, scope down towards the ground. This is its natural position when leaned from the vertical.
Stand half a step away after connecting the hose and gently open the valve on the main filling cylinder. The gauge will normally ‘click’ and just before starting to rise, and will show the actual pressure left inside the rifle.
Do not stand over the tube or directly in line with the end of the rifle. Do not lean over the top of the filling cylinder. It is particularly important for those using rifles that have built in pressure gauges on the end of the cylinder to avoid pointing the end of the rifle at the face. Use the pressure gauge on the filler hose when charging. The one that may be fitted to the rifle is there to use as a guide as to what is left in the rifle, not to be used as a filling measure.
When the filler hose gauge has reached the required pressure, close off the main valve on the filling cylinder. Make sure that you know which way you are turning it to close! Once shut, release the excess air from the lines, taking care to keep fingers away from the blow off valve exit in the case of the dump valve type mentioned earlier. The rifle can now be uncoupled from the connector line.
Never pick up the filling cylinder with the filling clamp. This will put strain on the threaded portion of the cylinder and weaken the already weakest link in the chain.
Regularly inspect the condition of all threads and hoses. Look for signs of dirt or cross threading. Any damage will make the fitting unsafe. Hoses should be checked for cracking or fraying and replaced if found defective.
Use only silicon grease on fittings and O-rings. No Oil!
Where possible, read the manufacturers safety instructions and take them seriously. It’s all part of shooting safely.
All this may sound complicated and risky but in reality, provided common sense and a little knowledge of what you are dealing with is used, this relatively trouble free type of rifle power can be handled perfectly safely. Many shooters have been using this system for decades now, myself included, without any major catastrophe at all.
May it continue that way for all PCP owners.

click on image to enlarge

click on image to enlarge
click on image to enlarge

click on image to enlarge
click on image to enlarge


