
Bushcraft: Simple Tarpology
- By John Fenna
-
377
 Comments
- Last updated: 01/02/2017


If you find a bunch of bushcrafters camping out in the woods, their shelters may range from natural ‘debris’ shelters, through to large tents, but the most common form of shelter you can expect to see is the humble ‘tarp’.
Now, tarps come in all sizes. I, for instance have used commercial tarps as big as 14- x 9-metres and as small as 1.6- x 2.45-metres. However, the most commonly used sizes seem to be 4- x 3-metres or 3- x 3-metres and the most common materials are waterproofed nylon or a cotton canvas. The nylon is a lot lighter!
There are several benefits to using a tarp: it is much easier and quicker to make a weather-proof shelter with a tarp than it is to build a really good natural shelter. A tarp can give a less enclosed shelter than a tent and thereby get you closer to nature. A tarp is easy to use with a hammock if you are a ‘dangler’. A tarp can be lighter than a tent, giving the same occupation space. Above all, a tarp is superbly versatile and can be pitched in a whole host of different ways to fill your shelter needs, wants and desires in the very changeable conditions you find in the British countryside.
Of all the various sized tarps available, I tend to go for a 4- x 3-metre model, and as I try to avoid too much synthetic fabric and materials in my bushcraft set-up, I prefer to use cotton canvas. I even use a lightweight cotton cambric one I made myself over nylon equivalents. Cotton canvas also appears to be more spark resistant than nylon, a useful point to note if you have a sparky fire!
If I want to go very lightweight, or want to use a very big tarp, I will go with synthetics. I am not so much of a naturals fan as to ignore the fact that proofed nylon is lightweight and waterproof and a good choice of fabric for a tarp!
I tend not to carry bivvi poles and tent pegs or extendable hiking poles with me, relying more on finding trees, branches and fallen wood to build my shelters around, but I do carry paracord or natural fibre cordage for guys and ridge lines and have come to love bungie hooks as quick and easy guys! I like to add some sort of elastic element into my guys in windy weather, as it takes pressure off the guy and fabric, pressure that can cause the tarp to rip in really gusty conditions. If I need tent pegs I tend to cut them on-site if I can.
I like to carry a number of carabiner clips and prussic loops to help simplify attaching my tarp to a ridgeline. The clips are small lightweight ones and the prussic loops made from a cord a bit thinner than the ridgeline cord. If you have not come across them before, a prussic loop is a simple loop of cord that you drape over the ridge line and back through itself a couple of times. This forms a friction knot that, when under load, will lock immovably, but will slide easily when the load is removed. Great for tensioning a tarp.
I also carry a few loops of cord to act as drip lines. Rain will run down a ridge line and into a tarp shelter, but if you attach a couple of drip lines where the water can run off the ridge line, it will seek the quickest way to run downhill and follow the drip line to drip onto the ground outside your shelter.
If you want to add guyng points anywhere on a tarp, use the ‘nut trick’. Tuck a nut/pine cone/pebble into the fabric, twist the fabric around the nut to form a neck and attach the guyline with a clove hitch around the neck. The nut stops the line coming off. Keep it simple!
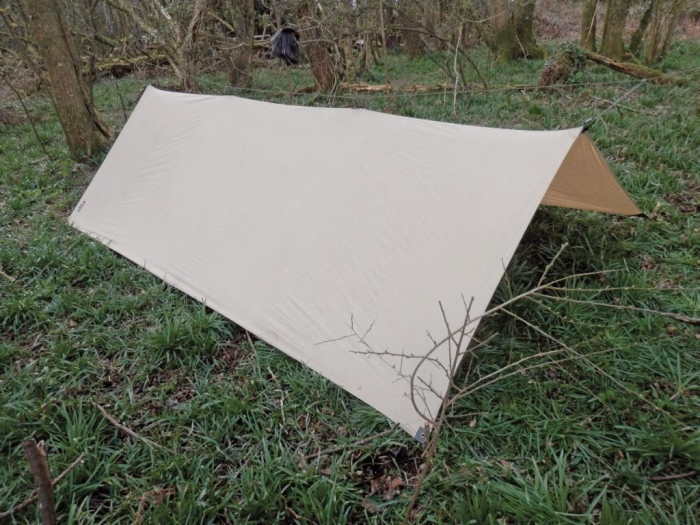
The simplest form of tarp shelter is probably the ‘lean-to’, where one edge of the tarp is pegged to the ground (usually one of the long edges if you are using an oblong, not square, tarp) and either the opposite edge is clipped onto a ridge line, or the two corners guyed to hold the tarp taut at somewhere around a 45-degree angle. In windy weather, guying the centre of the tarp out reduces wind flap. A lean-to can give great shelter from the weather, but can need re-siting if the wind changes!
The next simplest tarp shelter is the ‘ridge’. Here you clip the hanging loops (found on most tarps) of the centre line of the tarp onto a ridge line, tensioning it with prussics and pegging the two sides down to give a simple, but very effective double-sided roof shelter.
The ridge is also one of the types of shelter that can be adapted to form slight variations. If you pitch it high and guy the edges out rather than pegging them to the ground, the ‘flying ridge’ is the standard shelter for using over a hammock. You can close one end of the ridge (easiest with an oblong rather than square tarp) by not clipping in the last ridge loop to the ridge line and pegging
the end of the tarp to the ground to form a ‘closed ridge’, or by attaching the tarp to the ridge line, not at the centre line but by attachment points halfway between the centre line and one side to form an ‘asymmetric ridge’ with the long edge either pegged or guyed out to form a ‘flying asymmetric ridge’. The more attachment points your tarp has, the more variants you can dream up!
The ‘diamond’ is a tarp pitch that works well with oblong or square tarps. Attach one corner of the tarp to a tree or pole and peg the other corners to the ground to give a large area of shelter. Guy out the centre point to save it sagging too much, If you only peg out one of the side corners and fold the other in to give a vertical back wall and a bit of groundsheet cover you have a ‘half diamond’ shelter, while if you pitch the diamond with both ends raised, you form a ‘diamond ridge’ shelter, and if you make the diamond ridge high (usually clipped to a ridge line) you have a ‘flying diamond’ shelter, which is also a favourite among hammock dwellers.
Another useful ‘flying’ tarp shelter is the ‘flying roof’ or ‘flying pyramid’, best made from a large square tarp for covering a communal or work area. For this, clip the centre of the tarp to a high ridge line (or high line) and guy out all four sides. This is the same method I use for a parachute shelter using an army surplus ‘mushroom’ parachute instead of a tarp.
A ‘ground dwelling’ tarp pitch that gives great stability and weather-resistance and which works well with both oblong and square tarps, is the ‘wedge’. For this pitch, you guy the centre of one side (a long side for an oblong tarp) to a tree or pole and peg down the other three sides with the centre of the tarp guyed out in the other direction. The back of the tarp should face into the weather. If you ever need to guy out to a high point and there is no convenient tree, you can use a guy pole or even ‘sheerlegs’ or a tripod.
A guy pole is simply a single pole of the necessary height to which you run your guy line. To stop the pole falling over, you lean the top a little way from your shelter and then use two guys at around 45-degrees to hold the pole secure. Sheerlegs are two poles lashed together at one end and spread to form an unequal cross. With the lashing and short end of the cross at the top, stand them up and run your guy over the cross and down to the ground. Lean the sheerlegs away from your shelter for a stable, high guying point. With a tripod, position the tripod with one leg pointing at your shelter, run your guy over the top and then peg it down securely.
Whatever style you choose to make your tarp shelter, you’ll probably use a different one next time you venture out into the woods!

click on image to enlarge

click on image to enlarge

click on image to enlarge

click on image to enlarge
click on image to enlarge

click on image to enlarge

click on image to enlarge

click on image to enlarge

click on image to enlarge


 Folding Lock Knife")
