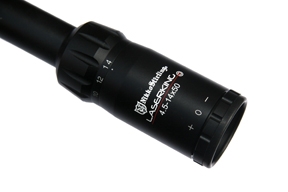
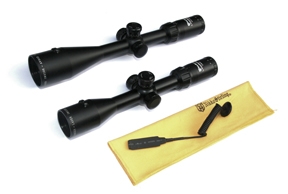
Nikko Stirling Laserking 3 – 9 X 42 vs. 4.5 – 14 X 50
-
8
 Comments
- Last updated: 14/12/2016


Fixed Parallax
These scopes are going to appeal mostly to airgun hunters and offer a fixed parallax of 75-80yds which is a tad long, but pretty much the norm for most airgun optics. Unlike true laser rangefinder scopes the Laserking offers a visual light beam that can be used for both basic rangefinding and point and shoot duties.
In the former case the scope is zeroed then the laser adjusted to hit the cross hairs at your chosen distance. However, as the projector is positioned inside the objective and only slightly above the sight line, the first consideration is the degree of difference the dot shows at longer ranges isn’t as much as it would be if the unit were externally mounted high or low in relation to the bore. However, the system is usable and I feel it’s a big step forward, but only for certain hunting situations - so the Laserkings are certainly specialised optics.
A standard, Mil-Dot reticule is used in the 2nd focal plane, so no real surprises here. However, its ladder-type design is useful as it offers a number of range and windage markers that can be pre-determined for your needs.
Target-Style, Why?
The build goes for a 1”, one-piece body tube; regardless of model with a long/slotted magnification ring and fast focus eyepiece. Turrets are target-style being un-capped and easy to adjust. Click value is ¼ MOA @ 100 yards with both models dialling positively. You get 60-clicks per turn and unusually the 3-9x42 offers 6 ½ full revolutions, whilst the 4.5 -14 X 50 only gives 4 ½ for both elevation and windage.
The elevation drum is sub-divided into 15-sections, each one being further divided into four. Windage is split with 7 ½ each way, making it easier to wind in a correction. On the fixed section is a scale to allow you to see ‘where you are’ in adjustment. Typically the drums can be slipped to 0 after zeroing by undoing the slot head screw in the top. Overall an effective build, but there is the consideration that an un-capped design such as this could get knocked off zero accidently. OK you might check your dials before you shoot, but the chances are you won’t… To be honest target features of this nature are not needed on what is primarily a hunting scope!
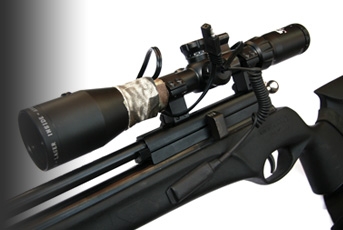
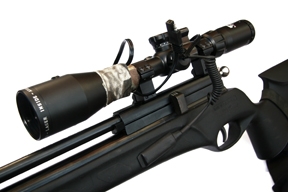
On the left of the saddle is the ON/OFF switch for the laser, which also incorporates the battery housing. Since Pete’s test, Nikko have added a remote pressure switch, which can be stock-mounted and I reckon this is the better option too.
Moving forward to the objective bell we can see the two, cross-shaped adjusters for the laser sitting on top. They are clearly marked with arrows to show directions and easily turned by hand, also far enough back to allow the fitting of a flip-up lens cover. The projector is positioned at 12 o’clock, inside the lens, clever is the fact that the adjuster in the centre is for elevation, whilst the one slightly to the right is for windage correction, so easy to remember which is which!
Easy As Pie
Anyone familiar with lasers will know setting them can often be fiddly, but these are the easiest I’ve ever used. In use the adjusters work just as the elevation and windage turrets do on a traditional scope.
The laser is a 5mW unit and runs off a CR2032 3V Lithium cell. The integral drum/battery housing is marked ON/OFF and it takes 1/16th-turn to do the job. Included in the package are a spare battery and a remote pressure pad switch. This then allows a stock-mounted, press ON facility, which is quicker and more practical than having to turn the drum. The remote replaces the battery cover though the drum needs to be set to the ON position, which will now only activate when you dab the pad.
So what do I think? Though the Laserkings are well built, give good light transmission and ease of use I feel the difference in laser over bore distance though enough for close range accuracy is a bit different from an externally mounted laser. However, the set up is now much less cluttered.
The Mil-Dot reticule is useful as I have detailed. In general the laser is best viewed at low magnification as it makes it less blurred, small, and therefore more useable. The 3 – 9 X 42 is going to be a hit with rat and feral pigeon shooters where the dot aids fast target acquisition and reactions.
As for the 4.5 – 14 X 50, the specification itself I’m sure will have shooters realise this is a more versatile optic and the fact I’ve now been using this exclusively for lamping recently says a lot! Kept on its lowest magnification I get a good field of view, no blurring of the dot and enough height of laser above the cross hair to aid me in rangefinding.
For: A clever integration of a scope and laser
Against: Target turrets are not a good feature on a hunting scope
Verdict: A clever idea that will doubtless appeal to the airgun hunter
PRICE: £139 / £174
click on image to enlarge
click on image to enlarge

click on image to enlarge
click on image to enlarge

click on image to enlarge
click on image to enlarge

click on image to enlarge


