Muzzle Loading Revolvers Part 3
-
2
 Comments
- Last updated: 24/04/2017


Hopefully you’ve read the first two parts of this series and been tempted or persuaded to dip your toe into the murky waters of black powder revolver shooting. Perhaps you’ve had a chance to shoot one or more examples of the vast array of guns available. If you decided to take the plunge after part one of the series, then maybe your firearms licensing department has already processed your variation and you have your own revolver.
If so, welcome to a fascinating and challenging aspect of shooting. Whatever stage of the process you are at, you will doubtless have heard that black powder guns are ‘a pig to clean’ or ‘it takes an age to clean them’. They are not difficult to clean but, yes, it does take a little longer than your old Smith & Wesson 686. If you were not a cartridge handgun shooter, then you have nothing to compare it with, so just take it as the norm.
If you have an interest in American history, then it is quite probable that you have seen, handled or even owned original 19th century examples of the reproduction percussion revolvers that we have access to today. Many of the old guns will have seen more use than a modern version will ever get and often with the very minimum of maintenance. Many thousands of these guns, particularly the Colt Model 1860 or the Remington New Model Army, will have seen service in the American Civil War, yet it is possible to find good clean examples that would still give years of sterling service.
They may not be quite as attractive to look at as when they were new, but mechanically they still have a lot of life left in them. During such conflicts your life could depend on having a serviceable revolver, so skimping on the cleaning was not really an option, even if it meant something else being missed.
Given that there were no ‘magic’ cleaning fluids around at the time, and that during the rigours of a long campaign even hot water would often be a luxury, the negative comments on the difficulty of cleaning do not really hold up. I have read on more than one occasion that urine would be used for a quick clean in the absence of any alternative. I do not advocate that you use this method at your gun club! It does, however, go to show that your revolver could be kept in reliable working order with the minimum of equipment.
I recall one guy who used nothing more than boiling water and a couple of brushes. The water got rid of the fouling and he claimed that the metal got so hot with the water that it dried out unaided. A wipe over with an oily rag and he was done. Another shooter said he never cleaned inside the cylinder chambers. As soon as he was finished shooting he loaded up – minus caps - ready for next time. Not sure I would condone this method!
You will probably have been warned that ‘black powder is corrosive’. The powder in itself is not corrosive but the residue left behind after shooting attracts moisture and, as it contains salts, this is where the problem can arise. It is therefore important that your cleaning is thorough, making sure that every little nook and cranny is spotless. During the winter months in particular it is imperative that you attend to the cleaning as soon as possible after shooting.
There are a number of cleaning solutions on the market and each shooter will have their preference as to which one is best. Talk to fellow black powder shooters for their opinions, try them for yourself and find which best suits your needs. Whichever method you choose, hot water and washing up liquid or dedicated cleaning solution, it pays to get into a routine that ensures every part of the gun is cleaned. To accomplish this, we need to take the gun apart first.
My first step is to remove the cylinder and take out the nipples, all of which are dropped into a bowl of boiling water containing a little washing up liquid. This will soften the fouling while I attend to the rest of the pistol. The Colt-type revolvers are the easiest to clean, stripping into three main components as they do. A bronze brush dipped into the above-mentioned bowl will scrub the bore clean very quickly, unless the gun has been left for some time. Even then, boiling water proves to be very successful at getting rid of fouling. During the summer months I have left a pistol for a couple of days without attention but still been able to get it back to pristine condition. During damp weather this kind of attitude could prove to be very costly. Let’s put it this way; don’t put it away dirty in a cold loft in a cold steel gun box and expect it to be in the same condition when you pull it out
The areas around the forcing cone (section of the barrel directly in front of the cylinder face) and frame can be cleaned using an old toothbrush and cotton buds, again with hot soapy water. Pay attention to the loading lever and its mechanism. The hammer and its recess in the frame get the same attention. If you are using the water method, try to see that none gets into the trigger mechanism through the locking bolt slot! As can be imagined, and unless you strip the mechanism down, those small steel parts will start to corrode very quickly.
Wooden tooth pics or plastic scribes can get into the tight angles. Using stainless dental scribes runs the risk of scratching the gun. When you are happy that you have removed all the dirt, make sure that the parts are dried completely. Dusters won’t always get into the tight spots, so a hair drier is a useful tool (get permission first unless you have your own!), as is a can of compressed air.
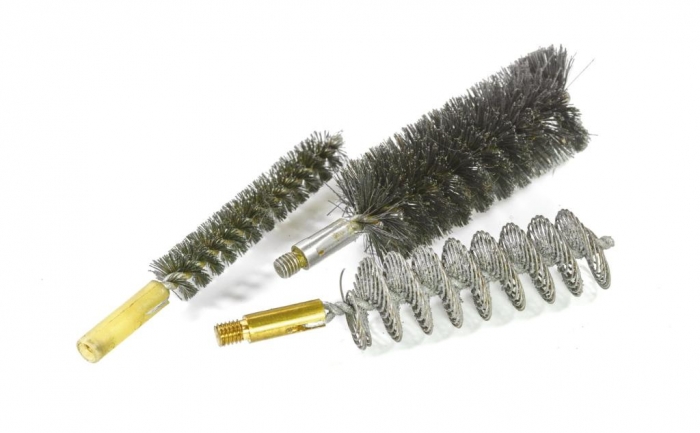
Turning to the cylinder and nipples, you will find that by this time a lot of the fouling has come off in the bowl and the rest brushes off very easily. The toothbrush cleans around the nipple recesses and ratchet at the rear, along with the front face and the nipples themselves. That little bit of wire that you’ve had in your toolbox for years can be used to clean the flash holes. I use a bronze brush for the chambers. I find that if I flatten the loop at the end of the brush, when it is inserted into the chamber it will protrude through the nipple hole, enabling the bristles to reach to the base of the chamber.
Once again it is imperative that everything is dried completely. A tiny dab of oil on the nipple threads before replacing ensures they will come out easily next time. When, and only when, you are one hundred per cent sure that everything is clean and dry, reassemble the revolver. Run an oiled patch through the barrel, put a couple of drops of oil on the cylinder arbour (pin that the cylinder rotate around), in the base of the hammer slot and into the locking bolt slot. Wipe over with an oily rag and put away until next time. Should you wish to use one of the commercial cleaners on the market then just substitute that for the boiling water; cleaning time will be the same!
I would advise that as soon after purchase as possible that you become thoroughly acquainted with every aspect of your chosen pistol. Sooner or later you are going to have to take it to pieces, or pay someone else, to clean the crud from the innards or to replace a part that has broken because you did not clean it.
The vast majority of today’s reproduction revolvers come with some kind of instructions that include a parts diagram to help in this process. If you buy the gun second hand, then the diagram will possibly be on the manufacturer’s web site. So your first bit of kit after the cleaning materials should be a couple of good screwdrivers. Don’t skimp on these; you probably only need two and a quality driver will pay for itself in the long run. Buy the hollow ground type, as I have found that many screws in the Italian guns are nipped up very tightly at the factory and a badly fitting driver will easily slip out of the screw slot and leave a nice scratch in that lovely blue finish. Another advantage of the hollow ground blade is that many of the screws are quite soft and are easily damaged with an ill-fitting driver.
Regardless of how often you shoot the revolver, it should have periodical strip downs, taking out every screw and the trigger mechanism. You may be surprised at where the fouling reaches. Clean the innards in the same way as the rest and add a dab of oil before reassembly.
You will probably clean your revolver in not much more time than it took to read this article. Done properly it will preserve it for many years; careless cleaning might see you replacing parts or, in the worst scenario, the gun itself. If you have put off buying a revolver until you read all three parts of this series, I hope I have convinced you that black powder revolver shooting is not nearly as unpleasant or difficult as it is often made out. If I have, Welcome to the Dark Side!
click on image to enlarge

click on image to enlarge

click on image to enlarge

click on image to enlarge

click on image to enlarge

click on image to enlarge

click on image to enlarge

click on image to enlarge


