Tuning The Remington Express Part II
- By Pete Moore
-
2
 Comments
- Last updated: 19/12/2016


Last time out, we tinkered with the main action. This time, I’m tuning the trigger, (not a task for the fumble fingered); replacing the parachute seal with an O-Ring kit from Vortek, (not for the weak of thumb); and cutting a lump off the end of the barrel, - not for the feint hearted! Part 1 in November 2015 shows the basic strip down.
The trigger is fine as standard and better than many in this price range but they are also my thing and I am sure I can tune it more to my taste. It looks similar in design to the Weihrauch Rekord unit but made from, understandably, cheaper parts. The pull is too heavy and the difference between stage one and two is too great, the movement too rough and the second stage too creepy. Piece of cake!
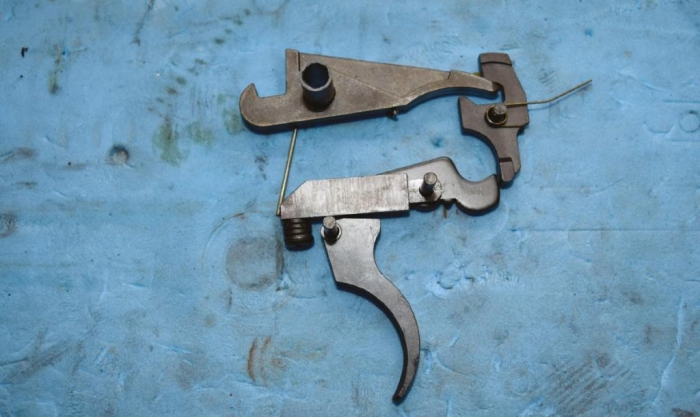
Please stay within your capabilities. Do this incorrectly and you can make your gun unsafe! I suggest you just work on the easier bottom half of the unit (fig 1); remove the trigger weight adjustment screw (grub screw and spring behind the trigger blade) then the two long loose pins and the trigger blade and lower sear will fall out. If you insist on delving into the upper parts where all the springs are, then if you remember where they hook onto, fig 2 may help you get it back together!
The difference in ‘stage one’ and ‘stage two’ weights is easy to fix. We need to reduce the length of the top face of the trigger blade, by removing metal at the rear. Once this is done, polish the top and rear faces. You can see the difference in fig 1 & 3. Fig 3 shows how much metal has been removed. This reduction in length of the top face of the trigger blade changes the leverages and brings the two pull weights closer together.
The golden rule for triggers: any two metal surfaces that rub together, must be polished. Please note; NOT reshaped, re-dimensioned or re-angled just polished. I generally use P1200-P2400 wet and dry and a flat surface. You are aiming for a mirror finish (fig 3). Do this to all the areas of the sears that rub together. Finally, remove the spring washers one at a time (fig 2) to reduce the second stage travel. Remove too many and the trigger will not set. I lightly oil the polished areas and pivots. By lightly I mean a drop of oil on my finger and rub it onto the metal.
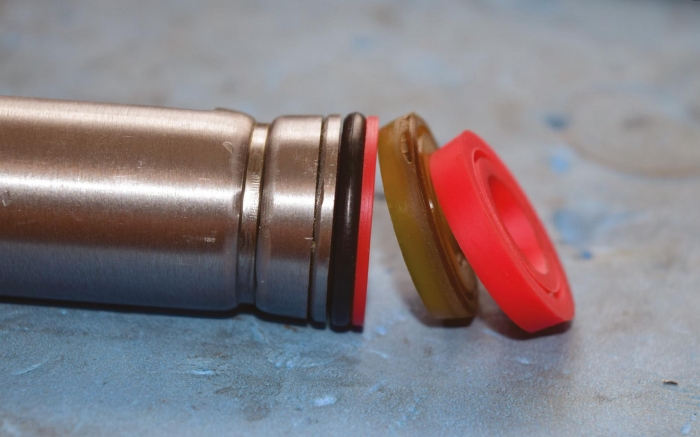
If you remember, the original parachute seal was damaged during manufacture and I cleaned it up as best I could. I have two alternatives from Vortek (UK distributer - agrtuning.co.uk) as replacements. A Pro-seal and an O-Ring seal, both 28mm diameter and ‘borrowed’ from the Diana range. O-ring kits are not always successful in break-barrels, due to the inconsistency of the action tube but I will try it first, as they are often considered to be superior. Get a screwdriver between the seal and the piston and prize it off and pop the new one on. Yeah right! Getting the old one off is not too bad but do keep your piston holding hand out of the path of a slipping screwdriver (fig 5).
Putting the new one on is a different story. It’s akin to getting a 20” bicycle tyre onto a 21” rim! With mighty thumbs, a small parallel punch, a bench and several cups of tea I managed it in as few as 40 minutes…
Popping the O-ring on (the kit comes with two) was a doddle. Fig 7 shows the new seal and O-Ring in place. Standing alongside is the old seal, and the unused Pro Seal option. With the new seal in place, just add a smear of grease.
Time to reassemble the rifle and see if I have just been wasting my time? I used a little more grease on the main spring this time, just a light brushing mind, to see if I could reduce the twang a little. Luck was on my side (helped by the judicious cleaning of the inside of the action tube last time), the O-ring kit has worked a treat. “Please stay within your capabilities. Do this incorrectly and you can make your gun unsafe!” After just a dozen or so shots to settle in, power is up a little and the firing cycle seems quicker. The twang is still there; in fact, with the piston now moving more freely and faster, this annoying noise is if anything just a little worse!
I wanted to shorten the barrel. It’s not choked, so I can just lop a lump off the end and re-crown it; sounds simple enough! This should make the rifle less hold sensitive, as well as easier to handle. It will of course make it harder to cock, so a good test is to move your hand down the barrel to make sure the cocking effort is OK for you and make a note of the desired length.
Remove the foresight holding screw and tap off with a friendly piece of wood. I used tape to mark my cut line, keeping it as square as possible. I suggest you keep the barrel at least 30cm long, as not only do the firearm’s laws gets more complicated if it’s less than that, you won’t be able to cock it! I chose to remove about four inches, leaving about 15”.
The squarer you can cut it the less filing you will have later. Because square it must be; if not, the pellet’s base will not exit the muzzle crown at the same time, which does nothing for accuracy or consistency! YOU HAVE BEEN WARNED!
Be brave, take your time and use long slow cuts whilst checking you are staying square. (fig 11).Use a file and then wet and dry to finish. Roughish but square will work, mirror finish but sloppy will not!
If you don’t know – the crown is a small chamfer at the muzzle, which to a degree protects the end of the rifling from damage, as it’s now recessed. I use a ball bearing and wet & dry paper (fig 12), rotating and circling the barrel. Some use a brass, round-headed screw and the lucky ones use a lathe! It is critical that the crown is an even depth all the way round and has no sharp edges. Use a cotton bud to see if any strands get caught and/or, use the point of a fine hypodermic needle to ‘feel’ for any burr. You will see in fig 15 that I also put a flat on the top of the end of the barrel to align the foresight should I re-fit it. I re-blued the end using a Birchwood Casey touch up bluing pen and when all reassembled was rather pleased with the new look (fig 16).
Yes and no. The trigger is lovely, the twang is annoying and the faster lock time and handling are great. It gives a very consistent 11 ft/lbs and the cocking effort is fine; but a little uncomfortable with the foresight back on. But what about the groups? Well, they are consistently better than the unmodified rifle but not as good as I had hoped. Fig 17 shows a typical ¾” 25 yard group which is easily achieved. (Did you know that a 20p piece has a constant diameter?). The supplied scope has been fine and has not moved. I will however try a different make/model, to see if that helps accuracy. Overall though, this is a good value rifle/scope package, which can be enjoyably improved. I will say again; the work is easy enough to accomplish, given you have knowledge of tools and their use, an idea about mechanisms is useful too. However, if you do not feel confident of your abilities, then don’t.

click on image to enlarge

click on image to enlarge
click on image to enlarge

click on image to enlarge
click on image to enlarge

click on image to enlarge


