Nightvision Diaries: Point & Press
-
2
 Comments
- Last updated: 31/07/2017


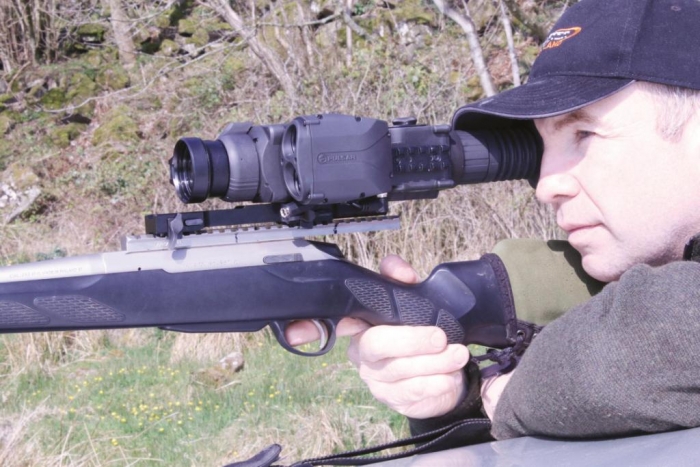
Tom from Thomas Jacks brought down Pulsar’s new Apex LRF (laser range finder) XQ50 thermal weapon scope for me to test and us to go out foxing with. This is their first model to include a proper point-and-press range finder, which should prove invaluable to the shooter; as deciding distance when shooting with thermal at night can prove somewhat tricky! If you don’t get it right, you stand a good chance of either missing or, worse injuring your quarry. So, this would remove a major quirk of night shooting; guessing the distance!
I had seen two foxes working the land on a couple of occasions during the week before. So, there was no better place to start. Using Pulsar’s Helion XP50 thermal spotter for the first time, I could see the two in question way down the bottom of the field. This gave me the chance to use the laser range finder on the XQ50. By pressing the dedicated button on top of the unit once (when pointed at your target) the digital display that overlays the image through the viewfinder shows three lines with ‘MTR’ written next to it on the top right-hand-side of the screen which looks like this: ‘MTR- - -‘. That’s the range finder doing its calculations!
On the second press of the same button, you get the distance displayed on the screen, which looks like this: ‘MTR 742’ (it works out to 999m). You can also press and hold the range finder button on the second press to select the scan option – this allows you to scan an area and ping multiple distances as you move the device. When in the range finding mode, the scope’s crosshair disappears and it goes back to standard magnification. But when you return to the scope mode, your earlier settings and magnification are reinstated.
With underfoot being so noisy, the minute we stepped out the motor it was going to be a struggle to get down the field close enough to get a shot. The only way forward was to make a move whenever a car passed along the top of the road behind us and wait until we were sure the two foxes were not looking up our way. The range finder on the LRF XQ50 was reading 742m, so the plan was to get down to around half that distance and try giving a squeak to bring them in the rest of the way.
Once we got into position it gave me a chance to compare the older Apex XD75 I use to the latest LRF XQ50. Straight away I could see that the clarity seemed better, but I soon realised that this was due to the XQ50 having a smaller lens by comparison. This means that the starting magnification is less, so things do look clearer, but you need to increase the magnification to 5.6x in order to match that on the XD75 – this increase produced a slightly more distorted image. I gave the foxes a squeak from the back of my hand. One decided to stay where it was but the other made its way towards us, following a fence line. It got to 104 yards then Tom took the perfect chest shot, making it his first fox in Scotland and another for my trusty Pulsar XD75.
Both the machines look very similar and they are identical in use, except the LRF XQ50 has the range finder and a couple of small differences in the menu but on the whole there is not much of a change in the operation of the new model. It comes with the usual canvas carry case, the lead to connect an external battery pack, a remote control, a lens cloth, user manual and a 3 year warranty card.
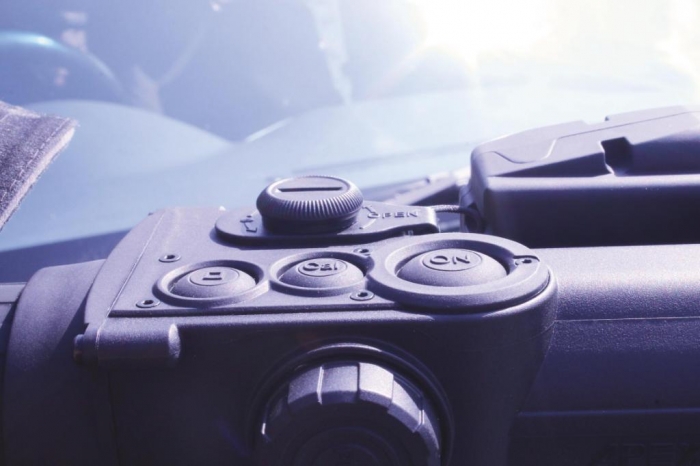
The LRF XQ50 is very easy to use. First off, you need to insert 2x CR123A batteries into the compartment (or use an EPS3i battery pack) and switch the unit on by holding down the button on the top of the scope. A wheel at the front of the eyepiece can be used to bring the screen into focus. There is a second ring at the front, just behind the main lens, that can be moved to focus on your target.
Once those two steps are complete, the scope should be in full focus to your eye. At this point, I would go through the menu by operating the scroll wheel on the right-hand side of the unit, which adjusts the settings such as to reticle type, zero function, brightness, contrast, time, date etc. Once you have completed your general set up, by consulting your user manual, it’s time to connect the unit to your rifle, which should already have some type of rail fitted. Many of my customers opt for the Picatinny-type if they don’t already have one fitted. Night Master sells a wide selection of these for various makes and models of rifle.
There are two zeroing functions; the one-shot and the freeze frame. I prefer the former, as I find it easier and more accurate. The later allows you to take your shot and capture the still image, so that you can use this to move a zeroing cross to the point-of-impact, without having to keep your rifle steady. When using a thermal imaging scope, you need a heat signature for your point-of-aim. I used to use heat pads and suchlike, but found a piece of tin foil does a better job, as it shows up jet black (when the scope is set to display heat as white) and stays like that all day. Also remember, when you set the X and Y (windage and elevation) values when zeroing, all movements are the complete opposite; move up to adjust down, down to adjust up, left to adjust right and right to adjust left. Each click is the equivalent of about 15mm.
The best way to zero is to use a big piece of cardboard, so that you are guaranteed to see the bullet strike and stick a two-inch square of tinfoil to the middle. Start out at 100 yds and take your first shot, aiming at the piece of foil. If you don’t hit the cardboard, you may have to go closer to around 50 yards and try again, either that or use a bigger sheet of board to start with. When you see the bullet strike, place another piece of foil over that hole, so it’s exactly in the middle of it. Go back to the scope, then press and hold the middle button on the scroll wheel, which will bring up the menu. Select M2, then the first one on the menu, which should look like a crosshair. This will now show up as a box with a crosshair in the middle.
At the top of the box, you will see X and Y for moving up, down, left and right. Place your crosshair on your original point of aim, then, with the menu wheel, press the middle button to select X or Y, then with the outer ring, move the other cross to your bullet strike hole; make sure that both crosshairs are dead on the centre of each piece of foil, then press and hold the middle button in the centre of the menu wheel until it shows up ‘OK’, then the screen jumps back to normal screen.
This is when you take your next shot at either piece of foil and, depending on how accurate you were lining your two crosshairs up, you should be dead-on centre. If you need to tweak your finished position slightly go back into menu M2, select the first icon on the list again and select either X or Y depending on your required movement and move the clicks to what you think you might need to get you to where you want to be. Press and hold the middle scroll wheel when you are finished, until you see ‘OK’. Always remember, when you are moving single clicks in this way, all your movements are in reverse. Up is down and left is right. So if you are too high, you need to move it up to bring it down and vice versa.
click on image to enlarge

click on image to enlarge
click on image to enlarge
click on image to enlarge
click on image to enlarge