Spypoint Tiny Tiny Trail Camera
-
2
 Comments
- Last updated: 16/12/2016


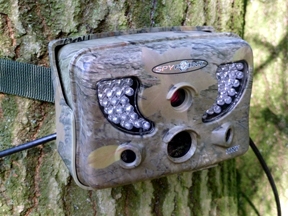
The original Spypoint Tiny (or Tiny D as the improved model is now called) is, as the name suggests, small, measuring just 132mm/5.2”(W) x 99mm/3.9” (H) x 88mm/3.5” (D) including the mounting bracket, and light, at 350g/12oz (500g/18oz with batteries), making it easier to carry several at once or to tuck a single camera in with the rest of your kit. Its small frontal area, along with a dipped camo finish (black is also available), arguably make the Tiny harder to spot than a conventional unit too.
LEDs and PIRs
The camera lens and central PIR detector windows are flanked by twin arrays containing a total of 38 infra-red LEDs (plus 1 red test light), and by a pair of angled PIR detectors that together open out the detection angle from 30 to 70 degrees. The LEDs provide a discreet night-time IR flash with excellent reach and even coverage, their intensity being automatically optimised by the camera - a feature unique to Spypoint - whilst the outer PIR detectors are user-selectable, and give the camera a crucial split second of advance warning on crossing targets that ensures the Tiny is ready to shoot when other cameras are still “waking up”.
Power Up
The Tiny is powered by six AA batteries. These slot into a tray that tucks up inside the camera via a small trap-door in the base. The tray will go in just as easily back-to-front or upside-down, however, so you need to learn to orientate it with open side facing you and the contacts at the top. Alternatively, you can fit the optional rechargeable LIT-C-8 lithium battery pack (or KIT-12V external 12V battery kit), which is less susceptible to cold and lasts 3 times longer.
Also accessed via the battery compartment are the data card slot, which will accept an SD card of up to 32 Gb capacity, a clip-in tray that holds the CR2032 system battery, and a two-position switch that lets you optimise performance when using either standard batteries (ALK) or the lithium pack with the optional SP-12-V solar charger (RECH).
Weatherproofing
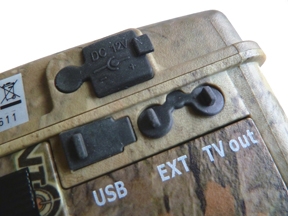
The bottom-access design reduces the chance of water getting in by minimising the length of the rubber seal and keeping the door away from the weather, but further protection is provided when the camera is seated in its mounting cradle, as this covers its base and rear, and has a line of holes in the bottom to ensure that any water which does get in drains right out again.
The other ports in the base of the camera aren’t protected by the cradle but by individual rubber covers. In the case of the external power jack and the EXT jack (for use with an external triggering device), this makes obvious sense, but why the cradle should be cut away to give access to the USB or TV Out ports is less clear, because to view or download images you have to remove the camera from the cradle to access the rubberised control buttons on the rear.
Controls and Timing
The control buttons are mounted either side of a 2.4” colour LCD screen. On the original Tiny model tested the screen is for configuration purposes only and can’t be used for viewing images, but it was replaced earlier this year with a new Tiny D model that adds a viewing function – a major upgrade that amazingly saw the price remain unchanged!
Pressing the power button to the left of the screen activates the camera, showing the Spypoint logo and then a screen with a woodland background that lets you select Photo, Video, Test, set-up (“Settings”), Report or (Tiny D only) View modes via the Up, Down, Back and OK buttons, which also let you control the options in set-up and View modes.
The range of options is pretty comprehensive, with a choice of Low, Medium and High PIR sensitivity; Low, Medium and High image resolutions; a multi shot function offering up to 6 shots at 1-second intervals; and video lengths of 10, 30, 60 or 90 seconds. There are several options for delay time (the time before the camera will activate again) too, with a choice of 1, 3, 5, 10, 15, and 30 minutes, but I only ever used the shortest three delays and would have preferred 30 and 10-second options in place of the 30- and 15-minute ones. There’s also a time-lapse mode that can be programmed to take pictures automatically every 30 seconds, or every 1, 3, 5, 10, 15, 30 or 60 minutes.
You can also set the camera to activate only between certain times of day (Time Start/Time Stop). So, for example, you can monitor a chicken run after they’re put away for the night and until they’re let out in the morning, but not during the day, thereby preventing your data card filling up with superfluous pictures of poultry. You can time-stamp the images too, which is vital when using the camera to establish the best time to ambush creatures of habit such as foxes, and the camera also adds helpful temperature data (in either Fahrenheit or Centigrade) and one of four moon-state icons (new, first quarter, full, last quarter).
In addition, you can manage performance and battery life by keeping the PIRs in either active (powered) mode or on standby, and by switching the side sensors on or off, and you can set the camera either to stop recording once the data card is full or to record automatically over the oldest images.
Fitting and Securing
Having programmed the camera you’ll want to attach it to something. The easiest way is to strap the cradle directly to a tree or post by passing the green 1” nylon webbing strap supplied through two slots in the back and cinching it tight, but there’s also a standard ¼”/20 tripod mounting socket in the base, which, when used with Spypoint’s own MA-360 tree mount, offers greater versatility. Finally, holes in the cradle and corresponding loops on the camera housing let you run an optional CL-6FT security cable through to keep everything safe, and if additional protection is required a lockable SB-T Secure Metal Box housing is also available as an optional extra.
As has already been mentioned, you can’t access the control buttons when the camera is clipped into the cradle, which is a bit frustrating. For example, if you set the camera to Test mode, and attach an external viewer, you can use the image on the viewer’s screen to aim the camera precisely – but then you have to dismount the camera again to switch it into photo or video mode, which can upset its alignment, especially when using the flexible tree mount. True, you can work around this, but this is still an area in which I feel Spypoint might have struck a better balance between ease-of-use and weatherproofing.
Video and Stills
Despite the odd niggle with its ergonomics, the Tiny performed well, capturing useful video at 640x480 resolution and good-quality still images of 3, 5 or 8 MP (8 MP = 3264 x 2448 pixels), although a grainy texture and a lack of fine detail in the 8 MP images is an inevitable consequence of the small fixed-focus lenses characteristic of trail cameras in general. Colour in day time images might have been a bit more natural, and night time images might have had a touch more contrast too, but overall the image quality was pretty good.
I was particularly interested to see how much the extra, angled PIR sensors helped the camera to catch crossing targets. I duly set the camera up pointing squarely across a trail I know to be used by both roe deer and foxes, placing it at a point where they tend to hurry across the trail as it crosses an open ride. I thought this would be a tough test for the Tiny, and it was, since the camera recorded several misses – where the camera triggered too late to catch the animal - and one shot that caught just the tip of a fox’s tail. To be fair, less severe tests at more oblique angles and on sheltered parts of the same trail produced better results, so my conclusion is that the Tiny’s extra sensors do improve its chances of capturing the shot you want, but won’t compensate entirely for poor camera placement.
Worth the Money
Overall, then, this is a handy camera that’s easier to site and more likely to catch the image you want than most, and is compatible with a host of accessories. The design is compact, discreet and weather resistant, but having to remove the camera from the cradle to access the controls can be tiresome, a shorter minimum delay setting would be welcome, and still images can lack the detail needed for sizing up a buck’s head, even at the highest resolution. Minor criticisms notwithstanding, however, you’ll be hard put to find another camera this good for under £200.

click on image to enlarge

click on image to enlarge
click on image to enlarge

click on image to enlarge
click on image to enlarge

click on image to enlarge