Bushcraft: String Theory
- By John Fenna
-
368
 Comments
- Last updated: 01/02/2017


If you are going to be making any kind of structures in the woods, shelters, furniture or anything else, you are going to need some sort of cordage, string or rope. The easy option is to buy in your cordage and the choice you have is wide. One of the most popular kinds of cord is ‘paracord’, which comes in various thicknesses and has a woven sheath over a multi-stranded core. This kind of cord used to be used for rigging parachutes (hence its name) and the finest is ‘550 paracord’ with a 550lb breaking strain, but the majority of cords of this sort will be plenty strong enough for most uses.
You also have the choice of cheaper cordage, such as the ugly, but versatile blue polypropylene rope, woven guy-line, sash cord, expensive but light, strong and almost unbreakable ‘Dyneema’, ‘Utility’ cord etc. among the synthetic cordage and if you want to go natural, then there are various garden twines, cotton parcel string, sisal baler twine and other cordage out there to suit. If the cordage you choose is not available in heavy and strong enough options, you can twist or plait thin cord or string, up to any size you want with simple tools, and I hope to show how in a future article.
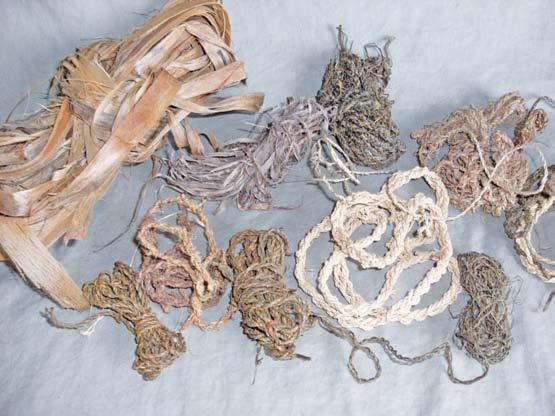
If you want to go right back to basics, you can make your own cordage from plants you harvest yourself, and this is not as hard as you might think! Many common plants offer up bark and stems that make good cordage with the simplest of preparation and here I will try to show how with coniferous tree roots, brambles, willow bark and nettles.
I have used different kinds of coniferous tree roots for cordage and have had my best results from pine and spruce roots. The roots you want are the skinny and long surface hugging roots (only two from a tree, please) and these are easy to scrape up with a stick. Choose roots that are a bit thicker than you want to use, as the first stage of preparation is to peel off the root’s outer bark layer by pulling it through a notch cut into the end of a stick. If the root is now the right size, job done! If the root is a bit thin, plait some together. If the root is too thick, split it down by cutting a slit in one end and pulling it apart.
If the split starts running off to one side, bend the thick bit back more until the split centres again.
You can go to great lengths to process brambles as cordage and just use the long thin fibres, but I have had great success using brambles more or less unprocessed, choosing long, thin runners and simply stripping them of their prickles and leaves by pulling them through a piece of canvas held in my gloved hand, or under the instep of my boot. Plaited together, brambles can prove very strong and with a bramble rope plaited from three strands I have lifted three gallons of water with ease. I have also used brambles to lash together shelters with the lashings proving very tough and long lasting.
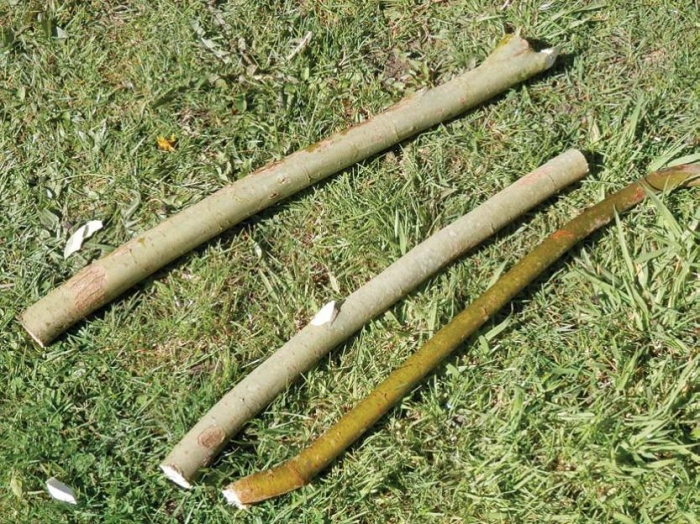
Willow bark makes my favourite cordage and, compared to some bark cords at least, is simple to produce. You can make tanned willow bark or green willow bark cords, but the tanned version should last longer. Willow bark cord is best made in spring when the bark is easiest to harvest.
First of all, you want to choose lengths of willow that have few, if any, side shoots and are between thumb and wrist thick. Once you have cut your sections, the unused tops can be pushed into the ground and may well take and grow as new trees. The first job is to scrape off the outer, green bark – the back of your knife is the ideal tool – and collect it, then pull the inner bark or ‘bast’ off the wood.
Split the outer bark into strips a few millimetres wide. Take an equal amount of wood ash and the green bark scrapings and boil these up with the bast strips, with enough water to allow the bark to move around and not burn in the container you use. The lye and tannins in the ash and bark effectively tan and preserve the bast fibres. You will know when it is done (around half an hour to a couple of hours) when the bast is a deep tan colour. Rinse the bast and it is ready to use or store for future use.
You may want to use a leather apron on your thigh for the cord twisting to turn the bast into cord. Loosely knot two unequal lengths of fibres, hold them by the knot and put a loose twist into each piece. Start twisting the cord by holding the knot in your left hand and with your palm flat down, covering both pieces of bast, push away so that the bast pieces roll on themselves, but not together. At the end of the stroke, keep the bast trapped against your leg under your palm and let go with your left hand. The two pieces of bast should twist together by themselves, but you can twist them tighter to help the cord.
Pinch the cord where it disappears under your right hand and roll again as before. Keep up the ‘pinch and roll’ until you come close to the end of the shorter piece. To extend the cord, twist a new length of bast onto the short end and keep ‘pinching and rolling’ and laying in new pieces of bast until the cord is as long as you want it. Finish with a figure of eight stopper knot. Trim off any ends and your cord is ready to use.
If you decide your cord is too thin, fold it in half and, working from the folded end, twist it together with a ‘pinch and roll’, but this time pulling your palm towards you, not away from you. Cords can be waxed to help preserve them.
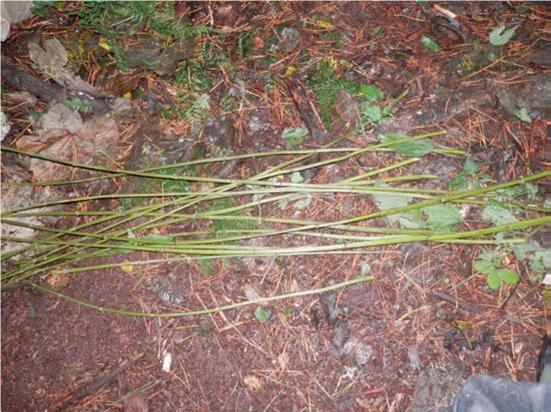
The humble nettle is a versatile plant — amongst other things giving us good food, good drink and good cordage. I do not know why they are thought of as weeds!
Making nettle cordage is the same as making willow bark cord – once you have prepared the fibres. Nettles for cordage are best picked after the plant flowers and the best nettles have reddish stems. Using gloves, pick a good bundle of stems and rub them well to remove leaves and stinging spines. Once well rubbed, they will not sting you.
Remove the pith from the centre of the nettle. This is best done by gently pounding the stems – not enough to break the fibres, but enough to loosen them from the pith, especially where the leaves were attached.
Run a thumbnail down the side of the stem and flatten it from a tube into a sheet, then peel the fibres off the pith. A showy and effective way of doing this is to bend the nettle in the middle until the pith breaks upwards and free from the fibres. Drape the fibres over your index finger and your thumb over the fibres, but under the pith, and pull on the other end of the nettle so the pith is stripped away. Repeat the operation for the other end of the nettle.
Once you have your nettle fibres free of pith, you will need to dry them until they are so dark green as to be almost black before you work them. Any pith you left attached will look white on the now dark fibres and should be picked off. You may need to slightly dampen the fibres to work them, but if you do not dry the fibres from their raw state they will dry and shrink once the rope is twisted and ruin the work.
There are loads of other plants that make good cords, but this should give you lots to work with!

click on image to enlarge
click on image to enlarge

click on image to enlarge
click on image to enlarge

click on image to enlarge

click on image to enlarge

click on image to enlarge
click on image to enlarge


 Folding Lock Knife")


