Airgun Workshop spring guns part II
-
363
 Comments
- Last updated: 19/12/2016


Last month we looked at the basics of how spring guns work, the fundamental differences between them and pre-charged pneumatics (PCPs) and why they are comparatively so much harder to master. This month we’ll take a look at the safety aspect that needs to be born in mind, some fundamental points along the way, then begin to look at shooting positions themselves.
Shooting sports in general have a remarkably good safety record, yet it falls to all of us to do our bit to maintain this fine tradition. Shooting safely by conducting ourselves in accordance with accepted rules, is part of our responsibility, yet being seen to be ultra safe is just as important. Spring-powered airguns in particular are an aid to this.
Take the classic break-barrel design. When the gun is being carried and not shot, it takes just a second to break the barrel open (without cocking the action), which instantly tells everyone that the gun isn’t loaded; rather like a double barrelled shotgun! Likewise, an under-lever can have the lever just unclipped at the muzzle, so that it will hang slightly down, again signifying to everyone that the action is clear and safe.
Guns with moving breech sections such as loading taps of some sort, can just have the tap turned upwards, or the breech unclipped - again proving all is safe. In short, if we all make an effort to look safe, the chance of an accident occurring will be extremely unlikely. Also remember; one serious accident tars us all with the same brush and there are many people out there who would take this as an opportunity to try and heap further restrictions and controls upon us!
OK; we’ve got our springer and we’ve become familiar with how to show that the mechanism is safe. Now it’s time to adopt some shooting stances, and see how everything feels. Before we do that, we need just to understand some basic rules. Whatever recoil is present when the gun fires, will be transferred to the shooter and possibly any object that it comes into contact with. How this is dealt with will affect results downrange.
Any deviation from the exact shooting position from which a gun was zeroed, may well result in a different point of impact, however slight. Tracking that deviation in advance, with homework, practise and experimentation and being prepared to compensate for it in the field, for any changes that may occur, is all part of the spring gun experience. Learning to do it right makes us a better shot all round.
KNEELING
When I first started shooting back in 1979, for some reason, the kneeling position just felt right and I subsequently ended up taking almost every shot from this position; even in competitions. I began in an indoor 10metre target club as it happened, but their accommodating approach allowed me to do my thing in the booth on the range. Some friendly pointers early on (from a club member who had been there when the legendary Malcolm Cooper had been in attendance as a special guest) stuck in my mind, and has helped ever since.
A key point is balance and for me, the forward weight of the rifle really helps stability. The official accepted kneeling position sees three points of contact. If you’re right handed, the left knee will be raised as a support for the left elbow, whilst the right knee will contact the floor, along with the toes of the bent right foot; with the heel of the right foot directly under the bottom. The left elbow ideally sits in the small hollow of the supporting knee, whilst that front leg should go straight down at a right angle beneath the elbow- so as to allow weight to be transferred straight down and be fully supported. Deliberately angle the front leg, and you’ll see what I mean, as the whole tripod effect tries to slide away!
Repeatability is the key with all this, and making sure that the butt pad locates in exactly the same spot and at exactly the same height in the shoulder, every time, is also critical, and will really pay dividends in the long run. The benefits here are twofold. Firstly, the recoil of the gun will be allowed to dissipate through the shoulder in an identical way each time; and secondly, by locating the butt carefully at the same height, the shooter’s eye will be looking through the same part of the scope lens each time - a vital factor, if parallax error (the apparent movement of an object, when viewed from a slightly different angle) isn’t to creep into the equation.
Grip is a big part of shooting a recoiling gun successfully and consistency of approach is probably the most important factor yet again. If you hold the forend at the very tip, try and do that every time. Likewise, if you squeeze the pistol grip in the aim, then do that every time too. That said, a relatively light yet supportive grip, is probably the best approach. From this comes not only a more relaxed shooting stance, but also more accurate shot placement, as the guns movement is allowed to gently find its own path.
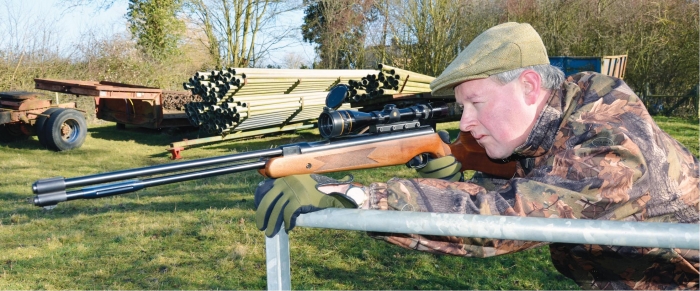
It is of course essential, regardless of which position you shoot from, that a recoiling rifle isn’t allowed to come into direct contact with a hard object. Kneeling up, yet resting the gun directly over a fence post for example, could be disastrous, as the force of the recoil could make the gun bounce upwards on firing, causing not only possible marking or damage to the gun, but a wayward point of impact. Cushioning the gun with a hand or arm can be the answer, yet as previously mentioned, if the gun has been zeroed from a particular position, any change from that position will almost certainly alter the impact point.
Taking a shot from a lying down/prone position can be tricky with a springpowered gun, since it can be really awkward to cock the action for the next shot, whilst still lying fl at. Try breaking the barrel or cocking an under lever rifle whilst in the prone position, and you’ll see what we’re up against. Having to keep getting up in between shots, over an extended practise session, just to cock the gun, can be a chore too. But the irritation is minimized when competing in a Hunter Field Target (HFT) shoot for example, since there’s only one target per lane, before the shooter has to get up and move along to the next lane anyway. Spring gun/recoiling rifle shooters have their own class in this event, and there’s a healthy competitive atmosphere at each tournament I’ve attended.
HFT allows competitors to take the majority of shots from the prone position, where prone is the default ‘free-style’ position and here, the shooter is required to touch a ‘peg’ (normally a wooden or plastic stake in the ground) whilst taking the shot. The use of a shooting mat makes the whole task more comfortable and angling the body off (at around 30° to the left in my case) to one side, seems preferable for many shooters. As per our previously mentioned guidelines, we don’t want to let the gun itself touch the peg, as the recoil may cause it to bounce off the hard surface. Holding the peg, and resting the rifle over the lead support hand is the preferred approach and here, ensuring that the gun rests on the same part of the supporting hand, is the key to consistency.
A properly adopted, unsupported, two handed prone shot, can be highly effective, but again, however you do it, just do the same thing every time! Crucially, do your own research and check things out in private practise sessions. Experiment by gripping the rifle more tightly and see whether the impact point changes. Likewise, hold the gun in a different place along the stock and again, gauge where the shots fall, and how much allowance would have to be given if that shot scenario should occur in the future.
Next month we’ll look at shooting from the sitting position, and of course taking those dreaded standing shots
click on image to enlarge

click on image to enlarge

click on image to enlarge

click on image to enlarge


