FITTING A NEW AIR RIFLE SPRING
- By Pete Moore
-
0
 Comments
- Last updated: 06/12/2016


Some of us like to tinker. I have a rather nice shooting HW97 yet I want to tune it. Let me be very clear about what I mean by ‘tune it’. I do not mean ‘make it more powerful’. In the UK we are limited by law to a perfectly usable 12 ft/lbs. This gives me my goal; I want to produce an HW97 running at 11-11.6 ft/lbs that is as smooth to cock and shoot as possible and is less sensitive to hold. Luckily for me, the market is awash with tuning kits, replacement springs, spring guide, top hats, seals and the internet abounds with ideas. There are lots of theories and lots of hardware available; some of which work, some not so well, and many work but just not together!
At heart, I like the science of it, take the mechanics back to basics and set a plan. When you pull the trigger, you release a powerful spring which pushes a piston down a tube forcing the air out through a small hole behind the pellet. The more efficient you can make this process, the less spring power you need. The less spring power, the smoother it is too; well that’s my theory at least!
I am going to replace all but the piston and cylinder with a kit from Vortek. Lots of internet interest about Vortek products, but there are complications and costs with importing from the United State(where they have sold more than 20,000 kits!). Well now there is an official UK distributor, AGR Tuning. The boss at AGR, Tony, is not just a businessman, but a very experienced, helpful and able tuner. Just as well as I had to call him a couple of times for help!
By using high tensile steel, the spring can be made from smaller diameter wire and wound to an overall smaller diameter (fig 1). Lighter and more efficient already! That gives space to fix it, along with a small shock pad, to both an inner and outer PTFE spring guide. With the fitted top hat at the other end and a tub of PTFE grease and power washers all included, you are good to go! (fig 2). I also wanted the kit that includes a new seal for the piston (£79 for the lot). Not a parachute seal like the green original but a harder material that needs to be individually sized to your piston (fig 3). If you want the best efficiency, which I do of course, you have to work for it!
Safety first and all that! Make sure the rifle is empty and not cocked before you start! Also make sure you have removed any scope mounts. Remove the action from the stock, if you are unsure how to do this then I suggest you stop now! AGR offer a fitting service for £120 including the full kit and postage back to you. Which is not too bad and for those with no mechanical skills a highly cost effective solution. I see it this way; it is better to spend another £41 than waste £79 due to your lack of ability!
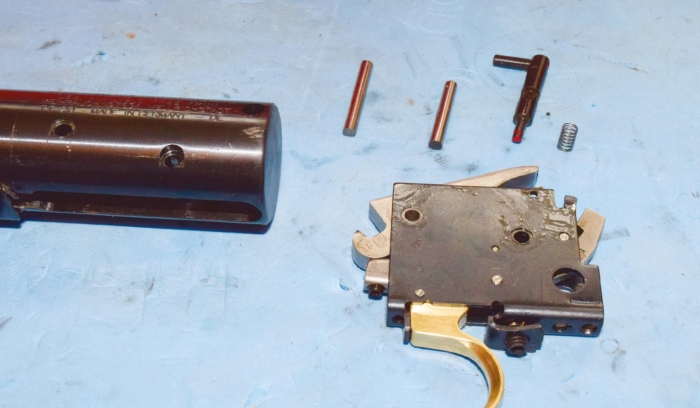
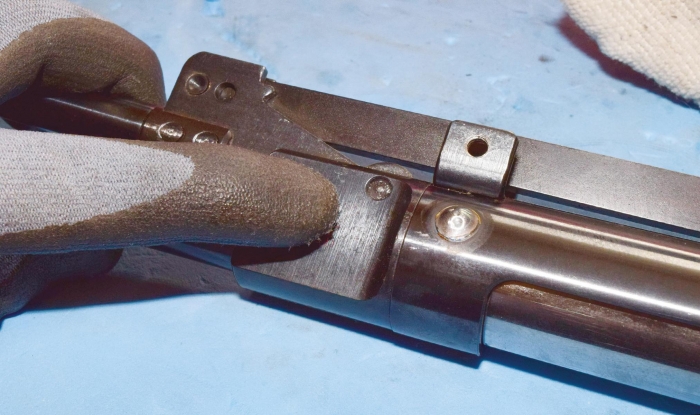
To remove the trigger unit, drift the two pins (fig 4). I suggest the rear one first, then with the front one still half in (fig 5a), the unit can be moved out slightly at one end which releases the sprung safety catch; don’t let it hit the cat! With the other pin out the trigger unit can be pulled free (fig 5b). You will notice that mine has a set-back replacement trigger blade which I got from Dave Welham at Airmasters88.
Whilst drifting, remove the pin which the cocking arm pivots on (fig 6). Lift the arm away from the action to remove (fig 7). Now release the ‘bolt’ (fig 9) that all important bolt that locks the end of the action in place, locates the anti bear trap device and holds the stock screw. Don’t lose the spacer. The pieces of the anti bear trap should stay together but are not difficult to reassemble should the need arise.
Please be careful with this next stage. The spring is obviously under a great deal of compression when the rifle is cocked, but even when un-cocked it is still under compression! This is the ‘pre-load’ and varies from rifle to rifle. We are about to unscrew the rear of the action and release the spring. If your rifle has a lot of pre-load then you will need most of your strength to contain it as it releases! Now I’ve scared you a little, you can carry on. As it happens, the pre-load on an HW97 is not usually very much and unscrewing the end is a fairly straightforward affair. However, please be careful.
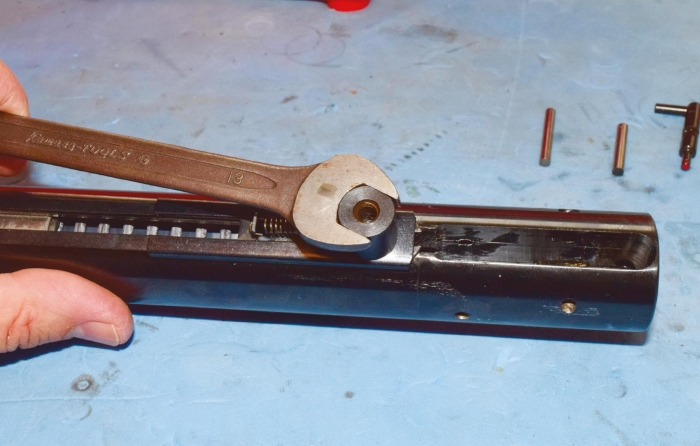
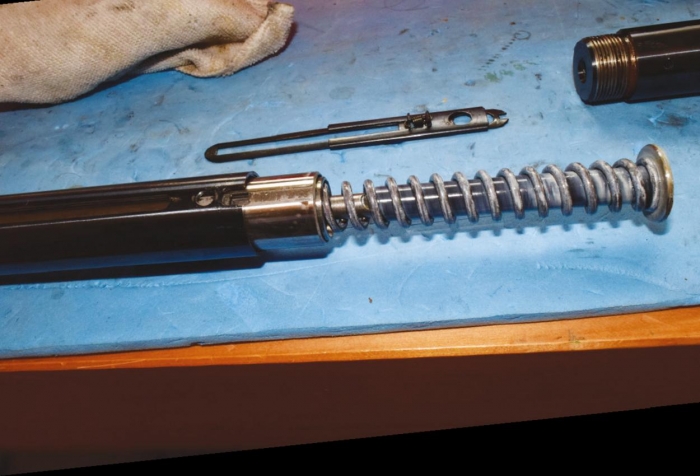
The rear part of the action can by quite tight initially to unscrew, especially the first time. Remember that slot that the trigger unit came out of? Now you need a big spanner, or similar, that just fits nicely into that slot with a piece of cloth round it. I don a rubber glove and grip the main tube of the action and give the free end of the spanner a tap with a hammer. Sometimes a couple of fairly hefty taps are needed (fig 9). There is a good ½” of thread to unscrew and once started this is fairly easy by hand. I suggest you wear thick leather gloves, like builders gloves. As I said, you are unscrewing a potential projectile that will do a lot more damage to the cat than the safety catch! You can see as you get to the end of the thread (fig 10 & 11), so keep pressure pushing the two parts together as you finally unscrew and release them. I wear protective goggles at this stage.
Now, if I did not want to replace the piston seal, I would be more or less done. As per the Vortek instructions, remove the old spring and any sleeves, power washers etc and replace with the new, lightly greased, spring, guide, and top-hat assembly. Simply reverse the instructions above to reassemble, using the tap on the spanner to get tight enough so that the scope dovetail lines up.
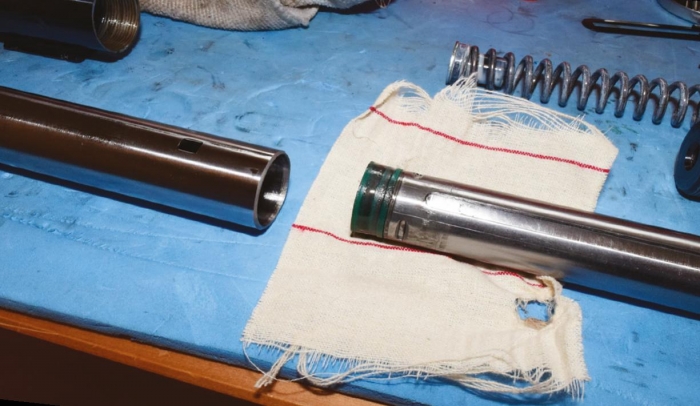
If like me, you are replacing the piston seal, continue thus. Once the spring is out of the way, you can slide the piston and cylinder out of the action tube, if they haven’t already fallen out! Clean any lubricant off the cylinder and hold it whilst you pull the piston out. At this stage make a note of how much effort is needed. Move the piston in and out a few times to get a feel for it. Mine was quite hard to move so I did a rough measurement. By placing the cylinder vertically on a set of scales, I slowly increased the pressure on the piston and noted the reading when it started to move. Mine needed just over 3.5kgs of ‘push’! So my poor old spring had to overcome that resistance even before it starts compressing any air!
The old seal is removed from the piston using a smallish flat screwdriver. Hold the piston firmly and insert the screwdriver between the seal and the piston and prise off, away from you. The easiest way to fit the new seal is from rifle to rifle. We are about to unscrew the rear of the action and release the spring. If your rifle has a lot of pre-load then you will need most of your strength to contain it as it releases! Now I’ve scared you a little, you can carry on. As it happens, the pre-load on an HW97 is not usually very much and unscrewing the end is a fairly straightforward affair. However, please be careful.
The rear part of the action can by quite tight initially to unscrew, especially the first time. Remember that slot that the trigger unit came out of? Now you need a big spanner, or similar, that just fits nicely into that slot with a piece of cloth round it. I don a rubber glove and grip the main tube of the action and give the free end of the spanner a tap with a hammer. Sometimes a couple of fairly hefty taps are needed (fig 9). There is a good ½” of thread to unscrew and once started this is fairly easy by hand. I suggest you wear thick leather gloves, like builders gloves. As I said, you are unscrewing a potential projectile that will do a lot more damage to the cat than the safety catch! You can see as you get to the end of the thread (fig 10 & 11), so keep pressure pushing the two parts together as you finally unscrew and release them. I wear protective goggles at this stage.
Now, if I did not want to replace the piston seal, I would be more or less done. As per the Vortek instructions, remove the old spring and any sleeves, power washers etc and replace with the new, lightly greased, spring, guide, and top-hat assembly. Simply reverse the instructions above to reassemble, using the tap on the spanner to get tight enough so that the scope dovetail lines up.
If like me, you are replacing the piston seal, continue thus. Once the spring is out of the way, you can slide the piston and cylinder out of the action tube, if they haven’t already fallen out! Clean any lubricant off the cylinder and hold it whilst you pull the piston out. At this stage make a note of how much effort is needed. Move the piston in and out a few times to get a feel for it. Mine was quite hard to move so I did a rough measurement. By placing the cylinder vertically on a set of scales, I slowly increased the pressure on the piston and noted the reading when it started to move. Mine needed just over 3.5kgs of ‘push’! So my poor old spring had to overcome that resistance even before it starts compressing any air!
The old seal is removed from the piston using a smallish flat screwdriver. Hold the piston firmly and insert the screwdriver between the seal and the piston and prise off, away from you. The easiest way to fit the new seal is place it on the bench and force the piston into it, initially at a slight angle. Pop the piston back in the cylinder and Bob’s your uncle. I’m lying! The original seal is a parachute type! As it rushes forward it expands slightly to make a good seal with the cylinder despite any manufacturing tolerances. The new Vortek vacseal is different as it needs to be ‘sized’ to your cylinder. You need to push it in and out and if you think it a bit tight, make the seal slightly smaller by rubbing with 240 wet & dry, taking care to retain its shape. Take it slowly and carefully as if you make it too small it will not seal, the rifle will be vastly underpowered and the only solution is a new seal. This is where I talked to Tony a lot!
I originally sized mine to be about the same resistance as the old seal. Reassembled and got about 8 ft/lbs! Dismantled, re-sized, reassembled (twice) and got to 9.5. Added two power washers, 10.8. By this stage a complete disassembly and re assembly of the rifle was taking me just 15 minutes! This power is really about right, around 11 ft/lbs is a bit of a benchmark for smooth springers. However, I wanted to achieve it without those power washers!
I want efficiency! In the interests of this article I now re-sized the seal as close to ruin as I dare! The piston would now fall out of the cylinder under its own weight! But stop if I covered the transfer port. Excellent! Back together with one power washer and ... 11.6 ft/lbs! Perfect for HFT. Personally I would leave it slightly tighter and not risk ruining the seal. The customer service at AGR is great but they can’t be sending out free seals because you’ve ground too much away!
What’s it like to shoot; lovely? The real test was when I handed it to a colleague and Shooting Sports regular, Mark Camoccio, who I happen to know was rather handy back in the ‘80’s with his FT prepared Airmasters specials. He’s probably competed with and shot more top end springers than anyone. His verdict: “One of the best I have ever shot”. Can’t say fairer than that!
Next time I’ll be covering both a lower cost option (mainly your time and a couple of essential parts) and hopefully a complete bespoke Cylinder/piston upgrade!
Vortek PG2 Tuning Kit, including new Vac-seal piston head for a 26mm HW97- £79
Details and contacts for AGR Tuning can be found at www.agrtuning.co.uk

click on image to enlarge

click on image to enlarge

click on image to enlarge

click on image to enlarge
click on image to enlarge
click on image to enlarge
click on image to enlarge

click on image to enlarge

click on image to enlarge

click on image to enlarge

click on image to enlarge
click on image to enlarge
click on image to enlarge

click on image to enlarge


