Bushcraft: Caught in a trap
- By John Fenna
- Last updated: 27/04/2018


It is important to stress that the following information is intended only for use in survival situations. Practice building the traps, snares and trigger mechanisms, but be sure to dismantle them. Never leave any snares or traps unattended. Some may be illegal to use and also ‘non-target’ animals, such as pets, may be injured or killed. Never allow any animal to be killed or injured needlessly. Do not break the laws on traps and snares where you are. All the snares described can be built using only a Swiss Army knife.
Unless you are in a position to regularly trap and snare animals and have the luxury of time and opportunity to practice a number of techniques to the point of perfection, I would advise you to learn a few, simple, traps and snaring set-ups and practice them well.
The following are some of the most simple and productive snares and traps I know and, although they are not by any means guaranteed to put food on your table, are the easiest to construct without much in the way of materials and in a short time with low output of energy. More complex traps may be more effective, but can be more of a drain on energy needed to make them and skill to actually make, and can be less portable.
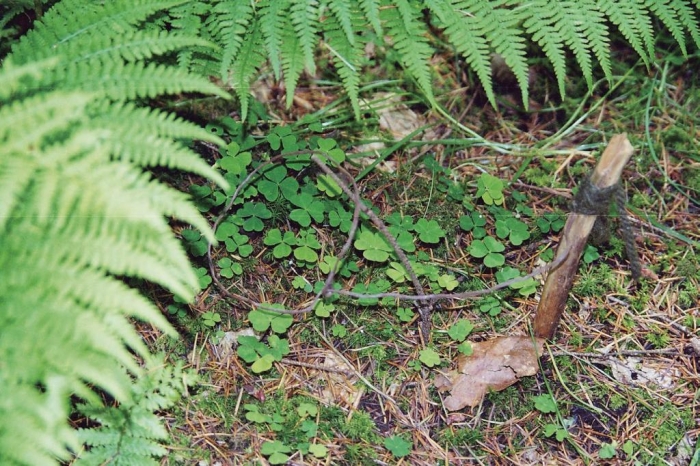
The simplest form of snare trap is a simple ‘static’ snare. Set the snare so that it is high enough and large enough for the prey’s head to go through the loop, but not allowing its body to get caught. Prop the snare in position and tie the end cords to a firmly anchored stake or convenient tree/branch etc.
For snaring a rabbit, the snare would need to be about a handswidth above the rabbit run and opened to easily accommodate an adult’s fist. Set the snare on an obvious rabbit run (you could set dead dry twigs and branches to funnel animals into your snare) and check it regularly, but from a great enough distance that you do not leave too much of your scent around the snare. To avoid leaving your scent, rub your hands and the snare in fresh rabbit dung before setting the snare.
A spring snare can be more effective. Make two interlocking hooked pegs and hammer one into the ground and tie one to a nearby springy sapling and also to the cords of the snare. Bend the sapling down and hook the pegs together, then set the snare in position as before. When the animal triggers the snare, the hooks are knocked apart and the springy sapling lifts it into the air out of reach of other predators. If there are no convenient saplings, you could build a weighted pivoting beam instead; adjust the hold of the hooks to suit the strength of your spring.
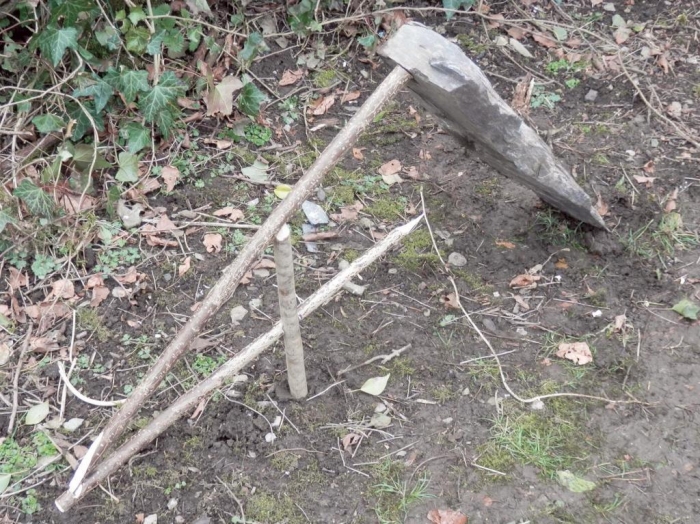
A simple trap, the Figure 4 Deadfall is not too difficult to construct, and the trigger – the Figure 4 – can be used for other types of trap as well.
Named after its shape, the Figure 4 comprises 3 sticks: A vertical stake with an angled top and a notch in its side to take the ‘bait bar’ horizontal stick, which is pointed on one end to take the bait, shaped to fit the notch in the vertical stake around its middle and notched to take the angled diagonal ‘prop’ stick at the far end. The prop stick is notched to fit onto the angled top of the vertical stake and shaped to fit into the notch at the end of the horizontal ‘bait bar’ at the other end.
When assembled, the Figure 4 should be capable of holding up a heavy ‘dead fall’ rock or other trap, but fall apart easily when a firmly attached bait is disturbed. Be sure that the dead fall rock falls clear of the vertical stake.
The Figure 4 trigger is probably the best you can have if you are moving around – it is small and easy to carry, so you do not invest a lot of energy rebuilding traps as you travel.
Again, size the trap to your prey – big traps will catch big prey, small traps small prey – and disguise human scent by covering your hands in dung from the prey species before handling traps.
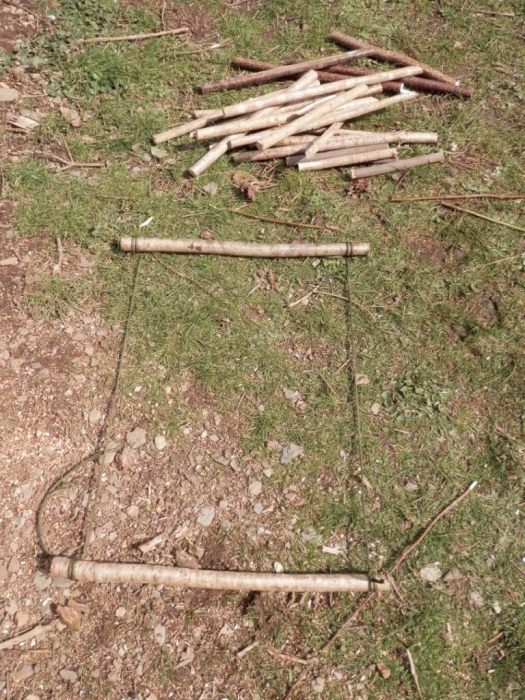
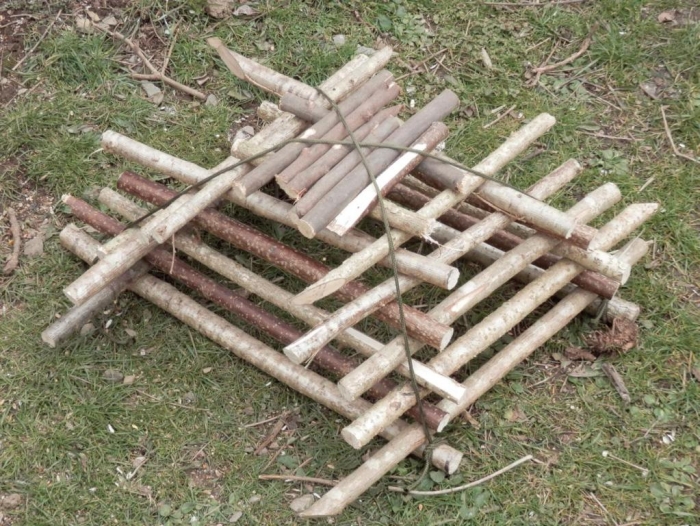
This is the easiest trap I have every come across, simple to build, and very effective. Naturally, you need to size the trap to the birds you hope to catch – emus will not fit in small ones, and sparrows escape through the bars of a large one!
The idea is to build a rectangular pyramid of sticks. You start with a pair of sticks – in this example about 18-inch long – and you want to lay these on the ground parallel and about 22-inches apart. Securely tie the sticks with cord to form a rectangle with string as two sides and the sticks as the other two sides. Flip one of the sticks end-for-end, so that the sticks are still parallel but the string forms a cross in the middle, halfway between the sticks.
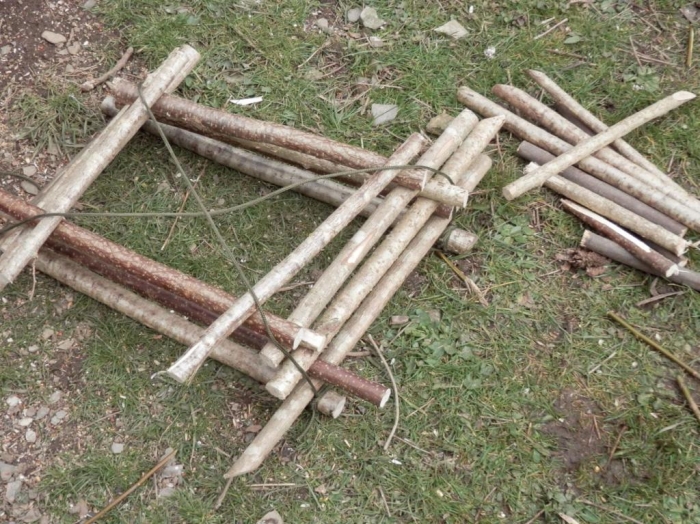
Take two more sticks and push them under the string to form a rectangle of sticks, tight up against the string. Continue fitting sticks of gradually decreasing length, alternating their direction, until you have your rectangular pyramid with the cross of string tight in the centre of the top, the arms of the cross running down the corners, between the ends of sticks.
Finish off by pushing more twigs under the cross to make a flat roof. The trap should be tight and firm enough to allow it to be picked up easily without falling apart.
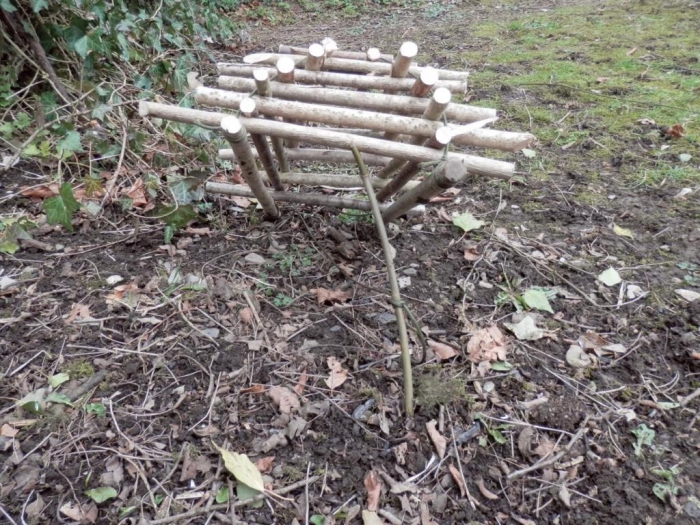
The trigger could be as simple as a forked stick on a string that you pull when a bird is under the trap. Have the stick on one side of the base and the string running under the trap to where you lie hidden and waiting to ensure the stick falls into the trap and does not hold the side of the trap open.
Place your bait towards the back of the trap. When a bird enters the trap, pull the string to dislodge the trigger stick and the trap falls over the bird.
To remove the bird, use your left hand to push one of the bars inwards (this is why the sticks are not individually tied) and reach under the trap to grab the bird.
Remember to bait your traps with appropriate bait, i.e. ptarmigan like plant buds, while finches like seeds; use the wrong bait and you will court failure!
click on image to enlarge

click on image to enlarge
click on image to enlarge
click on image to enlarge

click on image to enlarge
click on image to enlarge
click on image to enlarge
click on image to enlarge


