Dutch Oven & Cast Iron Cooking
- By John Fenna
- Last updated: 27/09/2017


I introduced the Dutch Oven in my ‘Food and Cooking’ article a while back but I have been asked to expand on the theme of cooking with Cast Iron. In that article, I gave one ‘Bannock’ recipe – in this article I give an alternative, simpler, recipe and alternative cooking methods.
The ‘Dutch Oven’ is the ideal cooking vessel for campfire cooking, as this seemingly simple cooking pot is extremely versatile in its usage. The Welsh ‘Bakestone’ (Planc, Llechfaen or Gradell) a flat circle of Cast Iron with a handle on one side and some sort of Cast Iron frying pan are also superior cooking implements for Bushcraft. Once you have cooked with Cast Iron, you will realise how much better it is – despite its extra weight!
Pioneers, from Canada to Australia and South Africa, have relied on the Dutch Oven or its local equivalents (the Bedourie in Oz and the Potjie in SA) to keep them fed during their wilderness adventures. A Dutch Oven can be used to make roasts, stews, casseroles, biscuits, cakes, bread, pie- even pizzas! Multiple Dutch Ovens could be stacked (up to five or six high!) to maximise the use of a smaller fire, or the lids used separately to fry on.
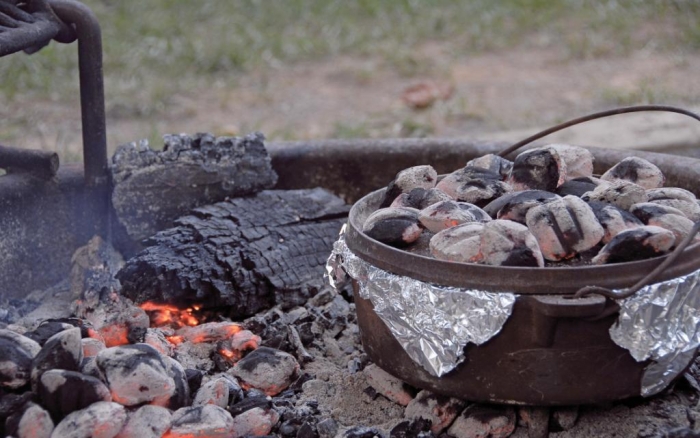
The typical Dutch Oven is made of cast iron with a circular body, with two handles sticking out near the rim. The base has three legs to allow it to stand over hot coals, while the handles support a strong wire bail loop to enable the Dutch Oven to hang over a fire. The lid has a raised edge, so that embers can be held safely on top of the Dutch Oven to give an even, top-to-bottom cooking heat. Some lids also sport three short legs to make it easy to use them independently, upside down, as frying pans etc. Cast iron heats well with an even heat and can be used above or beside the fire over flames, embers, or just using radiant heat, depending on what you are cooking. Pioneers found the Dutch Ovens so valuable that they were often individually mentioned in Wills!
The name ‘Dutch Oven’ comes from the 17th Century when the Dutch dry sand method of casting iron produced cooking pots with a smoother surface than other methods. Pots made using this ‘Dutch method’ proved popular in Britain and with the new pioneers in the Americas.
Practical pioneers added the legs and rimmed lids to the design and several American States have given the Dutch Oven the status of ‘Official State Cooking Pot’, while statues to pioneers often feature a Dutch Oven.
Dutch Ovens, like all cast iron cookware, are great to cook with, but need a bit of care to ensure they give their best. New Dutch Ovens are usually ‘seasoned’ by heating cooking oil or fats onto the surface to seal it and make it almost totally non-stick. Cast Iron often comes ‘pre-seasoned’ but if you want to be really sure that the iron is sealed and rust resistant, then seasoning can be repeated. Heat the pot with a good measure of cooking oil in it. When the oil is hot, rub it around the pot with paper towels on the end of a wooden spoon (to save burning yourself) and keep rubbing it in until the pot is evenly covered, then keep the pot hot until no liquid can be seen. Repeated use and proper cleaning maintain this surface and the Dutch Oven gets better the more it is used!
To avoid damaging this surface, you should not use soaps or detergents to clean a Dutch Oven - just boiling water and a stiff brush. A chain mail (yes, I mean chain mail – as in mediaeval armour!) scourer can be used to remove stubborn grime. After cleaning, the Cast Iron should be thoroughly dried and given a wipe down with cooking oil, and this goes for all your Cast Iron wares.
A well cared for Cast Iron cookwear becomes a sleek, black, smooth and shiny non-stick, multi-purpose cooking implement, an heirloom to take on every outing where weight is not over important!
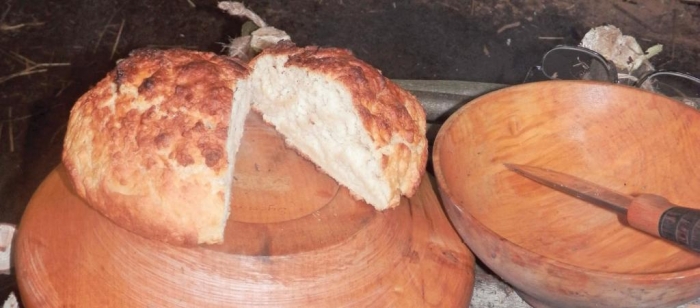
Bannock is a simple, but delicious, bread that is easy to cook on either a bakestone or in a Dutch Oven, over a simple campfire. It seems that this bread originates in Orkney, the island group off the northern tip of Scotland, which was the last port of call for ships of the Hudson’s Bay Company. Here, they would fill up their fresh water casks for the long trip across the Atlantic to their destination in Canada. The Company also recruited a large number of Orkney men, finding that their rugged island upbringing suited them well to the tough pioneer life in the Canadian wilderness. One of the most famous Orkneymen employed by the HBC was Dr. John Rae.
These men took with them their native cooking – including bannock bread – which became a staple of wilderness cuisine and has become a favourite with modern-day explorers and bushcrafters.
The basic ingredients of Bannock bread were easy to store staples that travelled well, but the recipe allowed simple variations – the addition of herbs, cheese or spices made simple savoury treats, while adding eggs and milk, plus extra sugar, made the Bannock more cake-like, and fruit, nuts and seeds in season add to the possibilities.
Once you have the basics, the variations are only limited by your imagination and what is to hand.
› 6 cups of plain flour
› 3 teaspoons of Bicarbonate of soda
› 1 teaspoon salt
› 1 teaspoon sugar
› 2 tablespoons of oil or equivalent of margarine/butter/ vegetable suet/ bear grease
› Lukewarm water/milk/buttermilk
1. Mix the ingredients in a bowl and then add the water/milk/buttermilk until you have a stiff dough. Pat the dough out to form a roughly circular Bannock, about 1-2cm thick. If the amount of dough you have makes too big a bannock for your bakestone, simply divide the mix to give two smaller Bannocks. Thinner Bannocks cook through faster, without over-cooking the crust.
2. Cook on a medium hot, floured (not greased) bakestone for about five-minutes each side, or until golden brown on each side and cooked in the middle.
3. The bakestone should be sitting over a bed of hot embers on a trivet or similar support. If the embers start dying, then rake more out of the fire to replace them.
1. The ingredients and method are the same as for the bakestone, but the cooking is as follows:
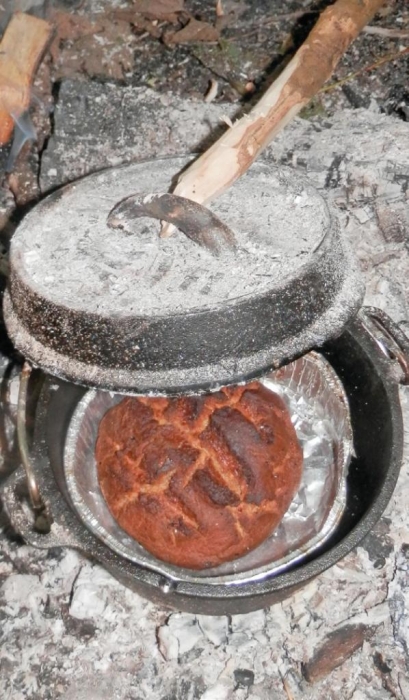
2. Preheat your Dutch Oven on the embers, having put in a trivet (a foil tart tray on three clean stones works well) to give an air flow under your bannock, helping avoid burning the lower crust. A lining of baking parchment can help things, but is not essential.
3. Roll the dough into a ball and put it in the Dutch Oven, making sure it does not touch the sides.
4. Stand the Dutch Oven on a bed of embers (not too hot) by the side of the fire and pile embers on the lid of the Dutch Oven, so that the Bannock cooks from above and below.
5. If the embers start dying, replace them with fresh embers raked from the fire.
6. Turn the Dutch Oven one-quarter turn every few minutes to even out the heat. Check every so often that the Bannock is not cooking too fast – it should be nicely done in half to threequarters of an hour.
7. The upturned lid of the Dutch Oven can take the place of the Bakestone, as can the base of a Cast Iron frying pan and the lid can also act as a hot plate or indeed a frying pan – but having the full set gives versatility – and the upturned lid of your Dutch Oven can prove difficult to manage and move when hot.
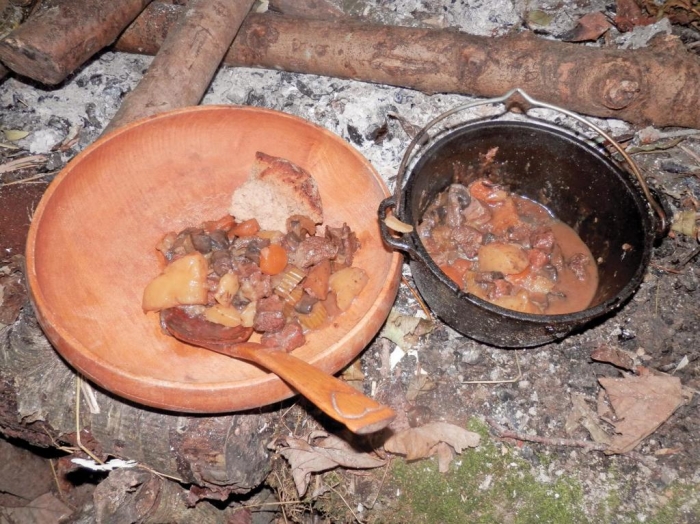
Most stew, casserole, soup and similar recipes, meat based or vegetarian, work well in a Dutch oven, so try out your favourites while the following recipe always goes down well. A Camp Fire Stew is the simplest of meals to cook in a Cast Iron Dutch Oven, used in the manner of the ‘cauldron’ over the fire. In some mythologies, a sacred cauldron was the source of eternal life – and a camp fire stew will certainly keep you going for a good while! Stews can contain almost any ingredient and can be varied to suit personal tastes and dietary needs – for example vegetarians could use soaked beans, tofu or Quorn in place of the meat in the following recipe. The following recipe is based on a traditional Welsh ‘Cawl’ or soup, but in this case presented as a stew!
› 1 onion
› 1kg Swede, chopped
› 2 large carrots, chopped
› 2 large potatoes, chopped
› 2 medium parsnips, chopped
› 3 large leeks cut into fine rings, or chopped
› 1kg lamb, cut into 5cm chunks
› Salt and pepper to taste
› About two-litres of water
› Cooking oil/butter/lard
Optional
› Stock cube/pot (lamb or vegetable) to taste.
› Remember, the smaller you cut the vegetables, the faster they will cook. If you chop the vegetables just before you add them to the pot, then the water has a chance to return to the boil and then the vegetables you put in before have a chance to soften a little.
1. To cook your stew, you will need your fire to have a good hot bed of embers (or glowing charcoal) with minimal flames.
2. Try to keep the fire at a regular hot ember level under the Dutch Oven when you are cooking the stew. Feed the fire with wood or charcoal to keep the heat constant and the stew bubbling along.
3. Pre-heat your Dutch Oven/ cauldron over the fire and add a table spoon or two of oil.
4. When the oil is almost smoking hot, throw in the cubed lamb and brown the meat along with the chopped onion.
5. When the meat is browned and the onion going transparent, you can add about half the water and bring it to the boil.
6. Add the swede, carrots, potatoes and parsnips in that order, letting the water return to the boil between each type of vegetable.
7. Add more water to ensure that the vegetables are well covered. This is also a good time to add any stock cube or pot you may like and salt and pepper to taste.
8. Add the leeks.
9. Keep the stew at a good simmer until all the vegetables are tender – somewhere around an hour to an hour and a half is about right for this recipe, then serve the stew with a hunk of Bannock and some cheese.
10. To add variety, you could add almost any herbs or spices you like to add flavour, or turn the stew into a curry or chili dish – but the basic recipe is very tasty as it is, the Welsh Cawl being a traditional favourite.
click on image to enlarge

click on image to enlarge
click on image to enlarge
click on image to enlarge

click on image to enlarge

click on image to enlarge
click on image to enlarge


