Decoy Direct Flocking Kit
- Last updated: 13/12/2016


I don’t know who first came up with the idea of flock-coating decoys, but it was a stroke of genius. Lightweight plastic decoys could now be used in any weather: no longer would they put off incoming birds by shining in the sun or glistening in the rain. It was obviously time to ditch the old painted decoys and invest in a new, flocked flock. Trouble is, the old ones still worked OK, and I’m simply no good at chucking out viable kit, even when something better comes along. So I was most interested when a bit of wet-weather web-surfing turned up a UK company that sells home flocking kits for upgrading both pigeon and crow decoys. That company is Decoydirect.co.uk, who, as their name suggests, offer all manner of decoy-related products via their e-commerce site.
The Full Kit
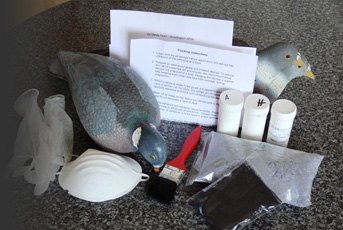
My e-mail enquiry was quickly answered, and within days the postman was handing me one of their pigeon flocking kits. This contained two bags of nylon flock (grey and black), two pots of adhesive (resin and hardener), a disposable paintbrush, a pair of latex gloves, a dust mask, a free pot of UV paint, and comprehensive instructions.
The flocking procedure was quite straightforward, but you still need to set aside a couple of hours, at least the first time you try it. And (for once) it’s worth reading the instructions before you start! You’ll need to make sure you have all the necessary equipment to hand too, i.e.: masking tape, something to mix up the adhesive in, something to support the decoys, a kitchen sieve, and a container to catch and recycle the flock.
Step by Step
The basic steps are as follows: (1) Wash and dry the decoys (2) tape over any areas you don’t want to flock, such as the eyes and beak (3) insert a support into the decoy to provide a handle (4) mix the 2-part adhesive and apply an even coat to the areas to be flocked (5) hold the decoy by the handle over the container (6) fill the sieve with flock and shake liberally over the decoy, working methodically down each side and from head to tail, and tapping the handle frequently to shake off any excess. Then, when you think the decoy is done, do it again! The aim is to cover all of the shiny adhesive and get an even fuzzy finish.
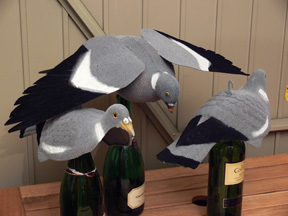
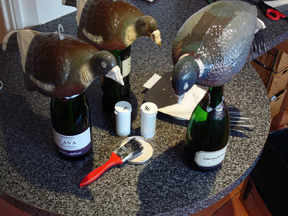
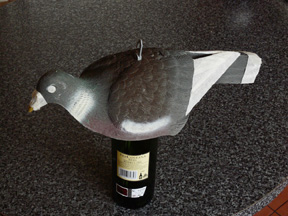
Having applied the flock to the decoys – it’s recommended that you do them in batches of three - they need to be set aside for 24 hours to dry, after which the process can be repeated with the other colour of flock. I started with the grey and then applied the black to the wings and tail, but next time I’ll do the black first and then go over most of it with grey, as the black should show through the grey for a subtler and more natural tome. Alternatively, to speed things up, I may just do the whole decoy in grey and simply paint on the darker “trim” on the wings and tail, saving the black flock for crow or magpie decoys.
As mentioned, the grey flock is lets some of the colour underneath show through, which is nice, but you’ll still need to re-do the white flashes on the wing covers and the neck with some white paint. I used a bit of oil-based undercoat but modelling enamel would do just as well.
With this done, you can apply that other recent technological innovation: UV paint. The idea is that birds see further into the UV range of the spectrum than humans and that the “white” flashes in a pigeon’s plumage are really (from a pigeon’s point of view) high-visibility UV reflectors. Consequently, painting the white flashes on a decoy with UV-reflective paint should make it visible from a greater distance as well as more natural-looking. I haven’t compared the effectiveness of flocked decoys with and without UV flashes yet, but the free pot of UV paint that comes with the DecoyDirect kit provides the perfect opportunity to experiment.
The Black Stuff
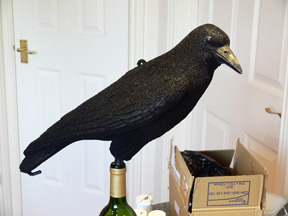
In the meantime, since Decoydirect.co.uk also do a crow flocking kit, I thought I’d use some of the black flock to do up a tatty old rook decoy (in dire need of a make-over) which I use for lofting. I didn’t get a perfect finish because I stinted a bit on the adhesive, but I reckoned the overall effect was more than OK. Incidentally, if you find you’ve got any bald spots, you can dab on a bit more adhesive, shake over some flock, and the job’s a good ‘un – not as neat as getting it right first time, but the birds won’t notice. (N.B. Sadly, the same doesn’t apply to humans!)
Anyway, I took my newly-flocked “crow” decoy out to a favourite spot, lofted it into a tree and retired to my hide to see how it would fare. I usually sit quietly for 15-20 minutes before getting the call out, but I’d barely sat down before two crows turned up to investigate the intruder, and by the end of the session I’d accounted no less than 22 crows and one magpie. The simple fact is that flocking has transformed my worst decoy into my best!
Give Me More!
The only downside of the flocking kit I can see is that one probably isn’t enough. Decoydirect.co.uk suggest that there’s enough flock and adhesive for 10 shell decoys, and this may will be true given a perfect technique, but after doing two shells and one full-body decoy with wings and tail I had used up well over half of my adhesive, and a fair bit of the flock, so I’d reckon 7-8 shells would be more realistic, for a first go at least. Trouble is, now I want to flock all my decoys, so I could really do with a jumbo flocking pack containing enough material for a couple of dozen shells! They’re a very helpful lot at Decoydirect though, and as well as extra adhesive and hardener, available for £6.74 a set, they tell me that it wouldn’t be a problem to supply additional bags of flock on request.
As for the cost, factory-flocked shells are around £5 each, and the pigeon and crow flocking kits cost £16.99 and £14.99 respectively. Even if you only cover 8 pigeon shells or 5 full-bodied crows per kit, therefore, that’s just over £2 per pigeon and £3 per crow to begin with, and probably less with practice, making DIY flocking considerably cheaper, much less wasteful, and definitely more fun than just binning your old decoys and buying new ones.
click on image to enlarge

click on image to enlarge
click on image to enlarge

click on image to enlarge
click on image to enlarge

click on image to enlarge
click on image to enlarge
click on image to enlarge
click on image to enlarge


