SpyPoint Link Micro trail camera
- Last updated: 26/05/2020


Imagine being able to see what’s on your hunting ground just by opening an app. Previous linked cameras have always been fiddly to set up, costly to run, and incapable of being remotely adjusted. Spypoint’s Link range changes all this, and their Micro model offers an attractive point-ofentry to this technology.
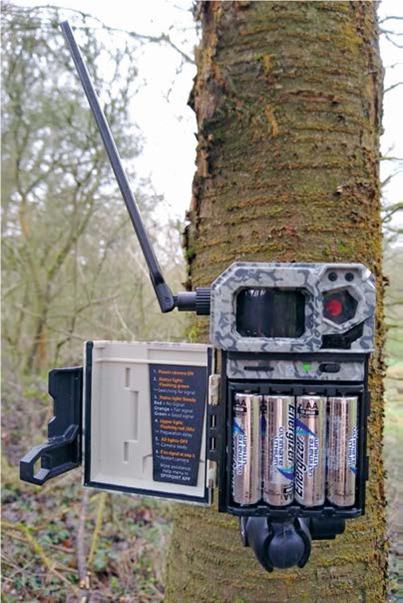
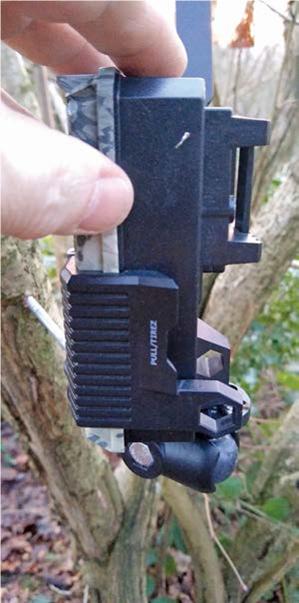
The camera comfortably fits a jacket pocket, and its camouflage finish makes it hard to spot in the woods. On-site installation is easy too.
Mount the camera, unlock the hinged front of the housing via the chunky clip on the R/H side, power ON, and wait for the green LED to stop flashing, adjusting the antenna on the L/H side if necessary. The camera is now ready to send photos to your phone. The low faff-factor means minimum disturbance to the hunting environment: a key benefit of a connected camera.
Next, download the SpyPoint Link app and register your camera with the serial number for the supplied SIM card. The camera is automatically named using the last four digits, but you can give it a more memorable/ distinctive name it (e.g. “coppice SW corner”). The SIM card is pre-activated, so there’s no need to set up an account with a telecom provider: everything is handled directly by SpyPoint.
Better still, the basic package gives you 100 free images every month. After that, the camera simply saves images to its SD card. When the new 30-day period starts, the camera transmits new images only, keeping everything current. Want more images? Then subscribe to get 250 (€5), 1000 (€10) or unlimited (€15) photos each month, with 20%, 30% or 33% discounts for annual payment. You can also buy supplementary Scouting Packages (€49.99 or €79.99 per year). These let you run multiple cameras, keep images available online for six or 12 months (vs. one month with the free service), and categorise images by quarry type. SpyPoint also offer rewards for referring new users and adding new cameras. Finally, images are stored on the SD card in HD, but transmitted at a lower resolution. This is usually sufficient, but for €5 you can upgrade any 50 photos in your stream to HD. Everything is managed via the app, so you can instantly increase quantity or quality where and when you want it, or save money by reverting to the free service at quieter times.
The Link Micro comes without a Micro SD card. SpyPoint cards are available, but at £29.95 (16Gb) or £49.95 (32Gb), I suspect most users will opt for other brands. You’ll also need eight AA cells. The Li-ion variety is best in most conditions, but alkaline cells are more cold-resistant.
Configuring the rest of the app will get the camera running and reporting as we want it. The “Status” tab displays the signal strength and battery level. Also logged are the monthly picture tally, the last upload time, the ambient temperature at the camera’s location and how full the SD card is.
The “Settings” tab controls the camera itself. On a top-end Link model it would offer video and a 1-3-shot burst option, but the Micro does stills-only and a maximum 2-shot burst.
Additionally, you can set the delay between triggers from zero to 30-minutes, and select high, medium or low sensitivity. Being able to tweak these settings remotely is a real asset when your image feed indicates a triggering issue. You can also set a daily upload time, and instruct the camera to upload images at 24-, 12-, 4- or 2-hour intervals, or each time it triggers. The fewer uploads, the longer the batteries last.
“Advanced” options let you schedule the camera to be active within a given time window for each day of the week, optimise the trigger speed, and choose the date format, centigrade or Fahrenheit, and whether to save images to the SD card in normal or high image quality. There’s even an option to turn off the mobile link. Scheduling is useful in areas where people regularly pass the camera during working hours, or for targeting nocturnal species.
The final option on the settings menu is one you hope never to use, because it lets you report the camera as stolen. Higher-end models let you locate your camera via GPS, too, but this function isn’t available with the Micro.
Most of your time on the app will be spent on the “Photos” tab. This displays images by date under a bar that shows use vs. allowance (e.g. “10/100”, or “HD 45 left”). Tapping on an image brings it up to full-screen and you can further enlarge/ scroll by spreading/dragging it. A data strip at the foot of the image adds the date and time, temperature and moon state. The image screen also has icons to bin, star, or share, as well as to request a 10mpx “HD” version if you’ve paid for this option. Unfortunately, although you can simultaneously delete multiple images from the “Photos” tab, you can only share images one at a time.
Valuable too is the “Info” tab. This provides access to a series of support videos and interactive trouble-shooting resources that address common camera or account issues and shows just how well supported and thought-through SpyPoint’s Link system really is.
aforementioned advantages of being able to configure the settings and view images remotely, how you site the camera on your ground still requires careful thought.
Having identified a promising trail, check the predominant track direction and aim the camera up the trail with a likely trigger point at close to maximum range (24m) for good head-on shots of animals. A 10-20-degree offset angle will give you a good sense of body size. To get the optimal trigger point, factor in the 42-degree detection angle. Better still, take movement out of the equation by siting the camera at a fraying, scentmarking, feeding or baiting site.
Consider the camera’s orientation, too. North-facing is best but avoid due east or west to prevent false triggers from lowangle sunlight at dawn and dusk. Height is important too: place the camera as low as possible without introducing much sky into the image and high enough not to be rattled by antlers or chewed by inquisitive mouths. Finally, take a brush saw to cut away any vegetation that might cause false triggers in strong winds, or over-exposure when the flash is activated at night.
Be prepared to return in a week or two after the initial set-up, since animals have minds of their own and often do the opposite of what you expected. For instance, after a couple of days of good head-on images, I had a whole string of tail-on shots, and then an unbroken sequence of crossers, as an intersecting trail became the main route. In these crossing images the 0.5-second delay between detection and capture often produced images that showed only the animals’ tail, whilst the darkness of the wood produced a slow exposures and blurred images. I had also placed the camera too high up, limiting the detection range and producing late triggers. Such is life, but remote, day-by-day monitoring of the camera let me know something was amiss, work out what to do, and pick a time that would cause least disturbance in the wood. This is a good thing, because its lack of a video or true burst mode undeniably makes the Link Micro less forgiving to site than cameras with these features. The lack of video is also regrettable because moving images provide a huge amount of behavioural information.
I take from this that SpyPoint has pared back the native capability of the Micro as far as they can, to produce the most compact and affordable package possible. This admittedly leaves the standalone performance of the Micro looking rather lacklustre, whether you compare it to the more expensive models in the Link range or to any of the plethora of cheap Chinese units available online.
Nonetheless, SpyPoint and Thomas Jacks give you infinitely better back-up, and when used in the right location (where animals can be encouraged to stand still, access is difficult, or minimising disturbance is a priority), the sheer convenience of accessing the camera’s output via your phone makes the Link Micro an undeniably rewarding purchase. Oh, and even if you don’t actually need a camera like this, checking for photo updates gets seriously addictive. I should know, I bought the test sample, and have upgraded my photo plan!
click on image to enlarge
click on image to enlarge

click on image to enlarge

click on image to enlarge

click on image to enlarge


