Bushcraft - Stay Sharp
- By John Fenna
- Last updated: 23/03/2018


A sharp knife not only cuts better, with less effort, than a dull one, but is safer too, being less likely to slip in a cut or glance off a stroke. Injuries from a clean, sharp knife, although they can be dramatic, tend to heal better and with less scarring than a ragged cut from a dull edged knife. So, you can see that having sharp cutting tools provides several benefits, but some people find achieving a sharp edge daunting and difficult. It need not be.
All you are doing in sharpening a blade is removing metal from each side of the cutting edge, until that edge is as thin as possible. This need not involve vastly expensive equipment and I have a preference for keeping things simple and affordable. Of course, if you have lots of knives to sharpen, some sort of mechanical sharpener can speed things up – but it can also speed up any mistakes you make!
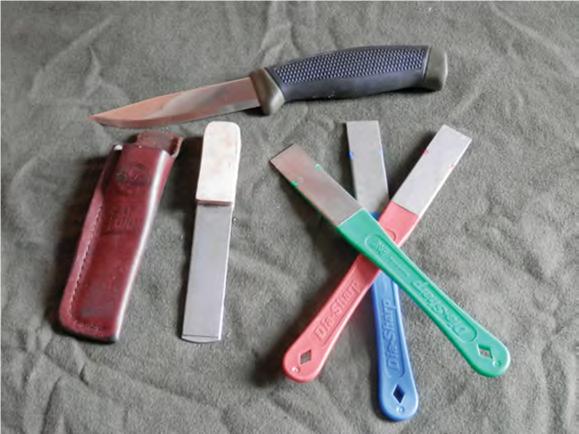
For sharpening a bushcraft knife, I like to use diamond stones – both bench stones for home use and pocket hones for use in the field – and although the word ‘diamond’ strikes fear into the wallets of many, my most used diamond bench stone was bought from Aldi for less than £10.
This is a four-sided ‘stone’, with sides graded ‘coarse’, ‘medium’, ‘fine’ and ‘superfine’ and similar ‘stones’ can be found at similar prices in most DIY stores and bargain-type shops. They all work well and if not as long-lasting as a set of oil stones, or Japanese water stones (which I have never been able to afford!) then they are cheap enough to replace. Diamond stones also have the advantage of being clean to use, as the only lubricant used is water. You can also use them dry, cleaning the diamonds of the metal you take off the knife with nothing more than a pencil eraser.
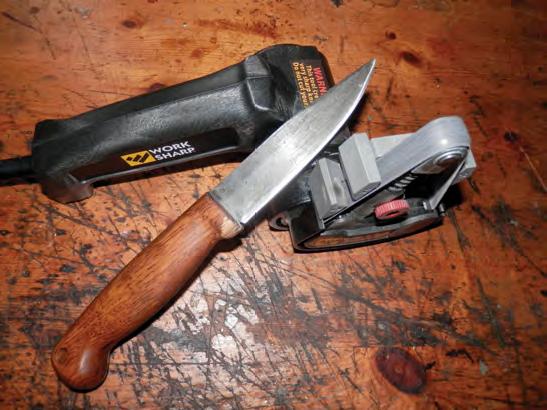
If I have a lot of knives to sharpen in one go – as I may do if I have been running a knife skills class – I may well resort to using a mechanical sharpening device, either a grinder or the ‘Worksharp knife and tool sharpener’ available from Casstrom. I do not think it worthwhile going in to using a grinder here and with the ‘Worksharp’, you simply follow the supplied instructions – being careful not to overheat the blade and keeping the grinding even.
Using a diamond bench stone is quite simple, especially with a Scandi ground blade, which is what I am going to describe here, as it is the most commonly used type of blade in bush crafting.
Place the stone on a flat surface and ensure that the stone cannot slip – many stones have non-slip bases – and put a few drops of water on the surface (if you do not want to use it dry). The water is there to carry away the steel you remove from the blade, so that it does not clog the diamond cutting surface and slow the sharpening down. Start with a fairly coarse stone but be aware that the coarsest stones only really need to be used for badly chipped edges – they eat metal!
Place the flat of the blade on the near end of the stone, with the edge facing away from you and the handle end of the blade snug to the edge of the stone. Tilt the knife up onto its bevel, so that the cutting edge is touching the stone and the whole depth of the bevel is in contact with the stone.
With moderate pressure, sweep the blade down the stone – keeping the bevel flat on the surface of the stone – as if you are trying to cut a thin sliver off the top of the diamonds. Use the whole length of the blade. This will generally involve raising the handle to keep the curve of the blade on the stone as you get towards the tip.
At the end of the stroke, lift the knife from the stone and repeat the action until you can see or feel a ‘wireedge’ or ‘burr’ along the whole length of the edge.
Once you have a continuous burr, turn the blade over and work towards yourself for the same number of strokes you used on the first side. This keeps the edge centralised.
Once you have done this with the coarsest stone you are using, you can turn to the next, finer grade stone and repeat the actions. Continue on this grade until the scratches made by the previous grade stone are gone. Repeat with each grade of stone until you have used the finest grade stone you have.
One tip- to make sure that you are sharpening the knife evenly, take a felt tip pen and cover the bevel in dark ink. Check it to see that the ink is being removed evenly, and if any ink is left, correct your stroke to remove it.
Eventually, you will get the feel and develop a muscle memory and using the bench stone will become almost automatic and something of a meditation exercise!
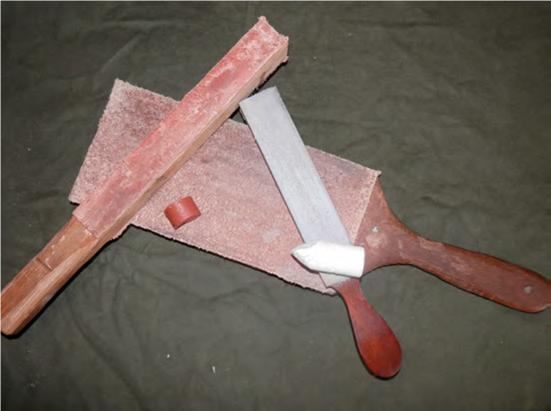
Once you have finished with the stones, your blade will benefit from a stropping. A strop is used to give a final polish to a cutting edge, removing any residual burr and scratches. Although you can buy commercial strops, they are easily made from a piece of scrap leather carefully glued to a flat board, ‘rough’ side up.
Load the leather with a commercial metal polishing compound, chrome polish or (at a pinch) toothpaste and give the blade a few polishing strokes on each side. I find 10 strokes is usually more than enough each side.
A stropping stoke is done by pushing the blade away from you, with the cutting edge towards you but still maintaining the contact of the full depth of the bevel against the strop.
After stropping it, the blade should be super sharp. I test mine by cutting the corner off a free hanging sheet of newspaper. The coarse paper soon lets you know where any dull areas have been left.
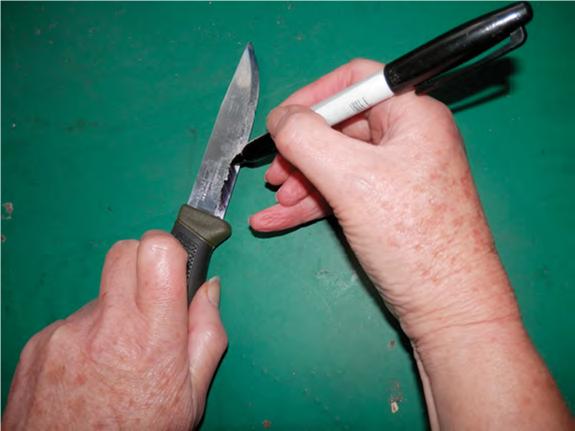
-In the field, you can use a small ‘pocket hone’ in the same ‘flat’ method, by laying it on a convenient log or by using the ‘circle’ method.
The circle method consists of holding your knife in one hand and your pocket hone in the other. Making sure that your fingers are safely out of the way, you lay the stone flat onto the bevel and using a small circular movement, work your way from the handle up to the tip and back. Repeat this several times and although no distinct burr may appear (it is wiped off in the reverse part of the circular motion) steel will be removed.
After you have worked up and down the blade a few times, flip the knife over and work on the other bevel to maintain an evenness to the grind.
A couple of quick and easy sharpening methods for field sharpening are found in using butchers’ steels and pull though type sharpeners.
Butchers steels come in full-sized or folding varieties and plain steel, or with ceramic or even diamond cutting surfaces and to use them you place the bevel on the steel and make as if you are cutting a layer off the surface. It can (in my experience) take a while to get fast and proficient at using a steel and I prefer to reserve these for rough work knives or those with a small secondary bevel to the edge.
‘Pull-through’ sharpeners are simple to use. You simply pull your blade through the factory-set angled tungsten carbide blocks or ceramic rods, which remove steel from the blade to give a wickedly sharp edge
However, there are several drawbacks of pull-through sharpeners. The factory set angle that they sharpen at may not be the same as the bevel on your knife and they may give you a ‘secondary’ bevel (not disastrous for most use, but not ideal – in my eyes at least – for fine work).
If you do not keep your blade upright and at an even pressure for the whole stroke, you can remove steel from your blade unevenly, giving a far from straight and even edge, and if you use too much pressure (especially with a carbide pull through), you can remove huge amounts of steel in one stroke. Add that to uneven pressure and you can give your knife a horribly uneven edge that can take hours of work on the bench stone to repair. Used well, and especially if the bevel set into the sharpener is what you want, a pull-through sharpener can make field sharpening a breeze.
The true secret of sharpening knives well is good practice. I recommend that you buy a cheap knife and start by practicing on that until you are happy with your technique. Stay sharp out there!

click on image to enlarge
click on image to enlarge
click on image to enlarge

click on image to enlarge
click on image to enlarge
click on image to enlarge
click on image to enlarge

click on image to enlarge


