Muzzle Loading Revolvers: Part 2 - Loading
- Last updated: 17/03/2017


If you were a handgun shooter pre-1997 you will remember being able to turn up at the range with your gun, a supply of ammunition (having done your loading at home) and your eye and ear protection. Although you probably had one or two other bits and bobs in your bag, this was basically all you needed to enjoy a session.
If you have chosen to go down the muzzleloading route, then you need to take a little bit more kit with you. How you choose to carry this extra gear will vary from shooter to shooter and you will see commercial shooting boxes and bags, plastic tool boxes and a few home-made contraptions among the muzzle-loading fraternity. Just find something that suits your needs and accommodates your equipment, but initially buy something that seems too big. You will soon fill it up with the various bits and bobs that help you get the best out of black powder shooting.
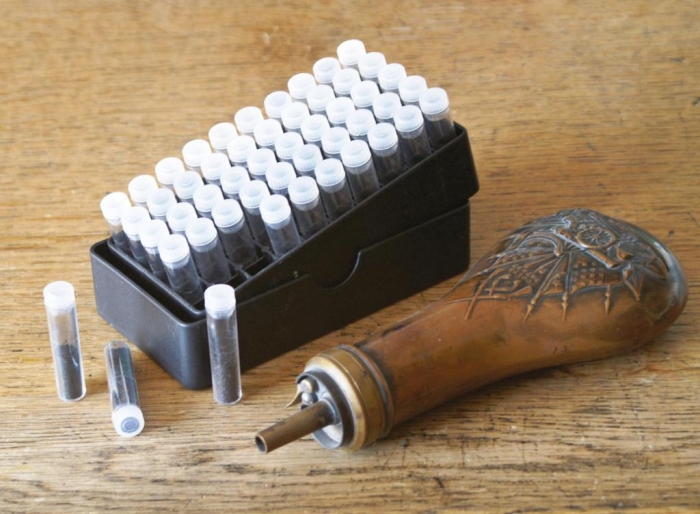
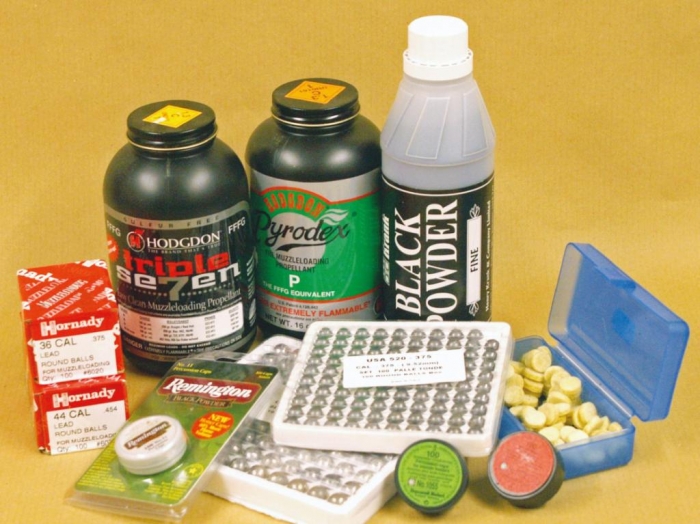
So, let’s look at what you need to take with you apart from the revolver. Your ‘ammunition’ will consist of powder, balls or bullets, percussion caps and some sort of lubrication to help keep the black powder fouling soft. The lead balls (by far the most popular) or bullets can be carried in the containers in which they were purchased, as can the caps. Whatever your choice of lubrication, that too can stay in its original packaging. Powder can be carried in a flask or as pre-measured charges in plastic or glass phials. As most, if not all, of your loading will be done at the range, there is no need for a loading press and dies. Indeed, most of the reproduction revolvers act as a loading press, so we will look at these first.
Just about everyone starts by loading the revolver in their hands just as it was done back in the day. It is not difficult and soon becomes second nature. You may, however, choose to make use of a loading stand, which are available ready-made or you can make your own. This supports the pistol vertically, so allowing two hands to fill it up.
You have a choice of powders depending on how much you want to pay and how serious you intend your shooting to be. Revolvers are generally best fed with fine powder, often referred to as FFFg. If your club allows the use of powder flasks, then this is as good a way as any to carry the powder. There are a number of reproduction flasks available at prices that will not break the bank and these usually come with a removable spout, which can be changed to increase or decrease the powder charge depending on the calibre in use.
Holding the flask in your right hand and with the spout facing up, put your forefinger over the mouth. Press the spring-loaded lever on top of the flask with your thumb (this opens a ‘gate’ on the top plate) and tip the flask upside down. A little shake will fill the spout with powder. Keeping your forefinger in place, release the lever and return the flask to the original position. Assuming that you fitted the appropriate spout, you should now have roughly the correct powder charge for your calibre ready to pour. A little experimenting with the weight will give you the optimum charge for your revolver/projectile combination.
With the revolver on half-cock (cylinder free wheels) and the muzzle pointing skywards, either in your hand or a loading stand, and the butt pointing towards you, carefully tip the powder into the empty chamber to the left of the barrel lug. If you are using phials then each one should be loaded with a premeasured charge. The charge can be weighed on scales or using one of the measuring devices available through your local gun shop.
If you are shooting an Italian made revolver it will invariably be stamped on the barrel something like “BLACK POWDER ONLY”. Should you choose to use a black powder substitute rather than the real thing, please read the manufacturer’s instructions very carefully, particularly in the case of Hodgdon 777. This powder requires a reduced weight compared to black powder to achieve the same energy.
With your cartridge guns, the lubrication is invariably in the bullet but with these muzzle loaders it needs to be added separately. If you are using lubricated wads, readily available from your local gun shop, or home-made grease cookies, then it will be done at this stage. The cookies can be made by melting beeswax and tallow (lard will do) and pouring into a flat dish to a depth of around 2mm. When set, cut out discs with a punch.
Experiment with the mixture to get cookies that are soft enough to do the job but hard enough to handle without being messy. Place the wad or cookie over the powder charge. If you are using the ‘grease over the ball’ method then omit this stage and add the grease to the mouth of the cylinder after loading the ball.
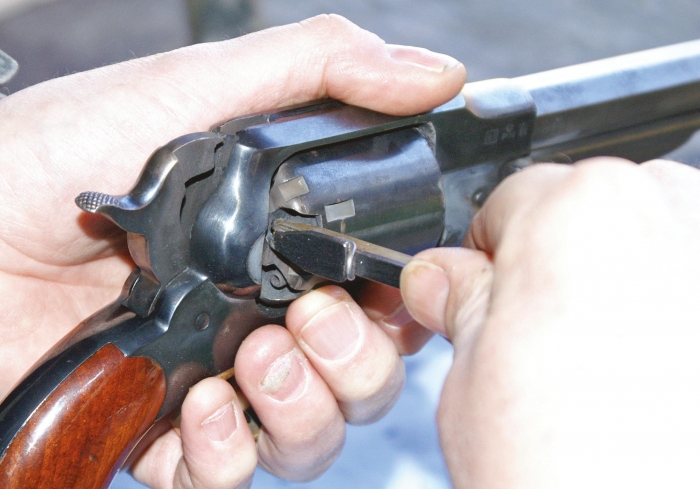
Round lead balls are easily obtained from your muzzle loading supplier, whilst conical bullets are scarce at best. If you are going to do a lot of shooting then it could be worth your while to invest in a mould and casting your own. Place the projectile into the mouth of the chamber and turn the cylinder until it is directly below the face of the rammer. Release the loading lever from its catch and press the projectile into the chamber, making sure that it is not sitting proud of the cylinder face, otherwise that chamber will not rotate past the barrel.
You will probably only make this mistake once! The correct size of ball will shave a tiny circle of lead from its circumference when seated. Repeat the above procedures until all six chambers are loaded and return the loading lever to its position. If you are shooting a competition where the revolver starts in a holster, then you will be instructed to only load five chambers and rest the hammer on the empty one!
Perhaps some of you will choose to make your own ‘cartridges’ in advance to save a little loading time at the range. These combustible paper cartridges were commercially available in the 19th century and are easily constructed, usually with cigarette papers, at home. They consist of a lead ball or bullet wrapped in paper with the appropriate powder charge. There are a number of instruction videos on YouTube for those who wish to go down this route.
There are a number of caps on the market but I have found those made by Remington to be extremely reliable. Having completed the above procedure, the revolver is still in a safe mode as there is no ignition system in place. Only when you are ready to shoot should you place the caps on the nipples. There are different sizes of caps available and trial and error will show which is best for your particular revolver. You are now ready to make some smoke!
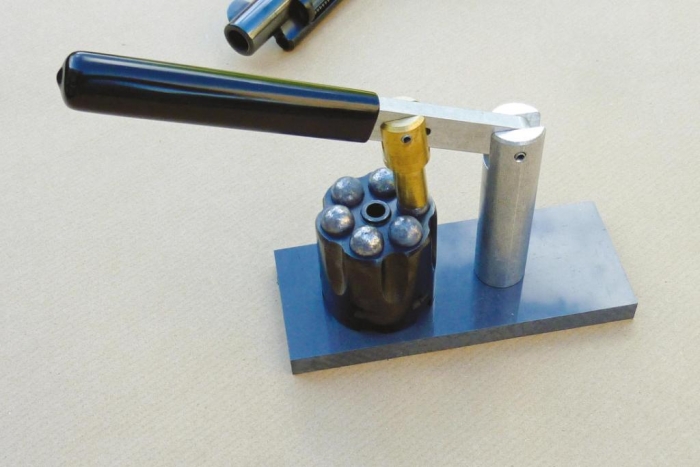
Should you have chosen the reproduction black powder Colt Single Action Army model, loading requires you to remove the cylinder from the pistol and a special tool is needed for this purpose. These are available commercially or you could make your own. The sequence of powder/lubricant/ball is the same as above but is done off the gun. Once loaded, the cylinder can be replaced before putting on the caps. Dropping a loaded, capped cylinder could prove a little embarrassing to say the least.
As stated above, you will need a little more kit to go black powder shooting than you did with a cartridge handgun. Some you will already have and the rest you can buy or fabricate as your need arises. A couple of good fitting screw drivers will always come in handy, as will a small soft faced hammer, used to knock out a stubborn wedge on a Colt-type revolver. A small pair of pliers will help remove the odd spent percussion cap that refuses to come off the nipple, and also retrieve the occasional broken cap that falls into the hammer/frame gap in your Colt pistol.
If you shoot your revolver in cold weather, a few dropped caps will convince you that a capping tool is a good investment. A nipple key should be high on your list of priorities that will allow you to remove the nipples from the cylinder to aid cleaning and ensure they are tight when you put them back.
If you are shooting for extended periods, the dreaded black powder fouling will rear its head and begins to slow the operation of cocking the revolver, necessitating cylinder removal. Carry a couple of old rags to wipe down the cylinder arbour (pivot pin), an old tooth brush to clean around the forcing cone (start of the barrel in front of the cylinder face) area and some grease or oil to apply to the arbour before re-assembly.
It may also be prudent to carry some basic spares in your kit. There are three springs in the single action revolver – mainspring, trigger/bolt spring and hand spring – and one of each would not come amiss. You may never need them but these things have a habit of breaking when you least want it, like part way through a competition stage. Likewise, you probably will not replace a trigger or nipple, but they don’t cost the earth and are handy to have in your box. As you encounter various tasks or problems you can add whatever helps make the task easier and more enjoyable. Things like the ubiquitous pocket knife, bits of wire or paper clips, pipe cleaners etc. will all eventually find their way into you tool kit.
Probably first seen among the British Western Shooting Society competitors, these revolvers have the advantage over traditional black powder revolvers in that they run on very small quantities of smokeless powder, which eliminates the fouling problem. This is a major plus if you are shooting competitions. Set against that is the cost of a new cylinder to accept the higher pressures and the need, in most cases, for a separate tool to load the cylinder off the gun. The model that I use (from Anvil Conversions) requires that the lead balls are only coated in liquid Alox, thus doing away with the need for wads or cookies. Ignition is by shotgun primers rather than percussion caps. Shooting one of these reminds me very much of the feel of a .38 Special revolver.
A word to the wise: please do not think that these “very small quantities” of smokeless powders will be OK to use in a cylinder that has not been specifically manufactured and proofed for this purpose. The consequences could be disastrous! Next time, we will look at the subject that probably gives black powder shooting much of its undeserved bad press – cleaning.
www.henrykrank.com
Everything muzzle loading; www.ubertireplicas.com, www.pietta.it, www.davide-pedersoli.com
Associations; Muzzle loaders Association of Great Britain; www.mlagb, British Western Shooting Society; www.bwss.co.uk
Smokeless conversions & tuning of percussion revolvers; www.aandagunsmith.co.uk, www.anvilconversions.co.uk, www.kershawguns.co.uk
Newly made smokeless revolvers; www.westlakeengineering.com, www.merseysidearmoury.co.uk

click on image to enlarge
click on image to enlarge
click on image to enlarge

click on image to enlarge

click on image to enlarge
click on image to enlarge
click on image to enlarge

click on image to enlarge


")