ATI Ruger 10/22 stock
- By Pete Moore
- Last updated: 29/11/2016


The Ruger 10/22 shares the distinction along with the Colt AR15 of being the rifle with the most amount of accessories made for it. However, these don’t just include improved controls and components as this little gun lends itself to be dressed up too. By this I mean it’s small enough to be fitted into a number of what might be called exoskeletons. We are not just talking replacement stocks but making the 10/22 look very different. Three of note were Bullpup and Tommy Gun kits and one to make it look like the German MG42 machine gun.
However, there’s no denying that your average 10/22 can do with a bit of a makeover. If so then a company that realises this is ATI who specialise in replacement stocks and furniture accessories for many top gun brands. The other year I tested their Strikeforce stock for the Ruger that gives a side-folding, length-adjustable butt with rails up front and most practical it is. For 2014 ATI have gone for the money with an AR-22 kit that gives the old 10/22 a serious AR15 look and feel.
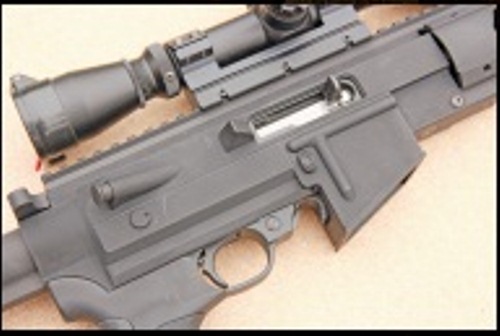
The AR-22 comes in a swanky box with magnetic closure on the lid; not sure why! Instructions are comprehensive and easy to read with all fixings included though you have to supply the tools! The kit consists of an AR-like polymer/clamshell receiver with dummy forward assist, safety, mag release, bolt hold open and case deflector. Plus T2-style pistol grip, round/free-float alloy forend, dummy alloy T-handle, 21” alloy Picatinny rail and a 6-position CAR15-type butt with adjustable comb on an alloy buffer tube. A final item is the rather wicked looking FSA8 Nose Cone, which looks like it was designed by the Marquis de Sade!
To start remove the barreled action from the Ruger stock, you don’t need to take off the iron sights but you must remove any scope base. Lay the L/H receiver section down and fit the butt section with the large, 1/4x20 button head screw (5/32” Allen key). Then slide in the square nut into the pistol grip base and fit the dummy T-handle. This component is not just for the look as it also serves to secure the rear Picatinny base and also add strength to the dummy receiver.
Drop in the 10/22 barrel/action and locate it in position then put on the R/H receiver half ensuring the tabs in the mag well engage. Push on the pistol grip and secure it with the long 10-32 x 1.125” (3/32” Allen key). This requires the back strap to be slid off first, which is then retained by a Phillips head screw once in position.
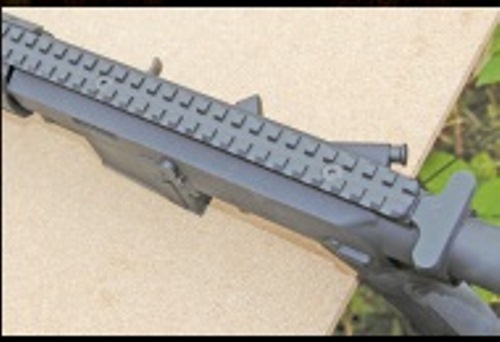
The forend slides over the barrel with the protruding lug at 6 o’clock facing the action, As it comes to rest you will see the two side holes line up with the one underneath aligning with the original Ruger stock screw hole. The side holes are secured by two 8-32x3/8” screws (3/32” Allen key) and the lower by a 10-32x5/8” screw (1/8” Allen key). The Picatinny rail attaches to both the forend and through the action into the T-handle below using two 10-32x58” screws (action) and four by 10-32x3/8” (forend) both with an 1/8” Allen key.
This is what give the AR-22 chassis it’s strength and rigidity. I would suggest here with both the forend to receiver and Picatinny to both; all screws are done up loosely before tightening everything down. I noted when fitted this rail was slightly bowed, doubtless due to small variations in component tolerances. However it was not enough to affect scope mounting to any degree!
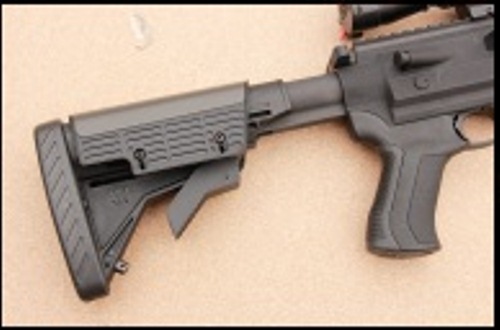
Using the eight Phillips head screws and nuts, the comb is attached to the butt section and by slacking off the outer screws the comb height can be adjusted. ATI includes a self-adhesive rubber sheet that goes over the top of the comb.
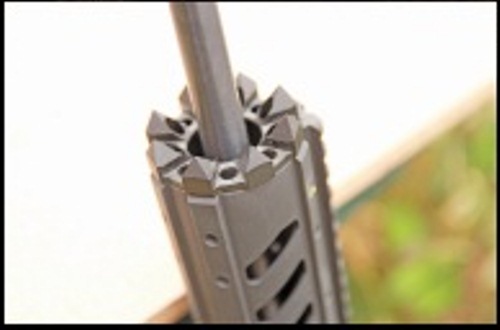
The final and positively worrying item is the Nose Cone. This consists of an alloy ring that fits into the front of the forend and has eight, sharp pointed spikes spaced around it! It’s retained by three, 10- 32x3/16” grub screws use a 3/32” Allen key. I assume this cookie cutter item is for ramming into wooden barricades for added stability, plus offering the potential of cutting your hands if you reach forward too far.
The AR-22 comes together easily and everything fits well, I reckon the job takes under 10 minutes. Ergonomically the new chassis feels good with the forend giving a lot to get hold of and the new pistol grip offering a decent hold. ATI have been clever as the dummy mag well accepts standard 10/22 mags and is cut out at the rear to use the rifle’s mag release. In terms of use a longer magazine is preferable as there’s more to get hold of. The standard Ruger 10-shot rotary unit has to be dropped in the well then pushed down to engage. The cross bolt safety remains as before as does the manual hold open catch. The standard cocking handle feels a bit short and I’d probably get an extended one!
The forend is drilled and tapped for optional rails at 2, 4, 6, 8 and 10 o’clock, so you can go lights, lasers and bipods if you wish. The full-length Picatinny rail allows you to fit what sights you like on top from QD irons, red dots and optics. Along with all the dummy AR controls moulded into the receiver halves ATI have also cut out a rectangular section top left so you can see the gun number.
As with all these exoskeleton kits the real downside is cleaning, as if you want to strip the bolt out etc the whole thing has to come off, which is a chore compared to a standard 10/22. However, 22 semis need regular cleaning so it has to be done!
click on image to enlarge
click on image to enlarge
click on image to enlarge
click on image to enlarge


")