K98 sniper Bruce Potts rebuilds a classic sniper rifle
- Last updated: 27/01/2017


I am not really into military rifles but there are certain ones that have always intrigued me, a good example being the German WWII K98 sniper rifle. It may be military but that 98 action is pure classic quality, so why not build a replica for hunting? Finding all the bits and talking to experts on the subject, which I am not, was enlightening. I had already tested a K98 sniper a couple of years ago with a long side mounting system, but really liked the look of the turret mount and this would be my ultimate goal.
Forget an original K98 sniper, if you could find one any way, the price would be way prohibitive. You see quite a few for sale but the majority are made up using period rifles and scopes but on the whole reproduction mounts. There’s nothing wrong in that so long as you know! Me I am not a collector I long as you know! Me, I am not a collector, I just wanted an accurate and shootable reproduction and I had a few plans as we shall see.
Sourcing a good, authentic matching numbered K98 that has not been buggered around with was no easy task. A good starting point is either Kirk Emmerich of By Sword & Musket or C & G Firearms, both of who have quality rifles in stock along with and have a wealth of advice and knowledge.
It soon became apparent that getting a matching numbered and dated K98 would be tough so I lowered my sights to a war-dated but mismatching numbers to irrelevant parts like the barrel band and concentrated on bore quality and matching stock, bolt.
Chris from C & G had a perfect candidate in the form of a BNZ 44 K98 (Steyr Puch Daimler), laminate stock with a very good bore, which cost £500. Like most K98 they are Russian capture indicated by the crossed are Russian capture indicated by the crossed rifle stamped into the top of the barrel but no matter for me with that bore it should shoot and that’s all that really matters. Next the scope and mounts?
Claw-mounts hark back to the 98 Mauser`s sporting heritage and both single and double claw variants are encountered. The double attaches with a bridge-type front recessed and dovetailed into the receiver ring. The rear also has twin slots that the top mount attaches to and is then latched in place.
The single claw have both front and back bases mounted to the left of the receiver and utilised a single claw attachment with the rear claw being retained by a tensioned plunger that allows the scope to be tipped up and forward to be removed when the plunger is depressed. As with all these systems the windage is adjusted by moving the scope left or right by a screw system, as optics of the time only offered elevation adjustment.
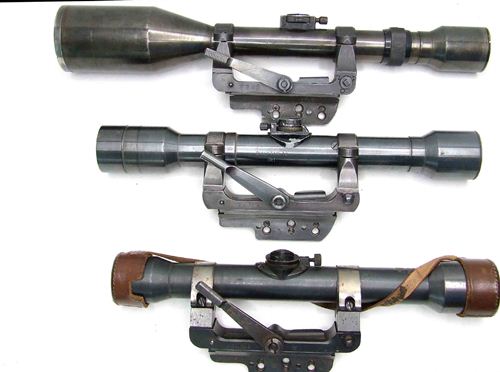
More common are the side mounted unit mounts. Two models are available, the short side/rail with its single large clamping lever sited at the front of the mount. The base is attached to the left of the action via either three screws or later models had three additional locking screws and some had two/three locating pins. The top section that incorporates the scope rings attaches and detaches by a dovetail cut along the length of the mounts under side. One problem was they worked loose under recoil and so you often see the later additional securing wing clamp to the scope ring assembly.
Second an improved short rail mount was the long rail or side mount system. This had a longer/bigger bearing surface (2.5cm more) on the action that stopped it yawing or tilting on firing. The ring section was improved by a large clamping lever sited in the middle of the mount and an additional locking arm to further stop movement. There are also three large screws retained by locking screws and two additional pegs that all stop rotation and loosening of this mounting system.
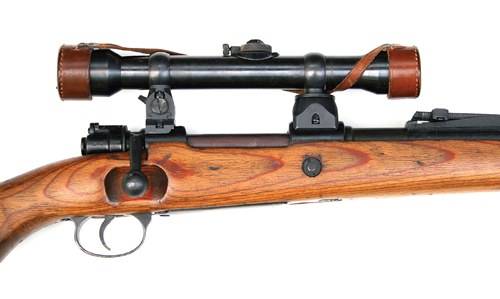
The Turret mounting system is the best for looks and solidity. Again several variants being the low or high although both use the typical German, swing-off scope system. Here the front base is secured to the receiver and locates a top scope ring by a recessed slotted turret that locks in a 90° plane simultaneously as the rear mount locates on a dovetailed base and is secured by a small locking lever with tensioned pin location. Again windage is via a screw and dovetail arrangement on the rear mount.
The only difference between the low or high turret mounts are the heights, unsurprisingly being only some 5mm. There are also some differences to the front locating system but essentially both offer a solid union between scope and rifle, this was what I was after!
Accumount from the USA are world renown for reproducing authentic looking and functioning scope mounts for the K98 and many other sniper rifles. They are excellent quality and I sourced the High Turret mounts system for $210 including securing screws and tap and die for fitting.
Zeiss scopes usually comprise of the Zielvier or Zielsech models. These are x4 and x6 power variants both with 26.5mm body tubes and single elevation adjustment turret and retaining screw. Hensoldt Dialytan models were also very popular, rare war-dated scopes can be distinguished by markings of BMJ which indicates the maker Hensoldt Wetzlar production.
Kahles H4/60 and Ajack in both x4 and x6 power are also encountered, the latter are super rare and an SS-Dienstglas (Service scope) can sell for thousands of pounds. You can find any of these scopes on the internet usually at prices ranging from £350 to £2000 plus depending on condition and rarity.
I sourced a Zeiss Zielvier from a chap called Robert from Austria who owns www.k98.com. He is a master at sourcing old optics and also has written a series of books on K98 sniper scope derivatives.
More importantly he can fit a scope correctly. The turret mounts I wanted means the scope has to be soldered in place as there are no securing screws, this takes skill and a partial disassembly, so don`t try it yourself.
He had a mil spec pre war Zeiss Zielvier for sale, so perfect and fitted the scope to the Accumount turret mounts by solder for only $ 100 plus p&p, bargain.
I did not stop there as I wanted a sniper safety, also sourced from Accumount for $45 along with leather scope covers for the Zeiss Zielvier, although I had an authentic one anyway. Trigger wise I wanted a single stage unit as those old K98 triggers can be interesting to say the least. The Sportsman Gun Centre had a couple of Timney Mauser triggers for sale, one a feather weight sporter and the other a standard weight sporter without safety, which I chose.
Problem now was to get it all together. Fitting the Turret mount to the action requires a skilled gun smith because siteing it correctly, perpendicular and so the swing off mounts work perfectly is hard. Also the mounts have two sets of screws to secure them to the action top, so lots of chances of disasters! Trouble is the action is work hardened and you have to break through the surface before the tap will work properly.
Steve Bowers came to my aid and set up the K98 barrelled action into his mill and continued to mic it up for zero run out. The mount screws are also set at an angle so holes have to be drilled accordingly, 35° in this case and at the same distant from the centre line.
Needless to say Steve is a master at this and made it look easy as the High turret mounted Zeiss was soon secured to the action. It would need further securing with solder but I wanted to check it first. Releasing the toggle on the left side of on the mount allowed the Zeiss to smoothly swing right and disengage from the front turret mount and reattach with ease and solidity, perfect!
I sourced some ammo from Norman Clark’s gunsmith, only FMJ at present to check it all shoots OK. The ammo was HP 8X57mm JS loads with a 197-grain bullet. Over the chrono they recorded a consistent 2459 fps and despite that all steel butt pad recoil was very manageable due to the overall weight of the combo.
Sight adjustment is a bit tricky as windage corrections requires loosening one screw and tightening the other and its trial and error as a small move makes a lot of difference and locking it off can shift it a bit. Accuracy-wise the first groups were two inches high and eight left so really very good for a soldered on scope. Better still three rounds shot into 1.75-2.0 inches which for FMJ and a 1944 dated rifle is pretty damn good.
Over the course of the next months I am now making some reloads to fine tune the accuracy and achieve the optimum from the old stalwart 8x57mm or 7.92mm cartridge. Finally taking it out stalking for a real field test, wish me luck!
click on image to enlarge
click on image to enlarge

click on image to enlarge


")