Hand-loading Part II components
- By Pete Moore
- Last updated: 14/12/2016


Let’s start with the most obvious bit, the case. For our purposes we will deal exclusively with those made from brass… There are other materials but they don’t lend themselves to safe practises. Brass is an alloy comprising 36+% zinc and 62+% copper and sometimes some lead. Modern cartridge brass uses a slightly softer 30/70% mix which offers improved cold working properties.
Obturation
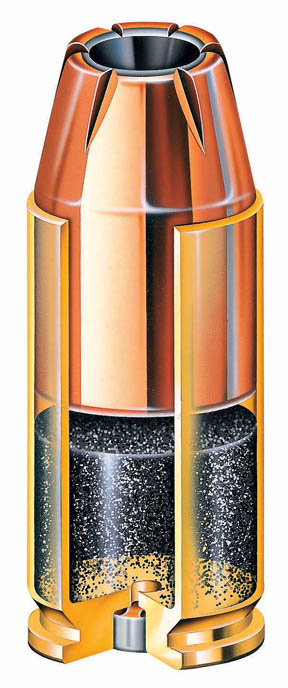
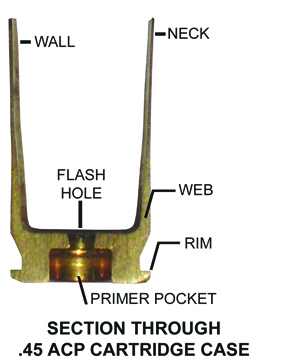
The case holds all the components together – bullet, primer and powder with the resultant item being called the cartridge or round of ammunition (round). During the firing sequence the brass case expands (obturates) so giving a gas-tight seal at the breech/chamber.
Brass is malleable so ideally suited to the task. A solid piece of material is drawn over a series of mandrels and punches to form the finished item, including the flash hole for the primer. The final operation is the headstamp which is stamped on information on calibre and manufacturer and is a requirement of CIP and SAAMI.
This working of the brass hardens it so at various stages of production the case is annealed (softened) by heat treatment and sometimes chemically. Completed cases are chemically cleaned and then packed ready for use or sent for a final nickel electro-plate finish.
The Consumables
The primer is the reloader’s spark plug, as it sets off the process. Essentially it consists of a drawn metal cup with the priming compound (flash material) in its base, which sits in a pocket in the base of the case. There are two types Berdan and Boxer, but the former is all but obsolete in terms of civilian reloading. For our purposes Boxer is king. The major differences are the Boxer has an integral anvil (the part the cup is crushed against to fire the compound) so allows a concentric flash hole. The Berdan has its anvil in the primer pocket and uses two, offset holes.
The explosive compound burns at 5200 metres per second and is usually a mix of lead styphnate or DDNP (diazodinitrophenol) and finely ground glass, this is added to improve its burning capabilities. These days many Western primer manufacturers have switched exclusively to DDNP so offering a lead-free option.
Primers come in two sizes and types – large and small, rifle and pistol and are further sub-divided into standard and magnum power ratings. You can also get bench rest grade, which are said to be more consistent.
Gone in a Flash
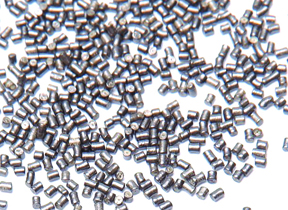
Power to move the bullet is supplied by the propellant charge (powder). Unlike the high explosives in the primer, small arms propellants are considered low explosives. As such they will burn rather than detonate and in doing so produce a volume of gas that pushes the bullet down the barrel at high speed. Two basic types exist, single base and double base. The primary active ingredient in the former is nitrocellulose, whilst the latter contains this and also nitro-glycerine in varying proportions.
There are many different grades of powders to suit all needs from a slow moving pistol bullet up to a high velocity varmint round. This is achieved by the size and shape of the individual kernels of propellant which will affect burn rate, along with any retardant coatings applied. Some kernels even have holes down their centres to improve this. Generally speaking a pistol powder needs to burn fast as it only has a short barrel to work with, so would probably use small flat flakes to achieve this. A rifle with a 24” barrel can afford to take a slower approach and use larger shapes, so you get a longer and slower burn. All these are variables and as the series progresses we will come to understand how to select the best for the job in hand.
What’s my Name?
The bullet is the projectile only, and not the whole cartridge, nor is it called a bullet head or head! That name applies to the base of the case only. Bullets offer a truly movable feast and can be encountered in all sorts of types and builds. The most basic is all-lead, normally made from a lead alloy to make it a bit harder. Moving up we have a lead core with a metal jacket (normally copper around it), which allows it to be fired at higher speeds.
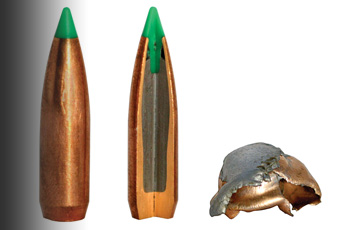
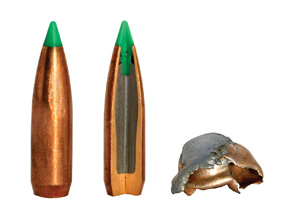
These jacketed types are available in many mission - specific builds. For target shooting we tend to use a full metal jacket (FMJ) meaning the pointed end of the bullet (ogive) is totally copper clad with just the base showing exposed lead where the copper wraps round. Or if we want the best it could be a boat tailed hollow point (BTHP). Here the jacket is drawn from the base, which makes this area stronger; the result being a slim hollow point nose, which is a symptom of the build rather than a requirement, though they usually chop neat holes in paper.
For hunting there are purpose-built hollow points designed to expand on contact, along with soft point (exposed lead tip) that improves expansion, and ballistic tips, which have a polymer nose piece to do the same job. The shape here usually makes them fly better. Today we are seeing the emergence of non-lead designs made entirely of copper alloys to reduce pollution… Some work well others do not shoot as good as the traditional styles.
The law states anything with a solid build is a Section 1 component, but if it’s a hollow point, soft nose or ballistic tip it’s Section 5 and therefore prohibited. However, to allow hunters to possess the right type of ammo for killing animals you are allowed to own Sect 5 bullets and ammo on a standard FAC. Daft isn’t it?
The range of shapes and weights is almost infinite. In some instances the term ‘calibre’ will give you the diameter required – but not always. A .44 calibre actually measures .429” for use in a .44 Mag, but a 44-40 requires a .427”projectile. This is yet another area we will be getting into.
click on image to enlarge
click on image to enlarge

click on image to enlarge
click on image to enlarge

click on image to enlarge
click on image to enlarge
click on image to enlarge

click on image to enlarge


