Scope Fitting
- Last updated: 21/11/2016


Many years down the line, and it’s easy to take things for granted in this game; yet running my own shooting club serves as the perfect reminder, that any newcomer to the sport requires guidance at every stage. There’s a lot to take in too, yet all in good time. I’ve witnessed those baffled and bewildered faces just recently, and the expressions say it all. It’s called ‘technical overload’, and at the early stages it can be rather off putting. Trajectory charts, windage, Mil-Dot reticules and it goes on!
A measured, methodical approach to each stage is preferable, if sanity is to be maintained, and my next couple of articles are intended to be just that.
So let’s assume you’ve finally splashed out on that specialist piece of hardware. Be it spring powered or pre-charged, the chances are that in common with the vast majority of today’s shooters, the fitting of a telescopic sight is the next move. I intend initially, to demonstrate the basic methods that have served me well over the years. Then I’ll highlight the pitfalls and problems that can occur in this area, and some of the ‘off-the-peg’ remedies available.
QUALITY FIRST
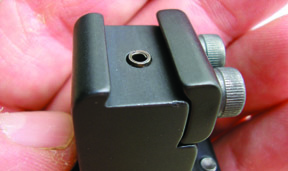
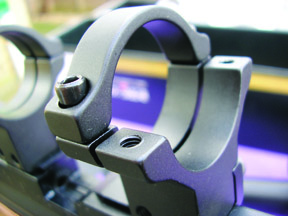
Firstly quality mounts make a difference. Bear in mind just how comparatively cheap a set are as a percentage of the overall rifle/scope budget. It always amazes me how some shooters are prepared to scrimp and go for the cheaper option. Personally, I’ve always used SportsMatch. They are British-made and superbly engineered. In addition, they’re dedicated airgun mounts, with specified dovetail dimensions to fit either a range of rifles, or in some cases, even a specific model. With many mounts now made in the Far East, quality varies enormously, with some being frankly atrocious. Many scopes include them in the package, and if budgets are tight, this can be handy. Otherwise, I’d recommend the relatively small outlay for top quality replacements. Brands of comparable quality to Sportsmatch are Bisley (largely made by SportsMatch!) and the American brand, BKL.
I have to say - avoid mounts that come with small pads inside the rings. These invariably become gummy, presumably from hot conditions and the residue can prove messy and irritating. The pads are intended to avoid marking the scope tube, yet ironically, the gum can be the only problem encountered. Fact:- Quality mounts, correctly and carefully assembled do not mark scopes!
CHOICES CHOICES
Two main types of mount exist for airguns: twin split rings and one-piece designs; the choice is usually dictated by the type of gun in question.
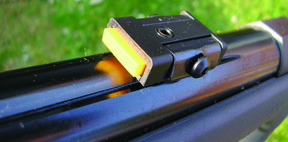
A spring-powered rifle has recoil to consider, which means that the scope may try to move backwards with the force of the firing cycle. Twin ring mounts can be used, but an arrestor system needs to be employed. Many rifles come with holes drilled into the receiver, to receive a small arrestor stud, which may protrude from inside the mount. This is either screwed in or out with an Allen key, or, in the case of those annoying roll pins, just needs a gentle tap with punch and hammer. In the absence of this, what’s termed as an ‘arrestor block’ can be used, which is an additional fixing, simply tightened up on the rails, behind one of the mounts, to prevent any movement.
Alternatively where spring guns are concerned, the fail-safe and slightly more expensive option, is the one-piece mount. These incorporate a longer clamping strip, which should ensure no movement under recoil.
With no recoil to worry about, pneumatics are far easier to deal with, and making sure that the breech area is kept clear, is the main consideration. Twin rings are normally fine in this scenario (given the two-piece rail configuration of many PCP’s), although if there is room for a one-piece mount, these can make switching scopes between guns, slightly more streamlined. Double screw strap mounts provide a more secure fitting, and BKL are unique with their design, although their dedicated rail design means selecting the right model is vital.
TAKE A REST
So you’ve made your selection, now ensure you have the correct tools to hand. A set of Allen keys is a must along with screwdrivers; both must be of good quality and not worn or chipped! Actually fitting the mounts is always easier with the rifle sitting in a V-block or rest, but a deep bean bag or cushion can suffice. First de-grease the dovetail rails on the rifle, just to remove excess oil. In the case of a spring gun, with fairly harsh recoil, it can be an idea to use de-greasing solution. Otherwise, just a piece of tissue paper should prove adequate.
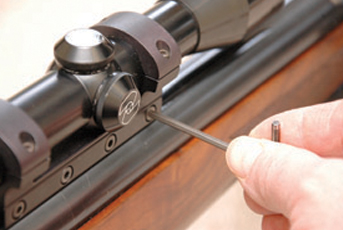
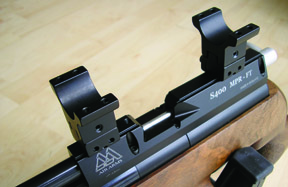
Next, unscrew the clamping bar on the side base of the mount and offer it up to the rail and gently hand-tighten the bar to the rail to check that it tightens accurately and adequately. If it seems the wrong width at this stage, then try removing the base Allen bolts (or screw head bolts if used), turning the clamping bar upside down, and then repositioning on the rails. Many mounts feature reversible clamping bars, which actually allow for varying rail widths (11mm – 13mm). If this still doesn’t rectify the problem, you’ve bought the wrong mounts!
INITIAL PLACEMENT
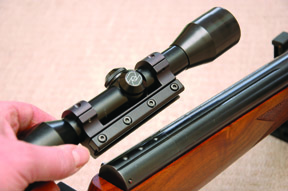
Accepting the mounts will clamp up OK, now remove the top halves of each ring, keeping them safely to one side with all the corresponding bolts ideally in a known pattern, to ensure they relocate in the same holes (thereby allowing for thread idiosyncrasies). Gently locate both bases in roughly the right position on the rails, and nip up the bolts just to hold them temporarily in place. Now place the scope in the lower halves of the rings and screw on both the top straps. At this stage, you are just aiming to gently tighten the bolts, stopping the moment if any resistance is felt. The idea is just to stop the scope falling out, whilst you decide on the right position.
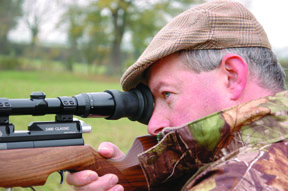
The position needs to be set for the scope, allowing the correct eye relief - that is to say the correct distance between the eye and the rear ocular lens; this is achieved when a full circular sight picture can be seen. With everything roughly held in place, and being careful to keep the gun flat (mindful of the loosely positioned scope, gently mount the rifle to your shoulder with your eyes shut, until the shooting position feels natural and unstrained. Open your eyes, and very gently move the scope either fractionally forwards or backwards within the mounts, until that full sight picture is achieved. As a rough guide, eye relief distance is around 2.5”, although this obviously varies from scope to scope, and with different eyesight. Gently nip up those bolts again, just enough to provide mild resistance of the scope within the mounts. Now recheck, mounting the rifle blind a few times, and when all seems satisfactory, we can move to the next stage.
RETICLE ALIGNMENT
Accurate shooting all stems from good basic preparation, so having the scope set true within the mounts is obviously a primary concern. Several methods exist for this operation, and over the years, I have tended to purely set-up by eye. Simple assists can be employed however, to ease the task.
Our aim is for a perfectly horizontal reticule with a perfectly perpendicular upright, all set against a level rifle action. To achieve this, a spirit level bubble can be placed on any flat section of the rifle’s action (maybe at the rear of the cylinder), whilst the scope is viewed against known accurate uprights such as brickwork. A plum line can be used, suspended downrange, to assist if necessary. Just gently twist the scope whilst checking the sight picture, until the reticule appears level and true.
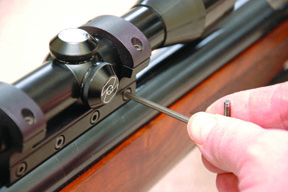
At this point, we can finally tighten the scope in place. First the bases fully, alternating between the bolts, in much the same way as car nuts are dome. Then the mount tops, again in that all-important alternate fashion. Be warned as you tighten down, the rings can and do impart a drive to the scope that can rotate it out of true! The idea is to achieve totally even pressure across the bolts, to ensure accurate true seating, with no distortion at any point. Do not over-tighten bolts, or they can become damaged!
A simple tip is to just use the end of the long arm of the Allen key in the bolt head, which means you are holding the short end of the key giving slightly less leverage. Where PCP’s are concerned in particular, remember- there’s no recoil! It simply isn’t necessary to hang off the bolts with a scaffold bar!. For the ham-fisted among us, the torque wrench, with settable fail-safe limits, is a wonderful thing.
OVER TIME
Finally, don’t worry too much at this stage, as careful monitoring and fine tweaking of the scopes final resting place, can be done over a few shooting sessions. Once mounting the rifle becomes second nature, and the sight picture falls into place, without strain or effort, the job is done.
click on image to enlarge
click on image to enlarge
click on image to enlarge
click on image to enlarge
click on image to enlarge
click on image to enlarge
click on image to enlarge
click on image to enlarge
click on image to enlarge


