Marble Arms Improved Tang Sight
- Last updated: 25/10/2017


Having recently added another under-lever to my collection, and wanting to see how it performs at longer distances, it was time to look at the improved sights available that can be fitted to the gun without any gunsmithing.
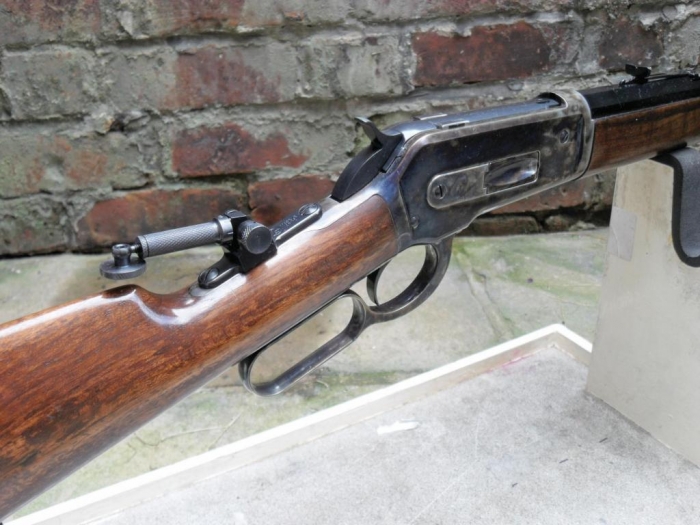
The gun in question is a Chiappa 1886 in 45/70 and I wanted to try it out at 100-yards. The factory fitted sights on the gun are a traditional post front sight and a buckhorn rear sight and are adequate for ranges up to 50-yards, but beyond that they are just not up to the job. The gun is a copy of the Winchester 1886 and so any sight designed to fit the Winchester should fit the gun.
While wanting to add a sight for 100-yard plus work, I also wanted to retain the existing sight for shorter distances and this made things more complicated. The existing rear sight does not fold down, like the one on a Marlin rifle, so whatever sight I added would have to function in tandem with the factory sight. Also, the new sight would need to be removable or collapsible, so that it was not in the way when using the short-range sight.
The solution was a peep sight, which fits on the tang of the gun just behind the hammer, and can fold down when not in use. The problem was finding a version that could overcome the need to retain the existing sight. The solution came in the form of the ‘Improved Peep Sight’ Manufactured by Marble Arms in the USA. The great thing about this particular sight is that it is purchased in separate parts: the base, the mounting screw set, and the sight post (which includes the sight aperture). The base and screw sets are purchased specific to the gun and Marble Arms’ helpful website lists the part numbers for most of the popular makes and models of gun. On this point, although Marble Arms do not currently list the Chiappa under-levers, Chiappa sent me a copy of one of their production drawings and this confirmed that the screw sizes are indeed an exact reproduction of the Winchester. The Sight post is available in three different sizes, short, medium and long, and this would allow me to purchase a sight that could work with the existing sight in place. To confirm which post I needed it was time to get the calculator out.
Firstly, while the sight post needed to be high enough to clear the existing sight, it couldn’t be so high that the bullets were heading skyward instead of going downrange. Fortunately, the 45/70 does have a trajectory like a rainbow and the bullet drop at 100-yards is significant; according to a couple of bullet drop calculators I found online, the drop at that distance is around 10- to 14-inches. Knowing the amount of bullet drop I had to play with, and using an old sight adjustment calculation I got from the legendary gunsmith Tom Neild many years ago, I was able to calculate that 12-inches on the target equated to 0.35-inches of adjustment on the rear sight, so I could install a sight post 0.35-inches higher than the existing sight line on the gun and still be approximately on target with the new sight at 100-yards; in theory anyway.
Carefully placing a straight edge on top of the existing front and rear sight, and measuring down from this line (at the point between the two fixing screws on the rifles tang) I was able to get the height of the existing sight line above that point. Adding 0.35-inches gave me the post height I needed, 2.725-inches. The Marble Arms website showed that the ‘Mid Range’ sight post had a height adjustable between 2.347- and 3.364-inches, so I decided to put the theory to the test and placed an order with McAvoy Guns in Standish.
When the sight arrived, the sight post and the mounting screws were in rather understated plastic bags but the sight base was in a very nice box, ideal for storing all three elements. Surprisingly, there were no fitting instructions with the sight, other than a tiny piece of paper explaining how to change between upright posts of different height.
The high-quality of the components is immediately obvious, with the relatively small parts being surprisingly heavy. The engineering on the base and post is top notch and it is good to see that no plastic has made its way into the production process. There is adjustment provision for both windage and elevation and both give a nice positive click as you turn them. The elevation has a locking nut to ensure that once sighted in the sight does not move. The Mounting screws are good quality too and it was pleasing to find that they fitted the existing threaded holes in the gun very smoothly, more testament to the fine engineering at Marble Arms.
Having fixed the base to the gun, the next stage is to fit the post to the base. It fits into a hole in the top of the base and is then secured by tightening a small grub screw with the Allen key provided. This gives a surprisingly good firm fixing and holds the post well. With such a tiny screw, I would recommend that the fitting and removal of the post is done on the workbench at home, rather than on the range.
Once fitted, the sight is easily adjusted with each click on both windage and elevation giving approximately a quarter of an inch movement on the target at 100-yards. Clamping the gun securely, and using the existing sights to line the gun up with a target, it was just a matter of fitting the sight post and adjusting it to line up with the front sight and the target, close enough to take the gun to the range for fine adjustment. To clear the factory fitted rear sight I started off with the new sight 0.35-inches above that sight line.
As the sight adjustment had been all theory so far, it was time to put it to the test. If all had gone to plan, then at 25-yards, the gun should be shooting on target with the factory sight, and approximately 12-inches high with the new tang sight. So, using a large target board, with an aiming point marked out 12-inches below the bullseye I test-fired the gun. No one was more surprised than me when the shots sighted at the aiming point hit ten to twelve inches above it, as planned!
I did need to make some windage adjustments to bring the hits on target and that was when another issue became apparent. As I made windage adjustments, I noticed that when the action was cycled one of the rear ‘wings’ of the breach bolt hit the sight post. This would no doubt result in damage to either the gun or the sight and also potentially knock the sight out of adjustment. The solution would be to either have the sight post machined down in diameter so that it did fit between the breach bolt wings or readjust the sights. As the second option would be far easier to do myself, I decided to go down that route. The adjustments had to be done in stages, as all three sight elements, the tang sight, the front sight and the factory rear sight were all going to have to be moved.
The first step was to measure the distance from the outside edge of the base on the tang sight to the centre of the sight post and note that down. I then moved the sight post over until the breach block cleared it and measured between the same two points again. The difference between the two measurements showed that the sight post had moved to the right by 3mm. Next, with the rear sight moving 3mm to the right, I knew that the point of impact would also have moved to the right, so to correct this I would have to move the front sight to the right to bring the bullet impact back on target. Moving the front sight was simply a case of releasing the screw that held it securely in place and knocking it over 3mm. The factory rear sight also needed moving over in line with the other sights, the method being the same as used to move the front sight, then it was back to the range to see if all the adjustments had worked. Both of the rear sights required some fine tuning but at 25-yards I soon had the factory targets bang on target and the tang sight shooting 10-inches high at that distance.
The sight looks great on the gun and looks like it has always been there. When not in use, I can either remove it, using the Allen key provided, or simply fold it down out of the way. Folding it up and down several times did not cause it to move out of adjustment or cause anything to loosen up. Although I have only had the opportunity to use the new sights at 100-yards once so far, the results are promising and with a few more minor adjustments I am confident of tightening up the group. With the new sight fitted, the gun will no doubt shoot well at greater distances and with the right reloads is probably now capable of shooting up to 300-yards. The great advantage of the marble Arms Improved Peep Sight is that if I run out of elevation adjustment with the current sight post, I can simply purchase the longer-range post and swap it over.

click on image to enlarge
click on image to enlarge

click on image to enlarge

click on image to enlarge


