PIXFRA PEGASUS PRO P650 THERMAL RIFLESCOPE
- Last updated: 09/06/2025


› Thomas Jacks is best known as Pulsar’s UK distributor, but, recognising that not everyone has the budget for a premium European product, they have worked with Chinese company Pixfra to create a range of devices that deliver great performance at more accessible price points. Since their launch at last summer’s Game Fair, Pixfra’s Pegasus thermal riflescopes have done precisely that.
Moreover, whereas the initial Pegasus models have now been replaced by the upgraded “Pro” series, prices have remained exactly the same, at £1,489.95 (P435P), £1,689.95 (P450P), £1,869.95 (P635P), and £2,069.95 (P650P), making them even more exceptional value.
So, what do you get for just over two grand? Quite a lot, as it turns out.
Build, handling, and feel
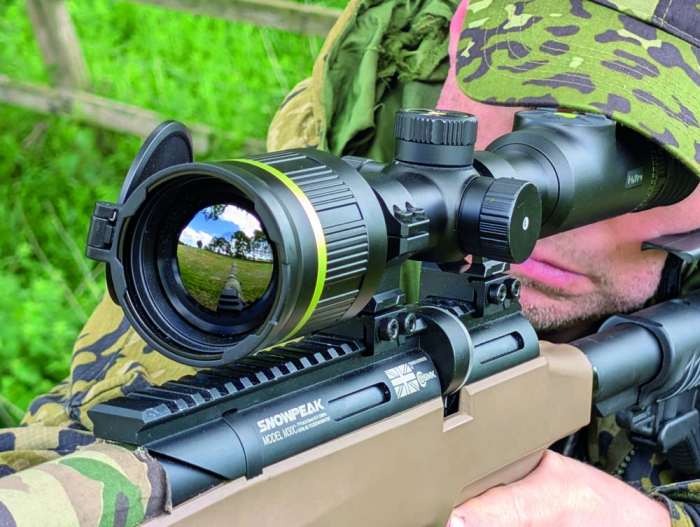
The P650P features a 50mm f/1.0 Germanium objective lens paired with a 640x512/12μm thermal sensor, delivering a native magnification of 2.78x. Overall dimensions (420.5 x 77.5 x 74mm) and weight (960g) place it shoulder-to-shoulder with Pulsar’s Thermion line. That’s not the only resemblance, as it mounts using standard 30mm rings, meaning no special hardware is required.
Build quality is excellent. The focusing rings for the ocular and objective lenses are nicely stiff, smooth-turning and backlash-free. The objective lens cover, which folds flat against the scope, has the rigidity of aluminium. The rubberised buttons on the ocular bell offer just the right amount of resistance, and the multi-function top turret turns and clicks with controllable ease. The whole scope carries an IP67 weatherproof rating and a 6,000-joule shock resistance.
Controls and interface
The main controls are split between the ocular bell and the saddle. On the bell, you get four buttons: power, image capture, palette change, and – unusually – a “range-setting” button (more on that later). The central power button is backlit (red for charging, green for active/charged). You can dim or disable this via the menu if needed.
The main menu system is accessed via the top turret, which scrolls and clicks to navigate and select. The interface isn’t entirely uniform; sometimes clicking confirms, and sometimes it cycles. It’s worth spending some time learning the layout. Once mastered, it’s fast and intuitive.
Recording and media
Formats are JPG/MP4, at 640x512px. A short press of the image button takes a snapshot, while a three-second press starts or stops video recording. You can’t pause mid-recording, but you can take stills, which is a nice touch. Audio recording is also available, and the recoil-activated video capture worked well with a .223. It didn’t trigger on my sub-12ft/lbs air rifle, which was expected.
Power and runtime
Power comes from a built-in pair of 3,200mAh Li-ion cells, giving around nine hours of runtime. There’s also a compartment for a CR123A battery under the left-hand turret, though, curiously, the scope won’t boot from the CR123A alone if the internal cells are flat. The Pegasus will run without a CR123A, however, so that’s what I went with. I also extended the runtime by activating the auto shut-down function and by using the USB-C port to top up from a power bank or the car when necessary.
Image quality and processing
The P650P’s standout feature is its AI-powered image processing, dubbed PIPS 2.0. This is one of two major upgrades over the original Pegasus range; the other being a not-unrelated improvement in claimed NETD, from ≤30 to ≤18mK. PIPS 2.0 automatically optimises brightness, contrast and sharpness in real-time, making manual tweaks largely redundant. Initially, I played with the manual image settings (available via the quick-access menu), but increasingly left things to PIPS. When you’re used to tinkering, going hands-free feels weird at first, but quickly becomes liberating.
Also available via the quick menu are two primary imaging modes: Standard and Forest. Standard offers a more nuanced, lower-contrast image, whereas Forest amps up the tips of the temperature peaks, making warm-blooded animals stand out more distinctly, especially in cluttered backgrounds.
Native “1x” magnification is actually 2.78x, with digital zoom at “2x”, “4x”, and “8x” levels, giving a top end of 22.24x. Ordinarily, I avoid digital zoom above “2x” due to the degradation of image quality. However, as you zoom in, PIPS 2.0 actively reinterprets the available sensor data, recreating a smooth and detailed image. That said, thermal imagery is always the system’s best guess at reality, so shoot within its limits as well as yours.
You can also overlay compass bearing, pitch and roll indicators. These require calibration by rotating the scope through 360 degrees on all three axes. It took me a few tries to get a clean reading, so don’t assume it’s right out of the box.
Zeroing and reticle options
The Pegasus lacks the app-driven ballistic profiles of some competitors, but it does support five “groups”, each with five individual “profiles”. To start, choose a profile number, reticle type, colour (red, green, white), and preset range (50m, 100m, etc.). From there, you fine-tune by entering the actual distance and using a freeze-frame system to shift the reticle to the point of impact.
The process is straightforward enough, but here are three tips to save time and ammunition: first, boresight the rifle by centring the target through the bore and aligning the scope’s image accordingly, which also helps with safety; second, start at a close distance where a hit is guaranteed to ensure the first shot provides useful feedback; and third, keep it simple by doing your familiarisation with a .177 sub-12ft/lbs air rifle in the garden, where any mistakes cost pennies rather than pounds.
Thomas Jacks includes adhesive thermal targets with the scope. These are excellent at longer ranges but a bit overpowered up close. For most thermal zeroing, I take a supply of 2cm tinfoil squares, a Pritt Stick, and a pack of Thermbright stickers for extra reflectivity when needed. Also good is a target backer that retains heat for long enough to let me enter the zeroing mode and freeze the target image (another skill to practise before you fire your first shot!).
To zero, fire a shot, enter freeze-frame mode, and move the cursor to the impact point using the scroll wheel. Click to change axis, click again to confirm, and the main reticle jumps to the new zero. You get a zoomed PiP window for fine adjustment, and the click values are shown clearly on the screen. It’s worth firing a confirmation shot, but if the first shot was good and your adjustments were precise, two rounds are usually enough.
Setting multiple ranges
Planning to do some ratting and feral clearance around the farmyard, I wanted to make use of the range-setting button by inputting zero points for my sub-12ft/lbs .177 air rifle at 5m increments from 15m to 45m. That meant creating five points in the “A” profile and a further two points in the “B” profile. For each point I created, I logged the X and Y coordinates, entering the numbers from the previous point as my baseline for the next. This kept all my shots on the paper and gave me minimal corrections to make. Keep your coordinates safe in case you ever need to do a factory reset!
Now, each press of the range-setting button gives me my next zero point, showing its name on the display. This also revealed the five-point limit as a positive, since it reduced the scroll-through time if I “missed my stop” in my enthusiasm to engage the target! Also good is having to enter the menu to change profiles, as this stopped me from accidentally selecting the wrong ballistic dataset in the heat of the action.
Retro perhaps, but the dedicated button gives this kind of point-by-point ballistic mapping a fresh lease of life. Nevertheless, in this era of integrated LRF/ballistic systems, they are perhaps overdue in releasing firmware incorporating a Pulsar-style ballistic solver with dial-in ranging, and new LRF-Pegasus models must surely be in the pipeline, too.
Practical performance
With everything set up, the Pegasus/.177 combination proved absolutely deadly on rats and ferals alike. I didn’t shoot any foxes or deer with it, but I was able to detect and identify both with ease, and even see cleaned antlers at 150m. Above all, thanks to PIPS 2.0, the scope was super-easy to run and delivered the best digital zoom experience yet.
Verdict
The Pixfra Pegasus P650P is not a “budget” scope in the patronising sense; it’s a well-engineered device that makes thermal more accessible.
It features a high-resolution sensor, long battery life, robust construction, and AI-driven image processing that makes digital zoom genuinely useful while reducing the need for manual adjustment. The controls are largely intuitive, and the combination of a simple zeroing process and a dedicated zero-point selection button adds speed and versatility in the field. Limitations? No ballistic calculator, quirky power management, and slightly inconsistent menu logic. But these are minor when measured against the performance on offer.
For shooters seeking high-end thermal imaging without emptying their bank account, the P650P deserves a very close look. It’s not just “good for the money”; it’s good, full stop.
Contact: Thomas Jacks -
www.pixfraoutdoor.co.uk

click on image to enlarge

click on image to enlarge

click on image to enlarge

click on image to enlarge

click on image to enlarge

click on image to enlarge

click on image to enlarge

click on image to enlarge

click on image to enlarge

click on image to enlarge

click on image to enlarge
click on image to enlarge

click on image to enlarge


