Getting Started in Airsoft: Luggage
- Last updated: 04/03/2020


So, you’ve got your basic clothing and loads ready to roll as detailed over the past couple of months, but now we need to look at a critical area that is often overlooked by many, even at the highest level of MilSim.
How the hell do we lug all our gear around, and once we’ve decided on load carriers, what further considerations should we be mindful of? I’ve seen some utterly terrible sights over the years, with guys turning up for a game absolutely overloaded with goodies that they might need; I’m sure we’ve all seen that meme with the guy hauling the ruc that is bigger than he is and had a good laugh at that, but the truth is that there are many players out there who really shouldn’t be laughing, instead looking to their own personal admin and preparation of their load.
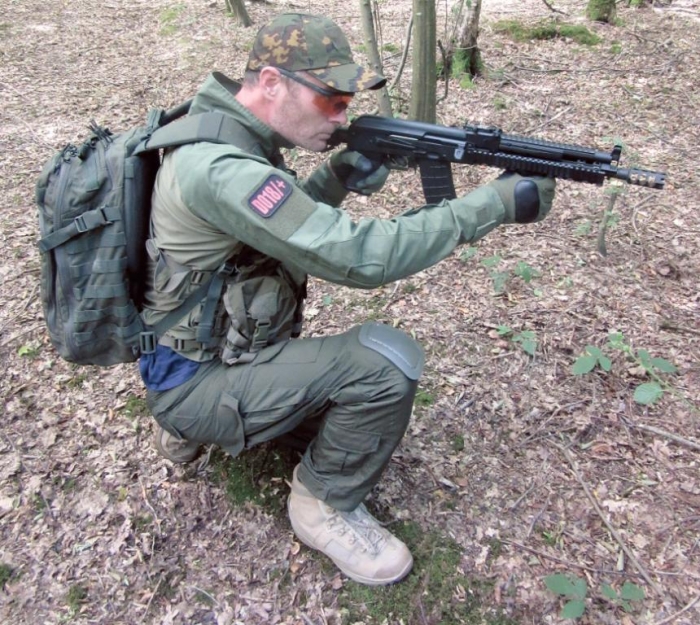
First up we need to look at Assault Gear. Basically, this is a very light pack with minimum gear; think here some water, food, first aid, a windshirt, and maybe spare BBs and gas and a couple of extra smokes/ grenades. The idea is that you can still fight with it on in combination with your Second Line. To fill this need I have chosen the RAIDER pack from Helikon-Tex (although my favourite Grey Ghost Gear pack often makes an appearance too). The RAIDER has an organiser pocket for small items situated at the top of the backpack, which is accessible without the need to open the main chamber. The front of the pack has a soft-lined eyepro/ electronics pocket, and velcro panels allow you to attach additional VIS-compatible inserts (Versatile Insert System) if you should so desire. Two open top side pockets could carry a windshirt or water bottle.
The front is covered with a Beavertail panel, which can easily accommodate a tactical helmet. If the backpack is used simply as an EDC item, the flap can be simply rolled and secured, to avoid having to unbuckle it every time to take something out. The backpack is fitted with comfortable, profiled straps, rigid back panel as well as a simple hip belt. All compartments close with YKK zippers, and there’s even a stowable rain cover should the elements go against you. Again, this design isn’t rocket science, but it’s a solid, eminently usable pack that can be used in conjunction with other items from the Helikon-Tex lines to create a superb modular system for all your tactical load-carrying needs.
This is a bit of a personal mantra of mine; your real Third Line is your sustainment load, and this is the gear that will keep you sparky and basically comfortable in the field, but essentially it’s a good solid pack, more water, food, cooking kit, sleeping and hygiene kit, spare clothes and the like. How much you need depends on the AO itself and how long you plan to stay out.
I basically have a pack that serves for spring through to autumn, and dedicated model for winter when I need to carry heavier and bulkier gear. The MKIII RAID from Tasmanian Tiger (TT) is my winter choice, and this is their flagship gear lugger, a classic military backpack with their new V2 plus carrying system. It extends the application range and flexibility with a removable hip belt and the greater adjustability of the back length, but in fairness it’s actually too big for most games!
The TT MISSION Pack constructed in 500D Cordura though is at 37L a bit of a classic patrol pack with enough space for a few days’ worth of operational equipment. It offers a large main compartment, a large zipped compartment with an attachment point for a hydration bladder on the inside; an exit point for the hydration tube is found on the top, just beneath a sturdy carry handle. On the front is another large compartment with four antenna/ cable ports, three open compartments, a zippered mesh pouch and a clip for keys. A flat compartment on the back with zips on the sides has yet more antenna/ comms ports in both upper corners, and an even flatter zippered pouch on the back is great for storing for notes, maps, or even a notebook computer. Last but not least is a zipped compartment on the bottom which houses an OD Green rain cover.
The MISSION pack also has acres of MOLLE webbing and some Velcro patches for insignia on the outside. The main compartment can be compressed with side straps for secure carriage of varying loads and there is a comfortably padded back with an internal support frame. The ergonomic shoulder straps are well padded and fully adjustable both at the top and bottom for a comfortable set-up. There’s a sternum strap with a neat emergency whistle buckle and a padded waist belt with two small zippered pouches, also fully removable.
Inside will be all the items that I need to sustain myself for multiple days, and it’s just as easy to pack for a week as it is for an overnighter as much of the gear is the same. Waterproof gear, extra clothing, stove, cooking pots, fuel, water, hygiene items and of course food all go in and it’s definitely worth working out your own version of the packing jigsaw and working on how to best load your gear.
With all these considerations in mind make your own kit choices, and in partnership with the likes of VIPER, Helikon-Tex, WISPORT and Military1st you can put together complete loadouts for any airsoft game you might find. Next month I’ll take a close look at what to pack into the MISSION for a full-on, multiday MilSim event to really get the best from your gear and from yourself!
click on image to enlarge
click on image to enlarge

click on image to enlarge

click on image to enlarge


