Reloading: Considering the actual bore size
- By Wheelwrite
- Last updated: 29/11/2016


Last month we looked at COL in some detail. Nonetheless, I’m going to start this edition with a few extra words on that subject. To be more specific, a clarification of some jumbled words that I failed to edit properly. Last month I suggested a bullet set back or reduction of COL of around .010”. It’s worth noting that this is my preferred figure in my .308 rounds. In other calibres the figure varies from .010” to around .025”. You need to experiment in order to discover the optimum in your rifle/ammo combos. Last month I also described the dimension for bullet jump as free-bore or leade. The free-bore, leade or throat refers to the chamber rather than the cartridge. It is that portion of the chamber between the end of the neck and the actual beginning of the rifling. The gap usually comprising a taper from the chamber neck diameter to the groove diameter and then (generally) a small section of barrel machined at groove diameter, that is, without the lands. However, it does influence the distance that the bullet has to travel before engraving the rifling.
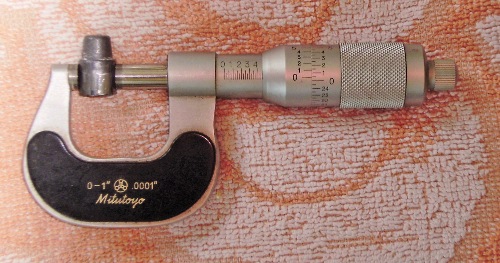
Whoa, hang on to your vernier caliper or micrometer; we’ve got more work for them. What are the actual bore diameters of the guns you reload for? Dunno? You’re not alone. If you only have ultra modern kit and are happy with what you get from ‘stock’ bullets or factory ammo then this is not for you. If your arsenal includes Enfields, Mosin Nagants, P14’s and the like then it’s possible that the bore size varies from standard for the calibre. Knowing the precise diameter will enable you to design ammo that can reduce wear, improve safety and above all, be more accurate.
Whilst I’ve seen a wide range of bore measurement techniques over the years, the favourite seemed to be the insertion of a cast or swaged bullet into the muzzle followed by a thorough bashing with a mallet. This was then followed by a further beating on the end of a cleaning rod until the remains of the pill exited the barrel into the chamber. Not good for the barrel or the slug, so let’s try another way!
We’ll start by itemising the kit we’re going to need. The slugs can be either swaged lead bullets of a suitable diameter or small cut lengths of commercial lead rod. In order to make them a better fit they can be ‘swelled’ if necessary by pinching between the soft jaws of a bench vice. We’ll also need a soft-faced mallet, case lube, dress making pins, patches and a micrometer or vernier. Additionally we need an adequate length of wooden dowel of a suitable diameter. We need to cut the dowel into 150 - 175mm lengths. Clean the ends with a fine tool file and remove the residue. Do not use emery or other grit based abrasives as any residual grit could damage the bore surface. Insert a round headed dress making pin into the end of the first section of dowel until half the head diameter is embedded in the wood.
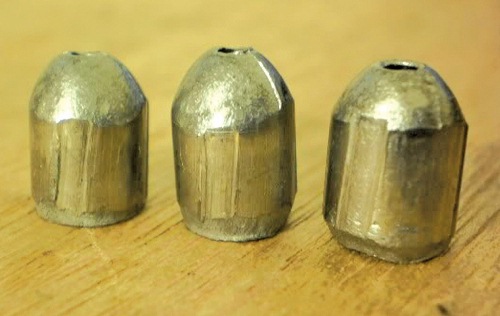
Clean the bore thoroughly and finish off with a patch wetted with case lube and place the rifle in a padded vice. Now roll the ball or slug in the wetted patch and insert it into the muzzle. Tap it with the mallet to get it started. Use the patch to moisten all the ends of the dowels with a dab of case lube and drive down the lead slug with pinned end of the first length of dowel. If we have a lever action rifle then we’re probably faced with the prospect of driving the slug down the entire length of the barrel. Simply add the next dowel and tap down, and so on until the slug exits the barrel. If it’s a bolt action design that permits ‘straight through cleaning’ then we now insert our dowels into the breach end and tap the slug out. We then repeat the process with a second slug inserted into the breach end, initially locating it with a plain ended piece of dowel. Then drive it in with the pinned end of the dowel and tap out from the muzzle end. This will give us two reference dimensions for our rifle barrel, whereas the single slug from the lever action will only give us the smallest bore diameter. Inspect the slugs for consistent land and groove impressions. If they are cleanly engraved and free from damage then we can make measurements.
We’ll start by itemising the kit we’re going to need. The slugs can be either swaged lead bullets of a suitable diameter or small cut lengths of commercial lead rod. In order to make them a better fit they can be ‘swelled’ if necessary by pinching between the soft jaws of a bench vice. We’ll also need a soft-faced mallet, case lube, dress making pins, patches and a micrometer or vernier. Additionally we need an adequate length of wooden dowel of a suitable diameter. We need to cut the dowel into 150 - 175mm lengths. Clean the ends with a fine tool file and remove the residue. Do not use emery or other grit based abrasives as any residual grit could damage the bore surface. Insert a round headed dress making pin into the end of the first section of dowel until half the head diameter is embedded in the wood.
Clean the bore thoroughly and finish off with a patch wetted with case lube and place the rifle in a padded vice. Now roll the ball or slug in the wetted patch and insert it into the muzzle. Tap it with the mallet to get it started. Use the patch to moisten all the ends of the dowels with a dab of case lube and drive down the lead slug with pinned end of the first length of dowel. If we have a lever action rifle then we’re probably faced with the prospect of driving the slug down the entire length of the barrel. Simply add the next dowel and tap down, and so on until the slug exits the barrel. If it’s a bolt action design that permits ‘straight through cleaning’ then we now insert our dowels into the breach end and tap the slug out. We then repeat the process with a second slug inserted into the breach end, initially locating it with a plain ended piece of dowel. Then drive it in with the pinned end of the dowel and tap out from the muzzle end. This will give us two reference dimensions for our rifle barrel, whereas the single slug from the lever action will only give us the smallest bore diameter. Inspect the slugs for consistent land and groove impressions. If they are cleanly engraved and free from damage then we can make measurements.
Ease of measurement will depend upon the number of grooves in the rifling. An even number means that there will always be opposing high points across which the dimension can be taken, ideally using a good clutched micrometer. If you only have a vernier caliper then it is important to take the measurement at right angles to the axis of the slug. In any event, take the dimension across all pairs of grooves and average the results.
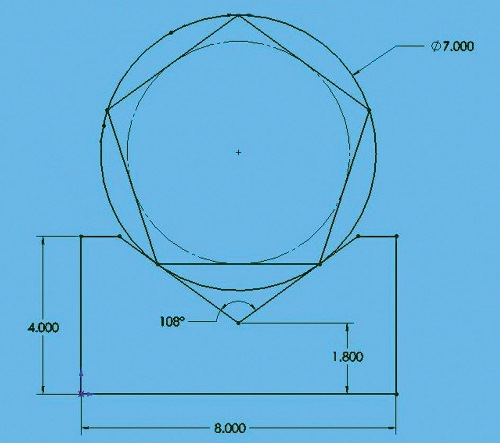
Let’s now grasp the nettle of uneven numbers, usually five. We can make the measurements using a V anvil micrometer, but that’s a very expensive option if you’re only going to measure sizing slugs with it. So, here’s plan B. If we divide a circle by five then we get 360/5, equalling 72o. This is therefore the angle between each groove. In order to do something useful with this figure blocks The best we need to use a V-block cut to the included angle - that is, 180o (the number of degrees in a triangle) minus 72o, divided by 2. That’s an included angle of 108o. We’ll also need a good surface plate and a DTI in order to carry out the following measurements. The maths then goes like this:-
Let a = the included angle of the V-block, t = the thickness of the V-block from the bottom of the V to the bottom, h = the measured height of the bullet and V-block and d = the diameter of the bullet.
This allows us to arrive at the formula for slug outside diameter d = 2(h - t)/(1 + 1/sin (a/2) )
“Inspect the slugs for consistent land and groove impressions.”
For a 5 groove bullet, the included angle (a) is 108°, assume the V-block “thickness” (t) is .250” and the measured total height (h) is .5854”, then
d = 2(.5854 - .250)/ (1 + 1/sin (108/2))
d = 2(.5854 - .250)/ (1 + 1/sin 54)
d = 2(.5854 - .250)/ (1 + 1/.80901)
d = 2(.5854 - .250)/ (1 + 1.23607)
d = 2(.5854 - .250)/ (2.23607)
d = 2(.3354)/(2.23607)
d = .6708/2.23607
d = .300
(Credit for the maths to G Gaskill of Practical Machinist.)
If you have taken both breech and muzzle end slugs, compare the averaged results. If they differ by more than 0.002” then it would be advisable to have the barrel examined by a gunsmith as tapered or choked rifled designs are almost unheard of in anything other than airgun and large bore military barrels. Clean your barrel before storage or use. Keep the slugs in marked bags for future reference.
click on image to enlarge
click on image to enlarge
click on image to enlarge

click on image to enlarge
click on image to enlarge
click on image to enlarge


