Pulsar Thermion XP50
- Last updated: 04/03/2020


Since launching the Apex in 2014, Pulsar have produced ever-more-desirable thermal riflescopes for the hunting market. I bought their second-generation model, the Trail XP50, two years ago. So many things are referred to as ‘game-changers’, but this purchase marked an absolute ‘before and after’ in my ability to control foxes and vermin on my permissions.
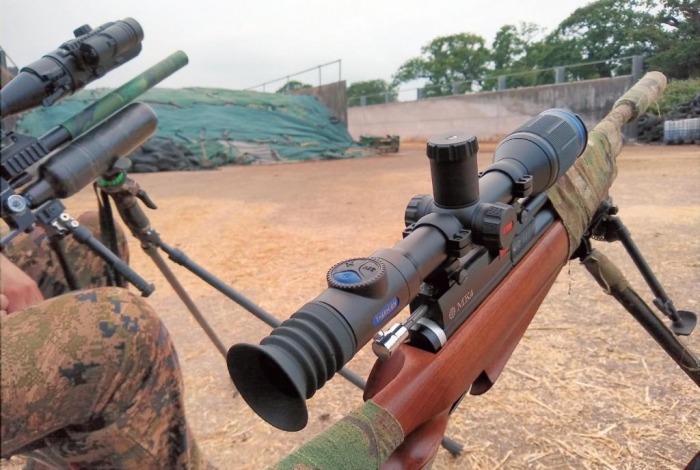
Now Pulsar have transformed the thermal landscape again, replacing the utilitarian ‘form follows function’ design of the Trail with the sleek elegance of their new Thermion range that sports a form factor superficially indistinguishable from high-end day scopes. I say ‘superficially’ because the design is so deceptively ingenious that many elements are not what you expect.
But first, what advantages does the new Thermion have over the Trail? The list absolutely has to start with aesthetics. It has always felt wrong to take a sleek rifle and put a bulky black polymer sight on it, even if it will be mostly used in the dark! Thermions banish this concern by offering a classic day-scope profile, with an anodised magnesium alloy build and smartly discreet blue and red highlights, making the rifle a pleasure to look at as well as to use.
The new layout also has practical benefits. Most importantly, the 30mm main tube opens up a world of mounting options: so you can get the Thermion perfectly aligned for your eye whichever rifle you put it on; and opt for a QD solution that lets you switch the sight between rifles so as to capitalise on its multiple (5) zeroing profiles. When choosing a mount, it is important to remember that any thermal sight has reduced eye relief so the Thermion has to be positioned some 5cm further to the rear than a day scope.
Having your eye closer to the scope obviously prompts questions about recoil, especially with the Thermion being rated for such impressive performers as the .375 H&H, 12g and 9.3x64 (6000 J). To counter this, it has a comfortable protective rubber eyepiece that attaches magnetically to the ocular bell (neat!). I didn’t use the sample unit on anything bigger than a .204 Ruger, but I’ve used my Trail on a 12g without issues, and the lower sight-line of the Thermion permits the kind of natural hold that is better for mitigating recoil in any case.
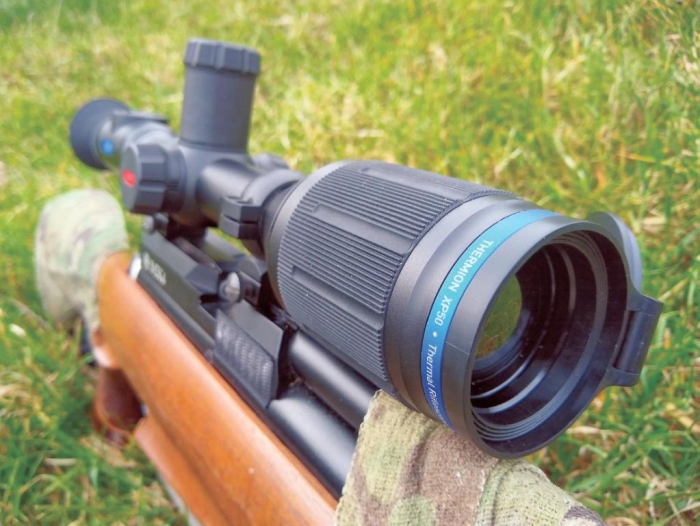
The next benefit you’ll notice is the Thermion’s ultra-quick (threesecond) boot-up time. Good too is the positioning of the power button within a rubberised threebutton pad on top of the eye bell that looks like the illuminator control on a high-end day scope. The other two buttons are for zoom and recording, making all three essential controls easy to find and quick to operate.
The zoom is activated by an initial double-click. Further clicks scroll the magnification in 2x increments. Optical magnification on the XP50 is 2x with an 8x digital zoom, giving 16x at full power. With thermal, I favour a low bottom end because the target is already highly visible and the wider field of view makes it easier to assess the backstop, to acquire the target and to judge its range and speed. If needed, a blip or two on the button will bring the image up to 4x or 8x so I can fine-tune the reticle position prior to sending the shot. Or you can hold down the magnification button to activate the picturein- picture function and have the best of both worlds!
It’s nice to have the record button close at hand too, especially since Pulsar omitted the useful recoil-activated recording function on the Trail from their initial firmware package. Fortunately, the next update should see this reinstated, along with the even more useful ‘pause’ function, which saves recording space in the field and editing time later.
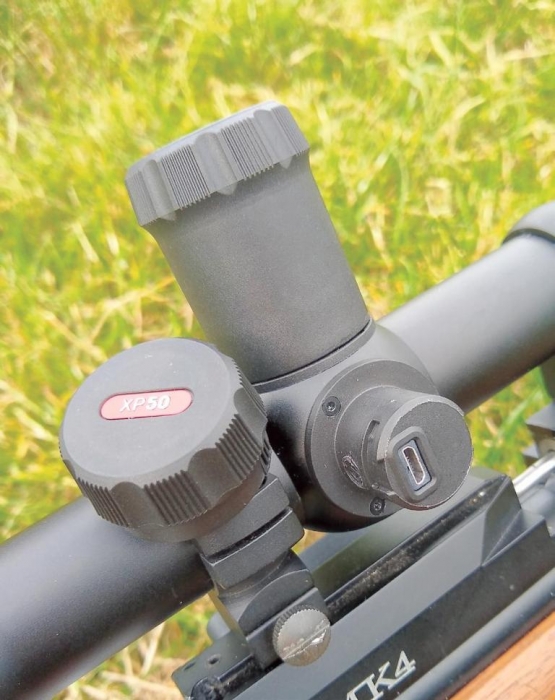
Other functions are accessed via the left-hand turret (where you’d expect to find the parallax and illumination controls on a day scope). Operation here is reminiscent of the rotary/push knob used on the remote control for previous Trail and Apex models, and originally installed on Quantums. A short push accesses the quick access menu (contrast, brightness, continuous zoom, profile/distance setting and stadiametric rangefinder), whilst a longer push takes you into the main menu. In either menu, rotating the knob in either direction scrolls through the options/settings and another push selects the one you want.
The control layout is much easier to master than on the Trail/Helion series, where it’s easy to press the wrong button, especially when wearing gloves. Doing away with the remote control and moving the navigation knob to the L/H side does make the Thermion less ambidextrous, of course, but in practice this left-hander didn’t feel disadvantaged.
Another welcome addition is a screen that provides a full range of colour palettes and a choice of reticle colours. I’m old-school when it comes to palettes. Black-hot and whitehot are all I need… although I could find a place for the new ‘red-hot’ option, which adds a red accent to the hottest part of the image (usually an animal’s body), as this can come in useful when scanning for animals in woodland on a warm day. As for all the rainbows and violets, if you like them, well now you can have them!
I’m more excited about the reticle colours. Like the Trail, the Thermion has 10 reticle patterns to choose from. Seven are SFP (non-scalable), but there are three FFP (scalable) ones in there too. Some are single-colour designs, whereas others use a contrasting central cross or dot. A problem can arise with a monochrome (black/ white/grey) reticle when you set up the contrast nicely in black-hot then switch to whitehot, because reticle colour isn’t tied to image polarity: i.e., one switches and the other doesn’t. Pulsar still haven’t fixed this, but being able to colour the reticle red, orange, yellow, green or blue ensures it will always contrast with the target.
My first outing with the Thermion involved fitting it to an air rifle and targeting some rats in a feed clamp. Because ranges ran from 5m to 45m, requiring significant hold-under/ over; and a cluttered thermal environment produced an image with strong contrasts, I selected the scalable M57Fi stadiametric reticle with a red centre dot, which did an excellent job. My overall favourite, however, was the D50i single fine dot, set to 6/10 intensity and coloured orange. This proved the perfect complement to my flat-shooting .17 Fireball (398fps) at my normal sub-200m foxing ranges: the combination of precision and visibility enabling precise hits even at 2x magnification.
All the other options will be familiar to anyone who has used any of Pulsar’s previous thermal or digital riflescopes, but even first-timers will find the one-shotzero process easy to master. This is especially true when using the ‘freeze’ mode in which you take a snapshot of your reticle centred on the target before moving the secondary cross onto your first bullet hole. A push on the button enters the adjustment and shifts the reticle from its original position to the position of the bullet hole. Your next shot will hit your point of aim.
This process can be done at any magnification. Selecting full zoom and a stadiametric reticle aids precision and can enable you both to see the residual heat around the bullet hole and measure the offset between it and the point of aim. When fine-tuning your zero, it’s worth bearing in mind that adjustment values vary widely from one Thermion model to another, are rarely round numbers, and are often quite high (e.g., 7, 10, 12, 28, or in the case of the XP50, 21mm/click). Overall adjustment range varies too: the XP50 offering an ample 2.4m in both axes at 100m.
You can store up to five gun profiles in the Thermion, and each profile has room for 10 range settings. Using these is the equivalent of dialling-in a day scope: i.e., slower, than aiming off, but the only truly consistent option with a simple SFP reticle.
Regarding targets, on a warm day, a simple black Shoot- N-C roundel can be enough. Aluminium tape/foil works well too. In colder weather, I’ll choose a shake-to-activate heat pad, and on a chilly night there’s nothing better than a Thermbright patch (from Bushwear). In each case I use a plain plastic backer.
With all the control functions assigned to the L/H turret, what do the other turrets do? Despite appearances, both the top and R/H turrets are actually just plastic caps. The former conceals a compartment for the auxiliary APS2 battery (supplied). Simply remove the standard (blanking) cap, drop in the battery, and secure it with the taller battery cap. The R/H cap protects the micro USB port used to charge the primary battery, which is permanently housed in the rear half of the main tube. Quoted runtime with both batteries installed is seven hours. Pulsar also say you can attach an external power source, but the design of the USB port is not well suited to this, a more rugged adapter being needed. Run time can also be extended by selecting a neat auto-shutdown option that switches off the scope if it is left immobile for one, three or five minutes with 70º of pitch or 30º of roll.
Another consequence of using the L/H turret to run the menus is that the parallax adjustment (target focus) ring is located on the objective bell. The large diameter facilitates precise focusing, and the set-back scope position makes it easier to reach than a comparable control on a day scope. A conventional quick-adjust dioptre ring on the ocular bell delivers Reticle/ screen focus. On-screen, blue icons present all the essential information (magnification, time, battery level, gun-profile/ zero-range, and observation and calibration modes) on a black information bar and are -at last- properly dimmable.
This brings me to the image, which as you would expect from the combination of a 50mm lens, 17 micron/640x480 sensor and 10254x768 AMOLED display, is simply superb. Pulsar quote a detection range of 1800m, and out in the field I didn’t encounter anything that was too far away either to detect or to identify. Obviously, the £4.5k XP50 is the most expensive model in the range, but I bought my Trail XP50 when it held the top spot and have no regrets about that. Except that now I really want a Thermion! I just love the way it looks and feels like a regular riflescope. I love the battery system. And I love my little orange dot!
click on image to enlarge

click on image to enlarge

click on image to enlarge
click on image to enlarge

click on image to enlarge
click on image to enlarge

click on image to enlarge


